<?xml version="1.0" encoding="UTF-8"?>
<feed xmlns="http://www.w3.org/2005/Atom">
  <generator uri="https://perron.railsdesigner.com/" version="1.1.0">Perron</generator>
  <id>https://railsdesigner.com/feed.xml</id>
  <title>Rails Designer Blog</title>
  <subtitle>Articles from Rails Designer Blog</subtitle>
  <link href="https://railsdesigner.com/feed.xml" rel="self" type="application/atom+xml"/>
  <link href="https://railsdesigner.com/" rel="alternate" type="text/html"/>
  <updated>2026-11-05T07:30:00Z</updated>

  
  <author>
    <name>Rails Designer</name>
    <email>support@railsdesigner.com</email>
  </author>

  
  <entry>
    <id>https://railsdesigner.com/modern-css-units-your-llm-keeps-ignoring/?ref=rss</id>
    <title>7 modern CSS units your LLM keeps ignoring</title>
    <link href="https://railsdesigner.com/modern-css-units-your-llm-keeps-ignoring/?ref=rss" rel="alternate" type="text/html"/>
    <published>2026-11-05T07:30:00Z</published>
    <updated>2026-11-05T14:31:40Z</updated>

    
      <author>
        <name>Rails Designer</name>
        <email>support@railsdesigner.com</email>
      </author>


      <content type="html" xml:base="https://railsdesigner.com/modern-css-units-your-llm-keeps-ignoring/?ref=rss"><![CDATA[<p>Ask any LLM to style a layout and it uses CSS units like: <code>px</code>, <code>rem</code>, <code>em</code>, <code>%</code> and <code>vh</code>. So do you, out of habit. But CSS has grown its number of units. Ones that fit specific jobs way better than your old defaults. Here are seven your code generator has probably never suggested.</p>
<p>They are all baseline ready (e.g. supported by core browsers for at least 30 months), so there is no fallback excuse left. Let’s get into it.</p>
<h2>
<a href="#logical-properties-think-in-axes-x-and-y" aria-hidden="true" class="anchor" id="logical-properties-think-in-axes-x-and-y"></a>Logical properties: think in axes (x and y)</h2>
<p>A few of these units only make sense when you drop the ideas of “width” and “height” and <strong>think in axes instead</strong>. CSS now measures along the <em>inline</em> axis (the direction your text flows, left to right in, for example, English) and the <em>block</em> axis (the direction blocks stack, top to bottom). Once that makes sense, units like <code>vi</code>, <code>vb</code> and <code>cqi</code> will be less weird. 💡</p>
<h2>
<a href="#full-screen-height-dvh" aria-hidden="true" class="anchor" id="full-screen-height-dvh"></a>Full screen height: dvh</h2>
<p><code>100vh</code> includes the space behind the browser’s address bar, so a full height hero can get clipped the moment the bar shows up. The dynamic viewport unit fixes this.</p>
<pre lang="css" style="background-color:#f8fafc;"><code><span style="color:#475569;">.</span><span style="color:#0369a1;">hero </span><span style="color:#475569;">{
</span><span style="color:#0c4a6e;">  min-height</span><span style="color:#475569;">: </span><span style="font-weight:bold;color:#d97706;">100</span><span style="color:#0c4a6e;">dvh</span><span style="color:#475569;">;
</span><span style="color:#475569;">}
</span></code></pre>
<p><code>1dvh</code> is one percent of the <em>dynamic</em> viewport, the size that shrinks and grows as the browser chrome moves. Its stable siblings <code>svh</code> (small, chrome shown) and <code>lvh</code> (large, chrome hidden) are there when you want a value that never moves.</p>
<h2>
<a href="#scroll-offsets-vi-and-vb" aria-hidden="true" class="anchor" id="scroll-offsets-vi-and-vb"></a>Scroll offsets: vi and vb</h2>
<p><code>vi</code> is one percent of the viewport’s inline axis (again: the direction the text flows), <code>vb</code> the block axis (how blocks are stacked). Because they are axis based, a change in <a href="https://developer.mozilla.org/en-US/docs/Web/CSS/Reference/Properties/writing-mode"><code>writing-mode</code></a> (the direction text flows) survives.</p>
<p>A common use case for me, is giving anchored jumps some room to breath:</p>
<pre lang="css" style="background-color:#f8fafc;"><code><span style="color:#475569;">[</span><span style="color:#0369a1;">id</span><span style="color:#475569;">] {
</span><span style="color:#0c4a6e;">  scroll-margin-top</span><span style="color:#475569;">: </span><span style="font-weight:bold;color:#d97706;">10</span><span style="color:#0c4a6e;">vb</span><span style="color:#475569;">;
</span><span style="color:#475569;">}
</span></code></pre>
<p>Upon a page click, or when <code>scroll-into-view</code> fires, the heading lands <code>20vb</code> below the top instead of jammed against the edge. Try doing that cleanly with <code>vh</code> and you are already guessing at orientations.</p>
<h2>
<a href="#container-aware-type-cqi" aria-hidden="true" class="anchor" id="container-aware-type-cqi"></a>Container aware type: cqi</h2>
<p>Viewport units can’t tell a card in a 300px sidebar from the same card in a 700px main column. They both see the whole window. Container query units measure the nearest <em>container</em> instead, which is what you actually want for reusable components.</p>
<pre lang="css" style="background-color:#f8fafc;"><code><span style="color:#475569;">.</span><span style="color:#0369a1;">cards </span><span style="color:#475569;">{
</span><span style="color:#0c4a6e;">  container-type</span><span style="color:#475569;">: </span><span style="color:#0c4a6e;">inline-size</span><span style="color:#475569;">;
</span><span style="color:#475569;">}
</span><span style="color:#0c4a6e;">
</span><span style="color:#475569;">.</span><span style="color:#0369a1;">card </span><span style="color:#475569;">{
</span><span style="color:#0c4a6e;">  font-size</span><span style="color:#475569;">: </span><span style="color:#0c4a6e;">clamp(</span><span style="font-weight:bold;color:#d97706;">1</span><span style="font-weight:bold;color:#dc2626;">rem</span><span style="color:#0c4a6e;">, </span><span style="font-weight:bold;color:#d97706;">4</span><span style="color:#0c4a6e;">cqi, </span><span style="font-weight:bold;color:#d97706;">1.5</span><span style="font-weight:bold;color:#dc2626;">rem</span><span style="color:#0c4a6e;">);
</span><span style="color:#0c4a6e;">  padding</span><span style="color:#475569;">: </span><span style="font-weight:bold;color:#d97706;">3</span><span style="color:#0c4a6e;">cqi</span><span style="color:#475569;">;
</span><span style="color:#475569;">}
</span></code></pre>
<p><code>1cqi</code> is one percent of the container’s inline size. The card now scales to wherever it lives, with zero media queries. The unit reads the <em>nearest ancestor</em> with <code>container-type</code>, never the element itself. And if you need <code>cqb</code> (block axis) you must set <code>container-type: size</code> and give the container a height.</p><p><a href="https://spinalcms.com/">[AD] Spinal CMS: Git-based CMS for static site generators</a></p>

<h2>
<a href="#line-perfect-spacing-lh" aria-hidden="true" class="anchor" id="line-perfect-spacing-lh"></a>Line perfect spacing: lh</h2>
<p><code>1lh</code> is exactly one line height of the current font’s size. That sounds small, but it lets you tie any spacing to your actual text rhythm instead of eyeballing <code>em</code> values.</p>
<pre lang="css" style="background-color:#f8fafc;"><code><span style="color:#475569;">.</span><span style="color:#0369a1;">field </span><span style="color:#475569;">{
</span><span style="color:#0c4a6e;">  line-height</span><span style="color:#475569;">: </span><span style="font-weight:bold;color:#d97706;">1.5</span><span style="color:#475569;">;
</span><span style="color:#475569;">}
</span><span style="color:#0c4a6e;">
</span><span style="font-weight:bold;color:#dc2626;">textarea </span><span style="color:#475569;">{
</span><span style="color:#0c4a6e;">  height</span><span style="color:#475569;">: </span><span style="font-weight:bold;color:#d97706;">3</span><span style="color:#0c4a6e;">lh</span><span style="color:#475569;">;
</span><span style="color:#475569;">}
</span><span style="color:#0c4a6e;">
</span><span style="font-weight:bold;color:#dc2626;">p </span><span style="color:#475569;">{
</span><span style="color:#0c4a6e;">  margin-block</span><span style="color:#475569;">: </span><span style="font-weight:bold;color:#d97706;">1</span><span style="color:#0c4a6e;">lh</span><span style="color:#475569;">;
</span><span style="color:#475569;">}
</span></code></pre>
<p>The <code>textarea</code> trick is one I use all the time now. No more <code>rows</code> guessing or JavaScript needed. <code>rlh</code> is the root version, the same idea as <code>rem</code> versus <code>em</code>. Both landed Baseline in November 2023.</p>
<h2>
<a href="#text-matched-icons-cap" aria-hidden="true" class="anchor" id="text-matched-icons-cap"></a>Text matched icons: cap</h2>
<p>Ever tried to size an inline icon next to a label and end up nudging <code>1em</code>, then <code>1.2em</code>, then <code>0.9em</code>? The <code>cap</code> unit ends the guessing. It equals the cap height of the font, the height of its capital letters.</p>
<pre lang="javascript" style="background-color:#f8fafc;"><code><span style="color:#475569;">.</span><span style="color:#0c4a6e;">icon </span><span style="color:#475569;">{
</span><span style="color:#0c4a6e;">  width</span><span style="color:#475569;">: </span><span style="font-weight:bold;color:#d97706;">1</span><span style="color:#1e293b;">cap</span><span style="color:#475569;">; </span><span style="color:#0c4a6e;">height</span><span style="color:#475569;">: </span><span style="font-weight:bold;color:#d97706;">1</span><span style="color:#1e293b;">cap</span><span style="color:#475569;">;
</span><span style="color:#0c4a6e;">  </span><span style="color:#1e293b;">vertical</span><span style="font-weight:bold;color:#0369a1;">-</span><span style="color:#1e293b;">align</span><span style="color:#0c4a6e;">: </span><span style="color:#1e293b;">baseline</span><span style="color:#475569;">;
</span><span style="color:#475569;">}
</span></code></pre>
<p>Now the icon lines up with the capitals in your text, in any font, at any size. Satisfying!</p>
<h2>
<a href="#reading-measure-ch-and-ic" aria-hidden="true" class="anchor" id="reading-measure-ch-and-ic"></a>Reading measure: ch and ic</h2>
<p><code>1ch</code> is the advance width of the <code>0</code> glyph in the element’s own font. Because it is relative to that font’s size, <code>60ch</code> means roughly sixty characters wide whether the text is 14px or 32px. The measure stays constant in character count, which is exactly what comfortable reading wants.</p>
<pre lang="css" style="background-color:#f8fafc;"><code><span style="color:#475569;">.</span><span style="color:#0369a1;">prose </span><span style="color:#475569;">{
</span><span style="color:#0c4a6e;">  max-width</span><span style="color:#475569;">: </span><span style="font-weight:bold;color:#d97706;">60</span><span style="font-weight:bold;color:#dc2626;">ch</span><span style="color:#475569;">;
</span><span style="color:#475569;">}
</span><span style="color:#0c4a6e;">
</span><span style="color:#475569;">.</span><span style="color:#0369a1;">input </span><span style="color:#475569;">{
</span><span style="color:#0c4a6e;">  width</span><span style="color:#475569;">: </span><span style="font-weight:bold;color:#d97706;">20</span><span style="font-weight:bold;color:#dc2626;">ch</span><span style="color:#475569;">;
</span><span style="color:#475569;">}
</span></code></pre>
<p>Note that <code>ch</code> is built on the <code>0</code> glyph, so it is an approximation of average character width, not a precise count. And for wide or CJK scripts (graphemes), reach for <code>ic</code> instead, which measures a full width ideograph.</p>
<h2>
<a href="#edge-fitting-squares-vmin-and-vmax" aria-hidden="true" class="anchor" id="edge-fitting-squares-vmin-and-vmax"></a>Edge fitting squares: vmin and vmax</h2>
<p><code>vmin</code> is one percent of the <em>smaller</em> viewport edge, <code>vmax</code> the larger. That makes them perfect for elements that must behave in any orientation without a media query.</p>
<pre lang="javascript" style="background-color:#f8fafc;"><code><span style="color:#475569;">.</span><span style="color:#0c4a6e;">avatar </span><span style="color:#475569;">{
</span><span style="color:#0c4a6e;">  width</span><span style="color:#475569;">: </span><span style="color:#1e293b;">min</span><span style="color:#475569;">(</span><span style="font-weight:bold;color:#d97706;">50</span><span style="color:#1e293b;">vmin</span><span style="color:#475569;">, </span><span style="font-weight:bold;color:#d97706;">200</span><span style="color:#1e293b;">px</span><span style="color:#475569;">);
</span><span style="color:#0c4a6e;">  </span><span style="color:#1e293b;">aspect</span><span style="font-weight:bold;color:#0369a1;">-</span><span style="color:#1e293b;">ratio</span><span style="color:#0c4a6e;">: </span><span style="font-weight:bold;color:#d97706;">1</span><span style="color:#475569;">;
</span><span style="color:#475569;">}
</span></code></pre>
<p>The avatar is half the smaller screen edge, capped at 200px, and never overflows when you rotate the phone. Same trick works for full bleed overlays with <code>vmax</code>.</p>
]]></content>


  </entry>
  
  <entry>
    <id>https://railsdesigner.com/introducing-hanami-icons/?ref=rss</id>
    <title>Introducing Hanami Icons</title>
    <link href="https://railsdesigner.com/introducing-hanami-icons/?ref=rss" rel="alternate" type="text/html"/>
    <published>2026-10-29T09:35:23Z</published>
    <updated>2026-10-29T09:35:23Z</updated>

    
      <author>
        <name>Rails Designer</name>
        <email>support@railsdesigner.com</email>
      </author>


      <content type="html" xml:base="https://railsdesigner.com/introducing-hanami-icons/?ref=rss"><![CDATA[<p>Most of what can be read here is around and for Ruby on Rails. My main apps still are powered by it. But monopolies are never good. Hanami is the one I get most excited about.</p>
<p>It is why I extracted the core features (pulling SVGs from remote repository, transforming filenames, etc.) of Rails Icons into a Ruby gem, called <a href="https://github.com/Rails-Designer/icons">Icons</a>, so other frameworks can have all the icons in their apps as well.</p>
<p><a href="https://github.com/Rails-Designer/hanami_icons/">Hanami Icons</a> is the next wrapper of the Icons gem for… drumroll… Hanami! It gives you the same interface as Rails Icons too, whether that is Heroicons, Lucide, Tabler or even a folder of your own SVGs.</p>
<pre lang="ruby" style="background-color:#f8fafc;"><code><span style="font-weight:bold;color:#0369a1;">&lt;%==</span><span style="color:#0c4a6e;"> icon </span><span style="color:#475569;">"</span><span style="color:#0369a1;">check</span><span style="color:#475569;">", </span><span style="font-weight:bold;color:#dc2626;">class</span><span style="font-weight:bold;color:#0369a1;">: </span><span style="color:#475569;">"</span><span style="color:#0369a1;">text-gray-500</span><span style="color:#475569;">" %&gt;
</span><span style="color:#0369a1;">
</span><span style="color:#0369a1;">&lt;%== icon "apple", library: "simple_icons", class: "text-black" %</span><span style="color:#475569;">&gt;
</span></code></pre>
<p>if you have seen Rails icons, you know Hanami Icons.</p>
<h2>
<a href="#one-interface-all-the-libraries" aria-hidden="true" class="anchor" id="one-interface-all-the-libraries"></a>One interface, all the libraries</h2>
<p>The work is done in Icons. If you do not know it: it syncs SVGs from their source repositories, normalizes names, handles variants and builds sprite markup. Hanami Icons just adds the Hanami-specific parts: a provider, view helpers and CLI generators.</p>
<p>Hanami Icons supports twelve first-party libraries: from good-old Feather to Heroicons to Lucide and Phosphor. That ranges from 49 icons in SidekickIcons to more than 9,000 in Phosphor. You can also add your own library (more on that below).</p>
<h2>
<a href="#install-and-generate" aria-hidden="true" class="anchor" id="install-and-generate"></a>Install and generate</h2>
<p>Hanami loads CLI extensions from the <code>:cli</code> Bundler group, while the view helpers need the gem at runtime. Add it to both:</p>
<pre lang="ruby" style="background-color:#f8fafc;"><code><span style="font-weight:bold;color:#dc2626;">gem </span><span style="color:#475569;">"</span><span style="color:#0369a1;">hanami_icons</span><span style="color:#475569;">", </span><span style="font-weight:bold;color:#075985;">group</span><span style="font-weight:bold;color:#475569;">: </span><span style="color:#475569;">[</span><span style="font-weight:bold;color:#475569;">:</span><span style="font-weight:bold;color:#075985;">default</span><span style="color:#475569;">, </span><span style="font-weight:bold;color:#475569;">:</span><span style="font-weight:bold;color:#075985;">cli</span><span style="color:#475569;">]
</span></code></pre>
<p>Then run:</p>
<pre lang="bash" style="background-color:#f8fafc;"><code><span style="color:#1e293b;">bundle</span><span style="color:#0c4a6e;"> install
</span><span style="color:#1e293b;">hanami</span><span style="color:#0c4a6e;"> generate icons</span><span style="color:#475569;"> --</span><span style="color:#1e293b;">library</span><span style="font-weight:bold;color:#0369a1;">=</span><span style="color:#0c4a6e;">lucide
</span></code></pre>
<p>The generator writes <code>config/providers/icons.rb</code>, registers the <code>icons</code> provider, adds the helpers to <code>app/views/helpers.rb</code> and syncs the library. You can pick several libraries or only the variants you need:</p>
<pre lang="javascript" style="background-color:#f8fafc;"><code><span style="color:#1e293b;">hanami generate icons </span><span style="font-weight:bold;color:#0369a1;">--</span><span style="color:#1e293b;">libraries</span><span style="font-weight:bold;color:#0369a1;">=</span><span style="color:#1e293b;">heroicons lucide
</span><span style="color:#1e293b;">hanami generate icons </span><span style="font-weight:bold;color:#0369a1;">--</span><span style="color:#1e293b;">library</span><span style="font-weight:bold;color:#0369a1;">=</span><span style="color:#1e293b;">heroicons </span><span style="font-weight:bold;color:#0369a1;">--</span><span style="color:#1e293b;">variants solid outline
</span></code></pre>
<p>The Hanami configuration can be used to set a default library and variant there:</p>
<pre lang="ruby" style="background-color:#f8fafc;"><code><span style="color:#0c4a6e;">HanamiIcons</span><span style="color:#475569;">.</span><span style="color:#0c4a6e;">configure </span><span style="font-weight:bold;color:#dc2626;">do </span><span style="color:#475569;">|</span><span style="color:#1e293b;">config</span><span style="color:#475569;">|
</span><span style="color:#0c4a6e;">  config</span><span style="color:#475569;">.</span><span style="color:#0c4a6e;">default_library </span><span style="font-weight:bold;color:#0369a1;">= </span><span style="color:#475569;">"</span><span style="color:#0369a1;">heroicons</span><span style="color:#475569;">"
</span><span style="color:#0c4a6e;">  config</span><span style="color:#475569;">.</span><span style="color:#0c4a6e;">default_variant </span><span style="font-weight:bold;color:#0369a1;">= </span><span style="color:#475569;">"</span><span style="color:#0369a1;">outline</span><span style="color:#475569;">"
</span><span style="font-weight:bold;color:#dc2626;">end
</span></code></pre>
<h2>
<a href="#icons-and-sprites" aria-hidden="true" class="anchor" id="icons-and-sprites"></a>Icons and sprites</h2>
<p>The main helper takes the icon name and any attributes you want on the SVG:</p>
<pre lang="ruby" style="background-color:#f8fafc;"><code><span style="color:#0c4a6e;">icon </span><span style="color:#475569;">"</span><span style="color:#0369a1;">check</span><span style="color:#475569;">"
</span><span style="color:#0c4a6e;">icon </span><span style="color:#475569;">"</span><span style="color:#0369a1;">check</span><span style="color:#475569;">", </span><span style="font-weight:bold;color:#075985;">variant</span><span style="font-weight:bold;color:#475569;">: </span><span style="color:#475569;">"</span><span style="color:#0369a1;">solid</span><span style="color:#475569;">"
</span><span style="color:#0c4a6e;">icon </span><span style="color:#475569;">"</span><span style="color:#0369a1;">check</span><span style="color:#475569;">", </span><span style="font-weight:bold;color:#075985;">library</span><span style="font-weight:bold;color:#475569;">: </span><span style="color:#475569;">"</span><span style="color:#0369a1;">heroicons</span><span style="color:#475569;">"
</span><span style="color:#0c4a6e;">icon </span><span style="color:#475569;">"</span><span style="color:#0369a1;">check</span><span style="color:#475569;">", </span><span style="font-weight:bold;color:#dc2626;">class</span><span style="font-weight:bold;color:#0369a1;">: </span><span style="color:#475569;">"</span><span style="color:#0369a1;">icon icon-small</span><span style="color:#475569;">"
</span><span style="color:#0c4a6e;">icon </span><span style="color:#475569;">"</span><span style="color:#0369a1;">check</span><span style="color:#475569;">", </span><span style="font-weight:bold;color:#075985;">aria</span><span style="font-weight:bold;color:#475569;">: </span><span style="color:#475569;">{ </span><span style="font-weight:bold;color:#075985;">label</span><span style="font-weight:bold;color:#475569;">: </span><span style="color:#475569;">"</span><span style="color:#0369a1;">Save</span><span style="color:#475569;">" }
</span><span style="color:#0c4a6e;">icon </span><span style="color:#475569;">"</span><span style="color:#0369a1;">check</span><span style="color:#475569;">", </span><span style="font-weight:bold;color:#075985;">stroke_width</span><span style="font-weight:bold;color:#475569;">: </span><span style="font-weight:bold;color:#d97706;">2
</span></code></pre><p><a href="https://spinalcms.com/">[AD] Spinal CMS: Git-based CMS for static site generators</a></p>

<p>A page with many icons repeats the same paths over and over. Sprites fix that. Generate one:</p>
<pre lang="javascript" style="background-color:#f8fafc;"><code><span style="color:#1e293b;">hanami generate </span><span style="color:#0c4a6e;">icons</span><span style="color:#475569;">:</span><span style="color:#1e293b;">sprite
</span></code></pre>
<p>Then reference symbols instead of inlining every path:</p>
<pre lang="javascript" style="background-color:#f8fafc;"><code><span style="font-weight:bold;color:#0369a1;">&lt;%== </span><span style="color:#1e293b;">sprite_icon </span><span style="color:#475569;">"</span><span style="color:#0369a1;">check</span><span style="color:#475569;">" </span><span style="font-weight:bold;color:#0369a1;">%&gt;
</span><span style="font-weight:bold;color:#0369a1;">&lt;%== </span><span style="color:#1e293b;">sprite_icon </span><span style="color:#475569;">"</span><span style="color:#0369a1;">search</span><span style="color:#475569;">", </span><span style="font-weight:bold;color:#dc2626;">class</span><span style="color:#0c4a6e;">: "</span><span style="font-weight:bold;color:#b91c1c;">icon icon</span><span style="color:#0c4a6e;">-</span><span style="font-weight:bold;color:#b91c1c;">small fill</span><span style="color:#0c4a6e;">-</span><span style="font-weight:bold;color:#b91c1c;">blue</span><span style="color:#0c4a6e;">-500" %&gt;
</span></code></pre>
<p>Point <code>config.default_sprite_location</code> at the generated file or at a CDN. Set it to <code>nil</code> to inline the sprite in your layout with <code>icons_sprite</code>. Check the README for more details on sprites. They give you the best of customisability and rendering optimisation.</p>
<h2>
<a href="#custom-libraries-and-syncing" aria-hidden="true" class="anchor" id="custom-libraries-and-syncing"></a>Custom libraries and syncing</h2>
<p>Any directory under <code>app/assets/svg/icons</code> is a “library”. Add a SVG and use it:</p>
<pre lang="bash" style="background-color:#f8fafc;"><code><span style="color:#1e293b;">app/assets/svg/icons/simple_icons/apple.svg
</span></code></pre>
<pre lang="ruby" style="background-color:#f8fafc;"><code><span style="color:#0c4a6e;">icon </span><span style="color:#475569;">"</span><span style="color:#0369a1;">apple</span><span style="color:#475569;">", </span><span style="font-weight:bold;color:#075985;">library</span><span style="font-weight:bold;color:#475569;">: </span><span style="color:#475569;">"</span><span style="color:#0369a1;">simple_icons</span><span style="color:#475569;">"
</span></code></pre>
<p>Libraries with variants use a variant directory, like <code>heroicons/outline/check.svg</code>. If you want a starting point, <code>hanami generate icons --library=simple_icons</code> creates the folder and adds <code>config.custom_library :simple_icons</code> to the provider.</p>
<p>You can also sync a library from a git repository:</p>
<pre lang="ruby" style="background-color:#f8fafc;"><code><span style="color:#0c4a6e;">HanamiIcons</span><span style="color:#475569;">.</span><span style="color:#0c4a6e;">configure </span><span style="font-weight:bold;color:#dc2626;">do </span><span style="color:#475569;">|</span><span style="color:#1e293b;">config</span><span style="color:#475569;">|
</span><span style="color:#0c4a6e;">  config</span><span style="color:#475569;">.</span><span style="color:#0c4a6e;">custom_library </span><span style="font-weight:bold;color:#475569;">:</span><span style="font-weight:bold;color:#075985;">my_icons</span><span style="color:#475569;">, </span><span style="font-weight:bold;color:#075985;">source</span><span style="font-weight:bold;color:#475569;">: </span><span style="color:#475569;">{
</span><span style="color:#0c4a6e;">    </span><span style="font-weight:bold;color:#075985;">url</span><span style="font-weight:bold;color:#475569;">: </span><span style="color:#475569;">"</span><span style="color:#0369a1;">https://github.com/user/icons.git</span><span style="color:#475569;">",
</span><span style="color:#0c4a6e;">    </span><span style="font-weight:bold;color:#075985;">variants</span><span style="font-weight:bold;color:#475569;">: </span><span style="color:#475569;">{ </span><span style="font-weight:bold;color:#075985;">default</span><span style="font-weight:bold;color:#475569;">: </span><span style="color:#475569;">"</span><span style="color:#0369a1;">.</span><span style="color:#475569;">" }
</span><span style="color:#0c4a6e;">  </span><span style="color:#475569;">}
</span><span style="font-weight:bold;color:#dc2626;">end
</span></code></pre>
<p>The <code>icons:sync</code> command runs before the app boots, so it does not load providers. It only sees the first-party libraries. Sync a custom library inside the app context instead:</p>
<pre lang="bash" style="background-color:#f8fafc;"><code><span style="color:#1e293b;">bundle</span><span style="color:#0c4a6e;"> exec hanami run </span><span style="color:#475569;">'</span><span style="color:#0369a1;">Icons::Sync.new(:my_icons).now</span><span style="color:#475569;">'
</span></code></pre>
<p>For first-party libraries, syncing is a single command:</p>
<pre lang="bash" style="background-color:#f8fafc;"><code><span style="color:#1e293b;">hanami</span><span style="color:#0c4a6e;"> generate icons:sync
</span><span style="color:#1e293b;">hanami</span><span style="color:#0c4a6e;"> generate icons:sync</span><span style="color:#475569;"> --</span><span style="color:#1e293b;">library</span><span style="font-weight:bold;color:#0369a1;">=</span><span style="color:#0c4a6e;">heroicons
</span><span style="color:#1e293b;">hanami</span><span style="color:#0c4a6e;"> generate icons:sync</span><span style="color:#475569;"> --</span><span style="color:#1e293b;">libraries</span><span style="font-weight:bold;color:#0369a1;">=</span><span style="color:#0c4a6e;">heroicons lucide
</span></code></pre>
<p>Run it whenever an upstream library adds icons you want. No <code>bundle update hanami_icons</code> needed.</p>
<hr>
<p>Hanami Icons is at 0.6.0. It is still early. The generators and helpers have tests, but I want to hear from people using it in real apps before calling it 1.0. If something feels awkward, <a href="https://github.com/Rails-Designer/hanami_icons/issues">open an issue</a> or send a pull request.</p>
<p>If Hanami Icons saves you an afternoon, a star helps other Hanami developers find it. ⭐</p>
]]></content>


  </entry>
  
  <entry>
    <id>https://railsdesigner.com/svg-filters/?ref=rss</id>
    <title>Distort HTML with SVG's feDisplacementMap</title>
    <link href="https://railsdesigner.com/svg-filters/?ref=rss" rel="alternate" type="text/html"/>
    <published>2026-10-22T07:30:00Z</published>
    <updated>2026-10-22T07:30:00Z</updated>

    
      <author>
        <name>Rails Designer</name>
        <email>support@railsdesigner.com</email>
      </author>


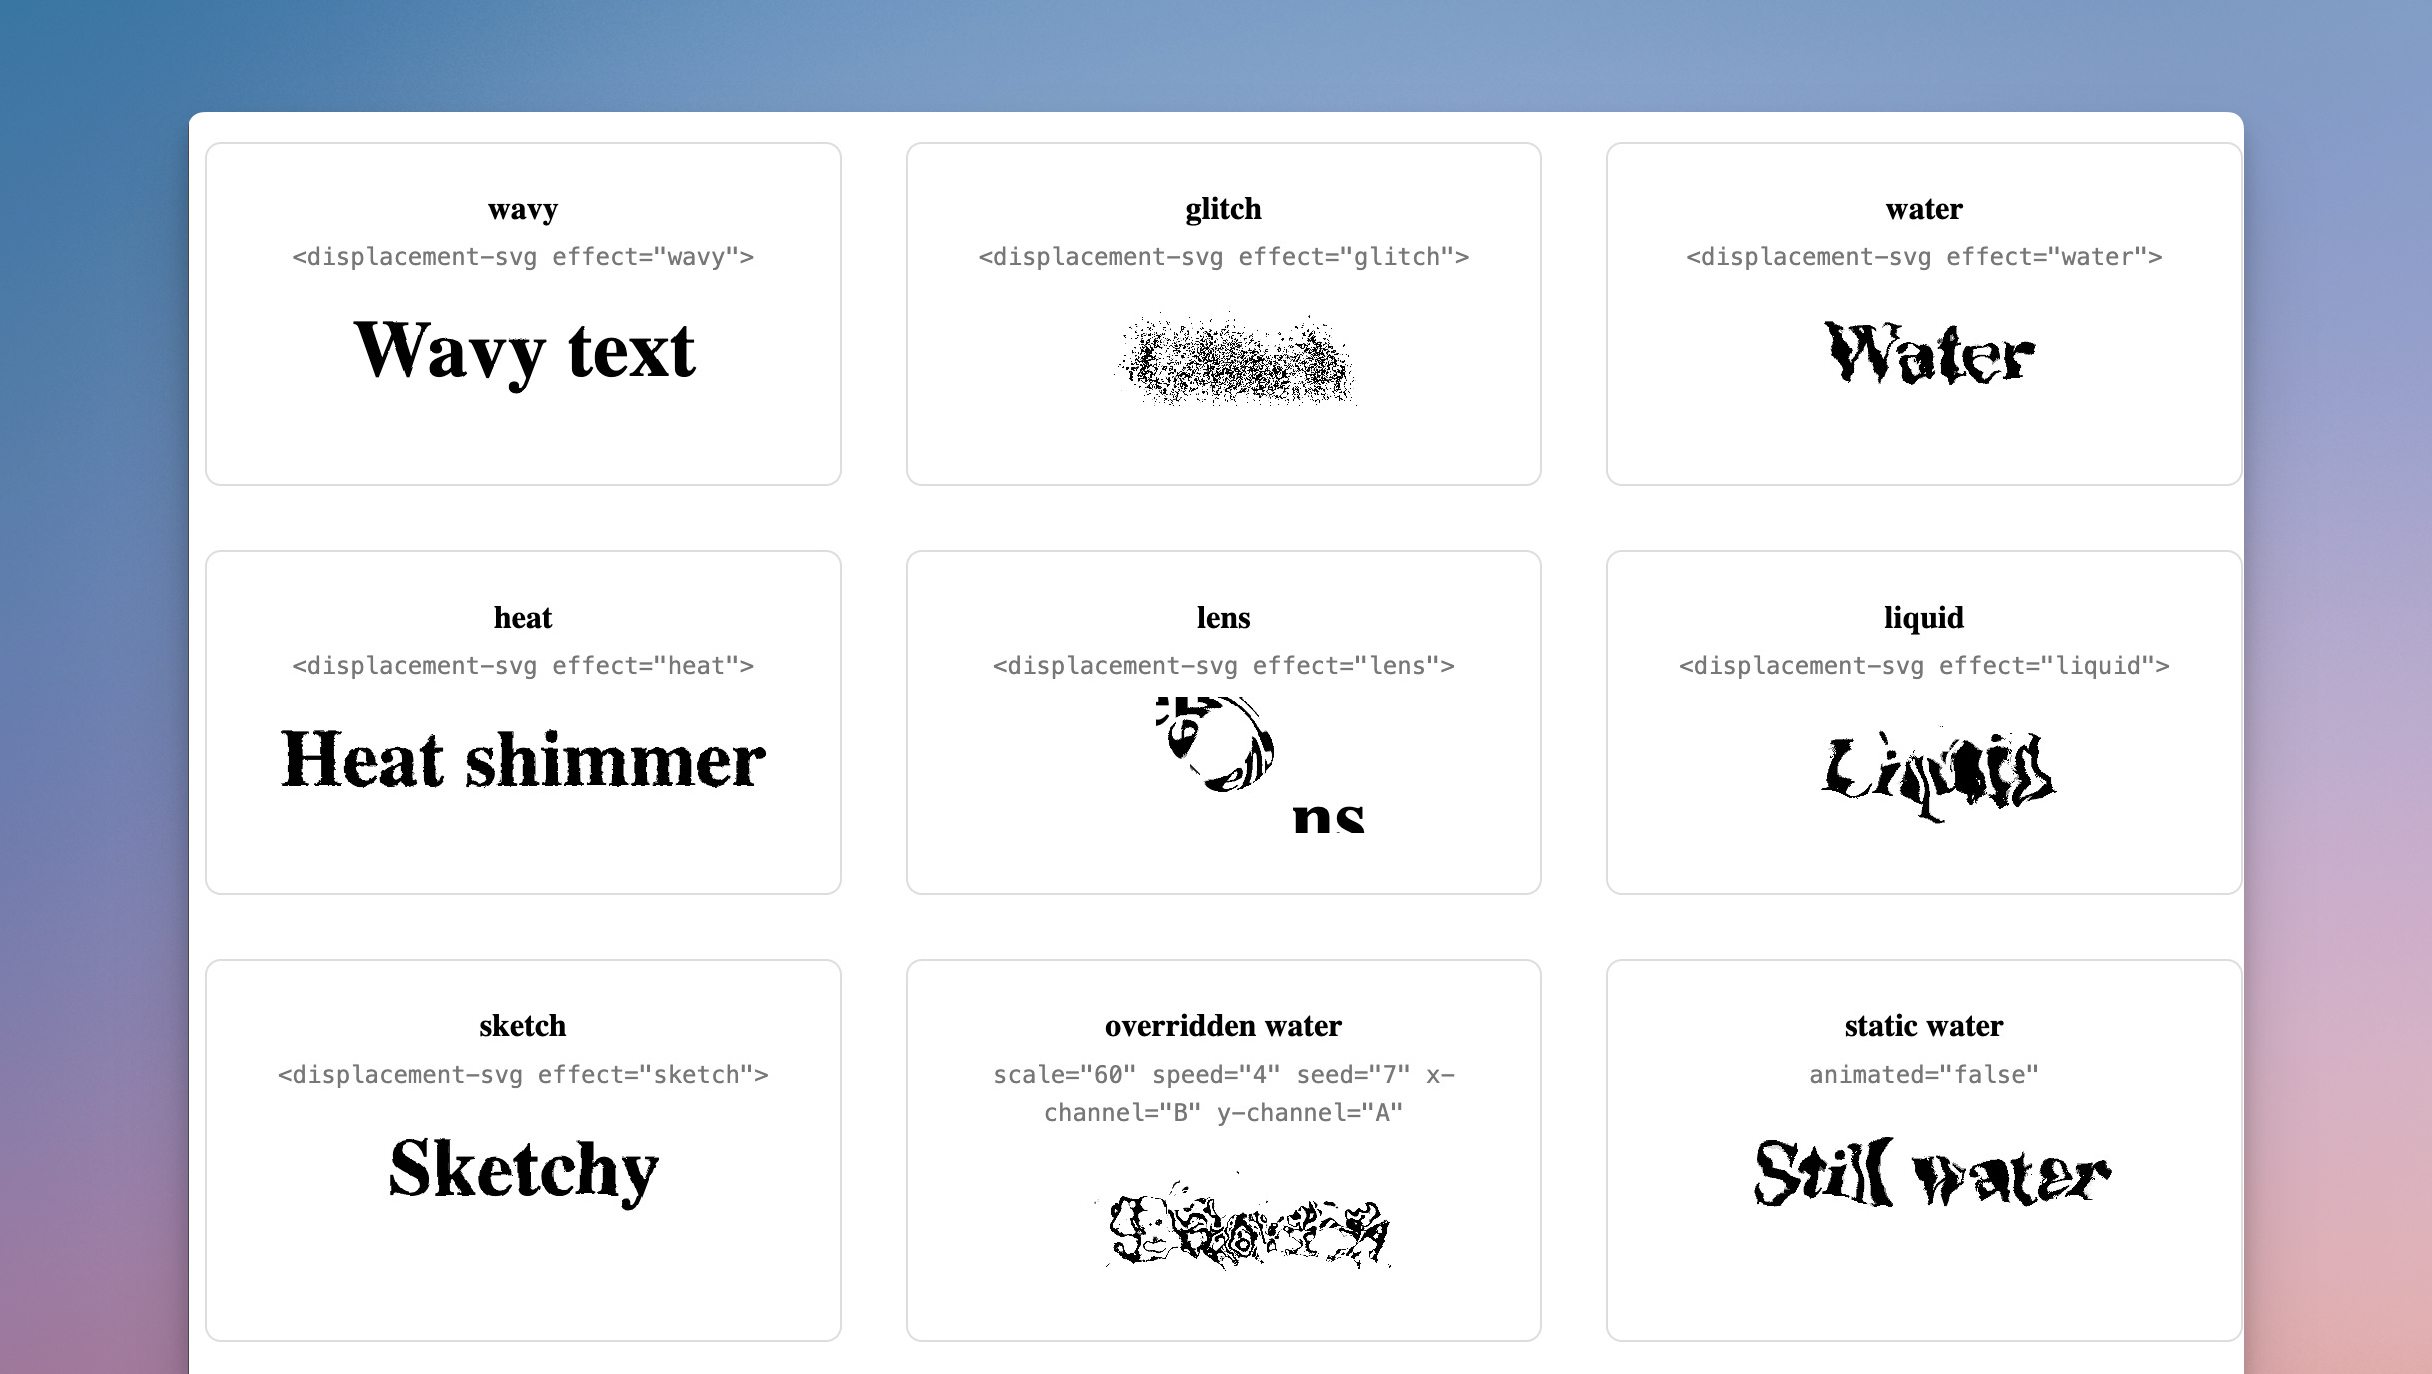
      <content type="html" xml:base="https://railsdesigner.com/svg-filters/?ref=rss"><![CDATA[<p><img src="https://railsdesigner.com/images/posts/gggglitch-1.jpg" alt="gggglitch.jpg"></p>
<p>Look at those text effects: wow would you build them?</p>
<p>My first answer, somewhere in the 2000s, would have been Flash. A timeline, some easing curves, spooky rippling text for every band MySpace page. 🤘 After Flash came many other options: jQuery plugins, canvas pixel picking, shaders in a giant WebGL library for one ripple of text.</p>
<p>Luckily today all you need fits in two SVG primitives and one line of CSS.</p>
<p>For a while now, you can apply SVG filters to regular HTML:</p>
<pre lang="css" style="background-color:#f8fafc;"><code><span style="font-weight:bold;color:#dc2626;">filter</span><span style="color:#0c4a6e;">: url(</span><span style="color:#475569;">#</span><span style="color:#0369a1;">my-filter</span><span style="color:#0c4a6e;">)
</span></code></pre>
<p>The browser then renders your element through that filter. And SVG filters can do wild things. The wildest of all: <code>feDisplacementMap</code>.</p>
<h2>
<a href="#how-fedisplacementmap-works" aria-hidden="true" class="anchor" id="how-fedisplacementmap-works"></a>How <code>feDisplacementMap</code> works</h2>
<p>Here’s how <code>feDisplacementMap</code> works. It takes two images. The first one is your content (<code>SourceGraphic</code>, in filter-speak). The second one is a <strong>map</strong>. For every pixel of your content, the filter reads the color at that position in the map, converts one of its channels to a number between 0 and 1, and shifts the pixel sideways by:</p>
<pre lang="css" style="background-color:#f8fafc;"><code><span style="color:#0c4a6e;">scale </span><span style="font-weight:bold;color:#dc2626;">*</span><span style="color:#0c4a6e;"> (channelValue - 0.5)
</span></code></pre>
<p>So a red channel value of <code>0.5</code> (neutral gray) means “don’t move this pixel”. A value of <code>1.0</code> pushes it <code>scale</code> pixels to the right (if you used Photoshop’s distort effect this might be familiar). A value of <code>0</code> pulls it back the other way.</p>
<p>This means the <em>real</em> work goes into the map, and you can build that map from anything. The workhorse for organic distortion is <code>feTurbulence</code>: it generates <a href="https://en.wikipedia.org/wiki/Perlin_noise">Perlin-style noise</a>, a soft cloud of grays and colors, and that becomes your map. Chain the two primitives and you get distortion for free.</p>
<h2>
<a href="#your-first-distortion" aria-hidden="true" class="anchor" id="your-first-distortion"></a>Your first distortion</h2>
<p>Enough theory. This is the full setup (and below, real examples!):</p>
<pre lang="html" style="background-color:#f8fafc;"><code><span style="color:#475569;">&lt;</span><span style="font-weight:bold;color:#dc2626;">svg </span><span style="color:#0369a1;">width</span><span style="color:#475569;">="</span><span style="color:#0369a1;">0</span><span style="color:#475569;">" </span><span style="color:#0369a1;">height</span><span style="color:#475569;">="</span><span style="color:#0369a1;">0</span><span style="color:#475569;">" </span><span style="color:#0369a1;">style</span><span style="color:#475569;">="</span><span style="color:#0c4a6e;">position</span><span style="color:#475569;">: </span><span style="color:#0c4a6e;">absolute</span><span style="color:#475569;">"&gt;
</span><span style="color:#0c4a6e;">  </span><span style="color:#475569;">&lt;</span><span style="font-weight:bold;color:#dc2626;">defs</span><span style="color:#475569;">&gt;
</span><span style="color:#0c4a6e;">    </span><span style="color:#475569;">&lt;</span><span style="font-weight:bold;color:#dc2626;">filter </span><span style="color:#0369a1;">id</span><span style="color:#475569;">="</span><span style="color:#0369a1;">fd-wavy</span><span style="color:#475569;">"&gt;
</span><span style="color:#0c4a6e;">      </span><span style="color:#475569;">&lt;</span><span style="font-weight:bold;color:#dc2626;">feTurbulence </span><span style="color:#0369a1;">type</span><span style="color:#475569;">="</span><span style="color:#0369a1;">turbulence</span><span style="color:#475569;">" </span><span style="color:#0369a1;">baseFrequency</span><span style="color:#475569;">="</span><span style="color:#0369a1;">0.02</span><span style="color:#475569;">" </span><span style="color:#0369a1;">numOctaves</span><span style="color:#475569;">="</span><span style="color:#0369a1;">2</span><span style="color:#475569;">" </span><span style="color:#0369a1;">result</span><span style="color:#475569;">="</span><span style="color:#0369a1;">map</span><span style="color:#475569;">"/&gt;
</span><span style="color:#0c4a6e;">
</span><span style="color:#0c4a6e;">      </span><span style="color:#475569;">&lt;</span><span style="font-weight:bold;color:#dc2626;">feDisplacementMap </span><span style="color:#0369a1;">in</span><span style="color:#475569;">="</span><span style="color:#0369a1;">SourceGraphic</span><span style="color:#475569;">" </span><span style="color:#0369a1;">in2</span><span style="color:#475569;">="</span><span style="color:#0369a1;">map</span><span style="color:#475569;">" </span><span style="color:#0369a1;">scale</span><span style="color:#475569;">="</span><span style="color:#0369a1;">20</span><span style="color:#475569;">"/&gt;
</span><span style="color:#0c4a6e;">    </span><span style="color:#475569;">&lt;/</span><span style="font-weight:bold;color:#dc2626;">filter</span><span style="color:#475569;">&gt;
</span><span style="color:#0c4a6e;">  </span><span style="color:#475569;">&lt;/</span><span style="font-weight:bold;color:#dc2626;">defs</span><span style="color:#475569;">&gt;
</span><span style="color:#475569;">&lt;/</span><span style="font-weight:bold;color:#dc2626;">svg</span><span style="color:#475569;">&gt;
</span></code></pre>
<p>Look at that! No JavaScript, no canvas, but real text you can select. 🤯 The <code>result="map"</code> names the turbulence output, and <code>in2="map"</code> pipes it into the displacement (you’ll also see <code>xChannelSelector</code> and <code>yChannelSelector</code> on <code>feDisplacementMap</code>; more on those in a second).</p>
<h2>
<a href="#turn-the-dials" aria-hidden="true" class="anchor" id="turn-the-dials"></a>Turn the dials</h2><p><a href="https://spinalcms.com/">[AD] Spinal CMS: Git-based CMS for static site generators</a></p>

<p>Two attributes control almost everything: <code>baseFrequency</code> on the turbulence and <code>scale</code> on the displacement.</p>
<p><code>baseFrequency</code> picks the size of the noise blobs. Low values give you big, slow waves. High values give you fine, nervous grain:</p>
<p><code>scale</code> picks how far pixels travel. Keep it small for a subtle wobble, crank it up and your text melts:</p>
<p>A few more dials worth knowing:</p>
<ul>
<li>
<code>numOctaves</code> layers noise on top of noise. More octaves, more detail.</li>
<li>
<code>seed</code> produces a different noise pattern. Great when you want variants that look related (but differ).</li>
<li>
<code>xChannelSelector</code> / <code>yChannelSelector</code> set which color channel drives horizontal and vertical shifts. The defaults are <code>R</code> and <code>G</code>. Point <code>yChannelSelector</code> at <code>A</code> and the vertical shift follows the noise’s alpha channel instead. This is how you design maps where X and Y move independently.</li>
</ul>
<h2>
<a href="#move-it" aria-hidden="true" class="anchor" id="move-it"></a>Move it</h2>
<p>A static distortion is nice, but you can use SVG’s own <code>&lt;animate&gt;</code> to, for example, wobble the turbulence’s <code>baseFrequency</code> over time:</p>
<pre lang="html" style="background-color:#f8fafc;"><code><span style="color:#475569;">&lt;</span><span style="font-weight:bold;color:#dc2626;">feTurbulence </span><span style="color:#0369a1;">type</span><span style="color:#475569;">="</span><span style="color:#0369a1;">turbulence</span><span style="color:#475569;">" </span><span style="color:#0369a1;">baseFrequency</span><span style="color:#475569;">="</span><span style="color:#0369a1;">0.02</span><span style="color:#475569;">" </span><span style="color:#0369a1;">numOctaves</span><span style="color:#475569;">="</span><span style="color:#0369a1;">2</span><span style="color:#475569;">" </span><span style="color:#0369a1;">result</span><span style="color:#475569;">="</span><span style="color:#0369a1;">map</span><span style="color:#475569;">"&gt;
</span><span style="color:#0c4a6e;">  </span><span style="color:#475569;">&lt;</span><span style="font-weight:bold;color:#dc2626;">animate </span><span style="color:#0369a1;">attributeName</span><span style="color:#475569;">="</span><span style="color:#0369a1;">baseFrequency</span><span style="color:#475569;">"
</span><span style="color:#0c4a6e;">           </span><span style="color:#0369a1;">dur</span><span style="color:#475569;">="</span><span style="color:#0369a1;">6s</span><span style="color:#475569;">" </span><span style="color:#0369a1;">repeatCount</span><span style="color:#475569;">="</span><span style="color:#0369a1;">indefinite</span><span style="color:#475569;">"
</span><span style="color:#0c4a6e;">           </span><span style="color:#0369a1;">values</span><span style="color:#475569;">="</span><span style="color:#0369a1;">0.02;0.04;0.02</span><span style="color:#475569;">"/&gt;
</span><span style="color:#475569;">&lt;/</span><span style="font-weight:bold;color:#dc2626;">feTurbulence</span><span style="color:#475569;">&gt;
</span></code></pre>
<p>Animating <code>scale</code> instead gives you a pulse. Animate both <code>baseFrequency</code> and <code>scale</code> and you get heat shimmer off a summer road.</p>
<h2>
<a href="#any-image-can-be-a-map" aria-hidden="true" class="anchor" id="any-image-can-be-a-map"></a>Any image can be a map</h2>
<p>My favorite part? The map is just an image. So swap <code>feTurbulence</code> for <code>feImage</code> and feed in any picture. A smooth radial gradient, for example, gives you a lens. One catch: <code>feImage</code> inside filters applied to plain HTML behaves unreliably across browsers, so I render the word inside an inline <code>&lt;svg&gt;</code> instead. Works everywhere:</p>
<pre lang="html" style="background-color:#f8fafc;"><code><span style="color:#475569;">&lt;</span><span style="font-weight:bold;color:#dc2626;">svg </span><span style="color:#0369a1;">width</span><span style="color:#475569;">="</span><span style="color:#0369a1;">240</span><span style="color:#475569;">" </span><span style="color:#0369a1;">height</span><span style="color:#475569;">="</span><span style="color:#0369a1;">100</span><span style="color:#475569;">"&gt;
</span><span style="color:#0c4a6e;">  </span><span style="color:#475569;">&lt;</span><span style="font-weight:bold;color:#dc2626;">defs</span><span style="color:#475569;">&gt;
</span><span style="color:#0c4a6e;">    </span><span style="color:#475569;">&lt;</span><span style="font-weight:bold;color:#dc2626;">filter </span><span style="color:#0369a1;">id</span><span style="color:#475569;">="</span><span style="color:#0369a1;">fd-lens</span><span style="color:#475569;">" </span><span style="color:#0369a1;">filterUnits</span><span style="color:#475569;">="</span><span style="color:#0369a1;">userSpaceOnUse</span><span style="color:#475569;">" </span><span style="color:#0369a1;">x</span><span style="color:#475569;">="</span><span style="color:#0369a1;">0</span><span style="color:#475569;">" </span><span style="color:#0369a1;">y</span><span style="color:#475569;">="</span><span style="color:#0369a1;">0</span><span style="color:#475569;">" </span><span style="color:#0369a1;">width</span><span style="color:#475569;">="</span><span style="color:#0369a1;">240</span><span style="color:#475569;">" </span><span style="color:#0369a1;">height</span><span style="color:#475569;">="</span><span style="color:#0369a1;">100</span><span style="color:#475569;">"&gt;
</span><span style="color:#0c4a6e;">      </span><span style="color:#475569;">&lt;</span><span style="font-weight:bold;color:#dc2626;">feImage </span><span style="color:#0369a1;">href</span><span style="color:#475569;">="</span><span style="color:#0369a1;">data:image/svg+xml,…</span><span style="color:#475569;">" </span><span style="color:#0369a1;">x</span><span style="color:#475569;">="</span><span style="color:#0369a1;">0</span><span style="color:#475569;">" </span><span style="color:#0369a1;">y</span><span style="color:#475569;">="</span><span style="color:#0369a1;">0</span><span style="color:#475569;">" </span><span style="color:#0369a1;">width</span><span style="color:#475569;">="</span><span style="color:#0369a1;">240</span><span style="color:#475569;">" </span><span style="color:#0369a1;">height</span><span style="color:#475569;">="</span><span style="color:#0369a1;">100</span><span style="color:#475569;">" </span><span style="color:#0369a1;">result</span><span style="color:#475569;">="</span><span style="color:#0369a1;">m</span><span style="color:#475569;">"/&gt;
</span><span style="color:#0c4a6e;">      </span><span style="color:#475569;">&lt;</span><span style="font-weight:bold;color:#dc2626;">feDisplacementMap </span><span style="color:#0369a1;">in</span><span style="color:#475569;">="</span><span style="color:#0369a1;">SourceGraphic</span><span style="color:#475569;">" </span><span style="color:#0369a1;">in2</span><span style="color:#475569;">="</span><span style="color:#0369a1;">m</span><span style="color:#475569;">" </span><span style="color:#0369a1;">scale</span><span style="color:#475569;">="</span><span style="color:#0369a1;">40</span><span style="color:#475569;">"/&gt;
</span><span style="color:#0c4a6e;">    </span><span style="color:#475569;">&lt;/</span><span style="font-weight:bold;color:#dc2626;">filter</span><span style="color:#475569;">&gt;
</span><span style="color:#0c4a6e;">  </span><span style="color:#475569;">&lt;/</span><span style="font-weight:bold;color:#dc2626;">defs</span><span style="color:#475569;">&gt;
</span><span style="color:#0c4a6e;">  </span><span style="color:#475569;">&lt;</span><span style="font-weight:bold;color:#dc2626;">text </span><span style="color:#0369a1;">x</span><span style="color:#475569;">="</span><span style="color:#0369a1;">120</span><span style="color:#475569;">" </span><span style="color:#0369a1;">y</span><span style="color:#475569;">="</span><span style="color:#0369a1;">64</span><span style="color:#475569;">" </span><span style="color:#0369a1;">text-anchor</span><span style="color:#475569;">="</span><span style="color:#0369a1;">middle</span><span style="color:#475569;">" </span><span style="color:#0369a1;">filter</span><span style="color:#475569;">="</span><span style="color:#0369a1;">url(#fd-lens)</span><span style="color:#475569;">"&gt;</span><span style="color:#0c4a6e;">lens</span><span style="color:#475569;">&lt;/</span><span style="font-weight:bold;color:#dc2626;">text</span><span style="color:#475569;">&gt;
</span><span style="color:#475569;">&lt;/</span><span style="font-weight:bold;color:#dc2626;">svg</span><span style="color:#475569;">&gt;
</span></code></pre>
<p>(Grayscale in the middle, white at the edges: pixels near the center stay put, pixels near the edge get pushed outward.)</p>
<p>And once you accept “the map is an image”, you are only limited to your imagination. Feed in a photo, a QR-looking pattern (instant glitch) or a <code>feColorMatrix</code> on top of turbulence. The displacement filter does exactly what the map tells it to. Design the map, design the distortion.</p>
<h2>
<a href="#try-it-yourself" aria-hidden="true" class="anchor" id="try-it-yourself"></a>Try it yourself</h2>
<p>I’ve wrapped these ideas in a tiny custom element, <code>&lt;displacement-svg&gt;</code>, with seven presets (wavy, glitch, water, heat, lens, liquid, sketch) and attributes to override every dial. As always, <a href="https://github.com/rails-designer-repos/displacement-svg">the code can be found on GitHub</a>.</p>
<p>Combine <code>feDisplacementMap</code> with <code>feBlend</code> for water-on-glass (to get that iOS’ liquid glass effect 💡). The MDN docs for <a href="https://developer.mozilla.org/en-US/docs/Web/SVG/Reference/Element/feDisplacementMap"><code>feDisplacementMap</code></a> are another great resource.</p>
]]></content>


  </entry>
  
  <entry>
    <id>https://railsdesigner.com/a-reusable-tooltip-built-with-a-custom-element/?ref=rss</id>
    <title>A reusable tooltip built with a custom element</title>
    <link href="https://railsdesigner.com/a-reusable-tooltip-built-with-a-custom-element/?ref=rss" rel="alternate" type="text/html"/>
    <published>2026-10-15T07:30:00Z</published>
    <updated>2026-10-15T07:30:00Z</updated>

    
      <author>
        <name>Rails Designer</name>
        <email>support@railsdesigner.com</email>
      </author>


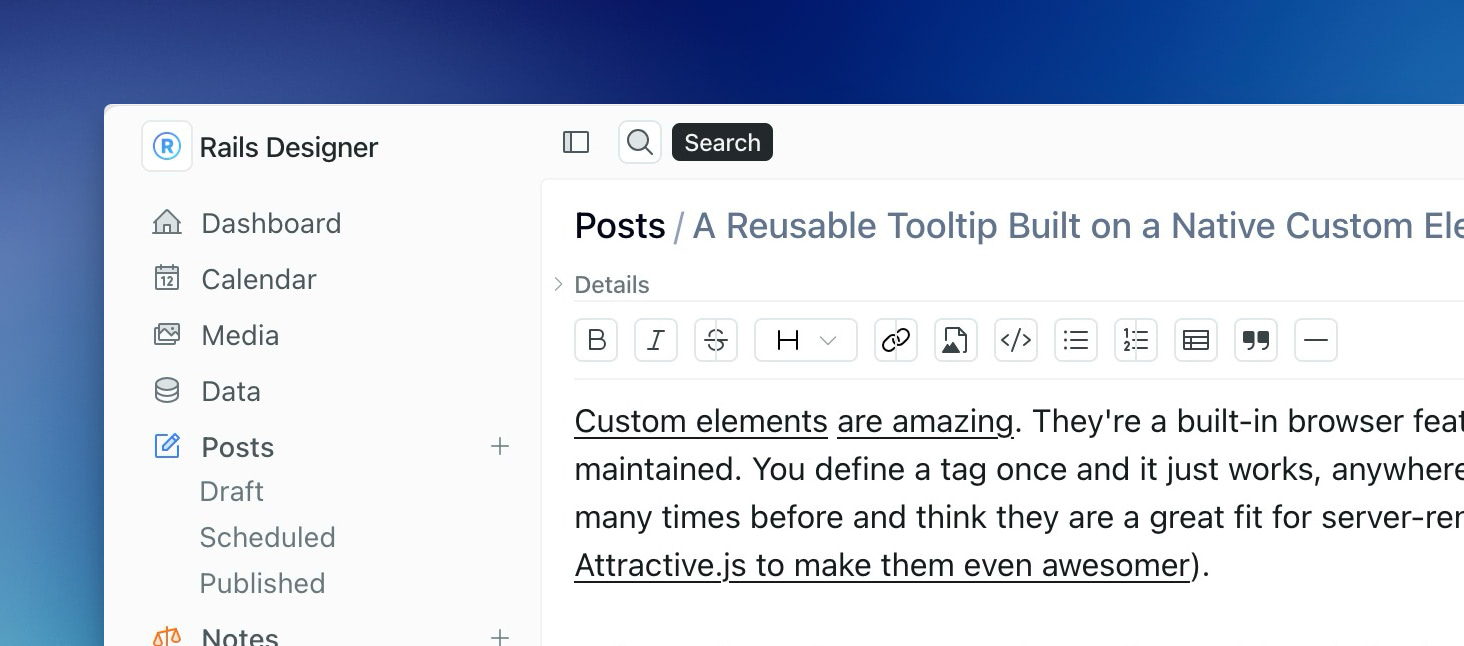
      <content type="html" xml:base="https://railsdesigner.com/a-reusable-tooltip-built-with-a-custom-element/?ref=rss"><![CDATA[<p><a href="https://railsdesigner.com/link-icon-custom-elements/">Custom elements</a> <a href="https://railsdesigner.com/custom-element-inline-edit/">are amazing</a>. They’re a built-in browser feature, not some library you <em>npm install</em> and then hope it will be maintained. You define a tag once and it just works, anywhere and in any framework (and browser). I have talked about them many times before and think they are a great fit for server-rendered apps like Hotwire is (I even <a href="https://attractivejs.railsdesigner.com/docs/element/">added an extension to Attractive.js to make them even awesomer</a>).</p>
<p><img src="https://railsdesigner.com/images/posts/tool-tip-preview.jpg" alt="Screen of the Spinal CMS app, where the “search” icon is hovered to show the custom element in action."></p>
<p>I will use them whenever I need a small, reusable UI behavior. The latest one I used (in my <a href="https://spinalcms.com/">main product</a>) is a tooltip and it’s a good example of why this approach is so clean. 🧼</p>
<p>The usage will show you my point:</p>
<pre lang="ruby" style="background-color:#f8fafc;"><code><span style="font-weight:bold;color:#0369a1;">&lt;</span><span style="color:#0c4a6e;">tool</span><span style="font-weight:bold;color:#0369a1;">-</span><span style="color:#0c4a6e;">tip label=</span><span style="color:#475569;">"</span><span style="color:#0369a1;">Search</span><span style="color:#475569;">"</span><span style="font-weight:bold;color:#0369a1;">&gt;
</span><span style="color:#0c4a6e;">  </span><span style="font-weight:bold;color:#0369a1;">&lt;%=</span><span style="color:#0c4a6e;"> icon </span><span style="color:#475569;">"</span><span style="color:#0369a1;">magnifying-glass</span><span style="color:#475569;">", </span><span style="font-weight:bold;color:#075985;">aria</span><span style="font-weight:bold;color:#475569;">: </span><span style="color:#475569;">{</span><span style="font-weight:bold;color:#075985;">label</span><span style="font-weight:bold;color:#475569;">: </span><span style="color:#475569;">"</span><span style="color:#0369a1;">View search</span><span style="color:#475569;">"} %&gt;
</span><span style="color:#0369a1;">&lt;/tool-tip</span><span style="color:#475569;">&gt;
</span></code></pre>
<p>You just wrap any element with <code>tool-tip.</code> That’s it. The <code>label</code> becomes the tooltip text. No Stimulus controller to wire up, no data attributes to memorize or no <code>data-controller</code> noise. Just a tag around the thing you already had.</p>
<p>An important detail (and it actually deserves a separate post!): the element adds <code>display: contents</code> to itself. Why does that matter? Because <code>display: contents</code> removes the custom element from the box tree while keeping its child elements in the normal DOM flow. The extra wrapper will not break your layout, your flexbox or your grid. The <code>&lt;svg&gt;</code> behaves exactly as if the <code>tool-tip</code> weren’t there.</p><p><a href="https://spinalcms.com/">[AD] Spinal CMS: Git-based CMS for static site generators</a></p>

<p>Under the hood, the element leans on the Popover API for the tooltip box. It creates a <code>div</code>, sets <code>popover="hint"</code> and positions it with <code>getBoundingClientRect</code>. The positioning logic is small: it finds the trigger’s <code>rect</code>, centers vertically, places the tooltip to the right and flips left if there’s no room:</p>
<pre lang="javascript" style="background-color:#f8fafc;"><code><span style="font-weight:bold;color:#dc2626;">let </span><span style="color:#1e293b;">left </span><span style="font-weight:bold;color:#0369a1;">= </span><span style="color:#1e293b;">triggerRect</span><span style="color:#475569;">.</span><span style="color:#0c4a6e;">right </span><span style="font-weight:bold;color:#0369a1;">+ </span><span style="color:#1e293b;">VIEWPORT_MARGIN
</span><span style="font-weight:bold;color:#dc2626;">if </span><span style="color:#475569;">(</span><span style="color:#1e293b;">left </span><span style="font-weight:bold;color:#0369a1;">+ </span><span style="color:#1e293b;">tooltipRect</span><span style="color:#475569;">.</span><span style="color:#0c4a6e;">width </span><span style="font-weight:bold;color:#0369a1;">&gt; </span><span style="color:#0c4a6e;">window</span><span style="color:#475569;">.</span><span style="color:#0c4a6e;">innerWidth </span><span style="font-weight:bold;color:#0369a1;">- </span><span style="color:#1e293b;">VIEWPORT_MARGIN</span><span style="color:#475569;">) {
</span><span style="color:#0c4a6e;">  </span><span style="color:#1e293b;">left </span><span style="font-weight:bold;color:#0369a1;">= </span><span style="color:#1e293b;">triggerRect</span><span style="color:#475569;">.</span><span style="color:#0c4a6e;">left </span><span style="font-weight:bold;color:#0369a1;">- </span><span style="color:#1e293b;">VIEWPORT_MARGIN </span><span style="font-weight:bold;color:#0369a1;">- </span><span style="color:#1e293b;">tooltipRect</span><span style="color:#475569;">.</span><span style="color:#0c4a6e;">width
</span><span style="color:#475569;">}
</span></code></pre>
<p>It also degrades gracefully. If the browser doesn’t support popover, it falls back to the native <code>title</code> attribute.</p>
<p>Now, CSS Anchor Positioning would massively simplify this element. The complete <code>#position</code> method, the scroll listeners, the resize recalculation: it could all collapse into a few lines of CSS if the browser support were there. I skipped it on purpose. Anchor positioning is still too thin on support to rely on (<span data-escaped-char>~</span>64% of the level 2 API as of this writing), so the JS stays as-is. When coverage improves, that positioning block is the first thing I’ll delete.</p>
<p>As always, <a href="https://github.com/rails-designer-repos/tool-tip-element">the code can be found on GitHub</a>. It’s a tiny file, and reading it end to end takes less time than this paragraph (okay, maybe not <em>this</em> one, but certainly the <em>previous</em> one…).</p>
<hr>
<p>Next time you reach for a tooltip gem or package, you could use this custom element instead. Wrap, label, done. 🏁 And keep an eye on anchor positioning, because the day it becomes “baseline wide available” I am going to replace a lot of code. 🧹</p>
]]></content>


  </entry>
  
  <entry>
    <id>https://railsdesigner.com/08/?ref=rss</id>
    <title>Build an accessible paused-GIF using an Custom Element</title>
    <link href="https://railsdesigner.com/08/?ref=rss" rel="alternate" type="text/html"/>
    <published>2026-10-08T07:30:00Z</published>
    <updated>2026-10-08T07:30:00Z</updated>

    
      <author>
        <name>Rails Designer</name>
        <email>support@railsdesigner.com</email>
      </author>


      <content type="html" xml:base="https://railsdesigner.com/08/?ref=rss"><![CDATA[<p>A looping GIF is a practical running joke in accessibility (a11y). It moves whether you want it to or not, you can’t stop it, and screen readers have nothing to grab onto. I built a small custom element that fixes all three at once.</p>
<p>The whole thing is <code>paused-gif</code>. Drop it in your markup and it renders a still frame with a button to play the animation:</p>
<pre lang="javascript" style="background-color:#f8fafc;"><code><span style="font-weight:bold;color:#0369a1;">&lt;</span><span style="color:#1e293b;">paused</span><span style="font-weight:bold;color:#0369a1;">-</span><span style="color:#1e293b;">gif src</span><span style="font-weight:bold;color:#0369a1;">=</span><span style="color:#475569;">"</span><span style="color:#0369a1;">/celebration.gif</span><span style="color:#475569;">" </span><span style="color:#1e293b;">alt</span><span style="font-weight:bold;color:#0369a1;">=</span><span style="color:#475569;">"</span><span style="color:#0369a1;">A confetti cannon going off at a launch party</span><span style="color:#475569;">"</span><span style="font-weight:bold;color:#0369a1;">&gt;&lt;</span><span style="color:#475569;">/</span><span style="color:#0369a1;">paused-gif&gt;
</span></code></pre>
<p>That’s it. Let me walk through why each accessibility decision in there matters, because that’s the interesting bit.</p>
<h2>
<a href="#pause-by-default" aria-hidden="true" class="anchor" id="pause-by-default"></a>Pause by default</h2>
<p>The “poster frame” (the initial image) is captured the moment the element mounts, so nothing animates until someone clicks “play”. This is the most important a11y win.</p>
<p>Why does it matter? Animated content triggers <a href="https://en.wikipedia.org/wiki/Vertigo">vertigo</a> and <a href="https://en.wikipedia.org/wiki/Balance_disorder">balance disorders</a> for a real chunk of people. <a href="https://www.w3.org/WAI/WCAG21/Understanding/animation-from-interactions.html">WCAG 2.3.3</a> says anything that moves for more than five seconds needs a pause control. By showing a still image first, I’m compliant before the user even clicks. I also grab the first frame onto a canvas so there’s no flash of a half-loaded GIF:</p>
<pre lang="javascript" style="background-color:#f8fafc;"><code><span style="color:#1e293b;">canvas</span><span style="color:#475569;">.</span><span style="color:#1e293b;">getContext</span><span style="color:#475569;">("</span><span style="color:#0369a1;">2d</span><span style="color:#475569;">").</span><span style="color:#1e293b;">drawImage</span><span style="color:#475569;">(</span><span style="color:#1e293b;">frame</span><span style="color:#475569;">, </span><span style="font-weight:bold;color:#d97706;">0</span><span style="color:#475569;">, </span><span style="font-weight:bold;color:#d97706;">0</span><span style="color:#475569;">);
</span><span style="color:#0c4a6e;">
</span><span style="color:#1e293b;">this</span><span style="color:#475569;">.</span><span style="color:#0c4a6e;">#</span><span style="color:#1e293b;">posterUrl </span><span style="font-weight:bold;color:#0369a1;">= </span><span style="color:#1e293b;">canvas</span><span style="color:#475569;">.</span><span style="color:#1e293b;">toDataURL</span><span style="color:#475569;">("</span><span style="color:#0369a1;">image/png</span><span style="color:#475569;">");
</span></code></pre>
<p>If the canvas read fails (cross-origin issue, mostly), I fall back to the source URL. The poster still shows, the animation stays paused.</p>
<h2>
<a href="#a-real-button-not-a-div-with-a-click-handler-yes-i-have-seen-this" aria-hidden="true" class="anchor" id="a-real-button-not-a-div-with-a-click-handler-yes-i-have-seen-this"></a>A real button, not a div with a click handler (yes, I have seen this)</h2>
<p>The toggle is a <code>&lt;button type="button"&gt;</code>. This matters more than it looks:</p>
<pre lang="javascript" style="background-color:#f8fafc;"><code><span style="color:#1e293b;">this</span><span style="color:#475569;">.</span><span style="color:#0c4a6e;">#</span><span style="color:#1e293b;">button </span><span style="font-weight:bold;color:#0369a1;">= </span><span style="color:#0c4a6e;">document</span><span style="color:#475569;">.</span><span style="color:#0284c7;">createElement</span><span style="color:#475569;">("</span><span style="color:#0369a1;">button</span><span style="color:#475569;">");
</span><span style="color:#1e293b;">this</span><span style="color:#475569;">.</span><span style="color:#0c4a6e;">#</span><span style="color:#1e293b;">button</span><span style="color:#475569;">.</span><span style="color:#0c4a6e;">type </span><span style="font-weight:bold;color:#0369a1;">= </span><span style="color:#475569;">"</span><span style="color:#0369a1;">button</span><span style="color:#475569;">";
</span><span style="color:#0c4a6e;">
</span><span style="color:#1e293b;">this</span><span style="color:#475569;">.</span><span style="color:#0c4a6e;">#</span><span style="color:#1e293b;">button</span><span style="color:#475569;">.</span><span style="color:#1e293b;">addEventListener</span><span style="color:#475569;">("</span><span style="color:#0369a1;">click</span><span style="color:#475569;">", () </span><span style="font-weight:bold;color:#dc2626;">=&gt; </span><span style="color:#1e293b;">this</span><span style="color:#475569;">.</span><span style="color:#1e293b;">toggle</span><span style="color:#475569;">());
</span></code></pre><p><a href="https://spinalcms.com/">[AD] Spinal CMS: Git-based CMS for static site generators</a></p>

<p>Setting <code>type="button"</code> stops it from accidentally submitting a form it happens to live inside. Because it’s a native button, keyboard users get Tab, Enter and Space for free. If you use any other element (e.g. <code>&lt;div&gt;</code>), you’ve just created a problem that already has a solution.</p>
<h2>
<a href="#state-that-screen-readers-can-hear" aria-hidden="true" class="anchor" id="state-that-screen-readers-can-hear"></a>State that screen readers can hear</h2>
<p>A play/pause button is a toggle, so it needs <code>aria-pressed</code>. The render method keeps it in sync with the actual state:</p>
<pre lang="javascript" style="background-color:#f8fafc;"><code><span style="color:#1e293b;">this</span><span style="color:#475569;">.</span><span style="color:#0c4a6e;">#</span><span style="color:#1e293b;">button</span><span style="color:#475569;">.</span><span style="color:#0284c7;">setAttribute</span><span style="color:#475569;">("</span><span style="color:#0369a1;">aria-pressed</span><span style="color:#475569;">", </span><span style="color:#1e293b;">String</span><span style="color:#475569;">(</span><span style="color:#1e293b;">this</span><span style="color:#475569;">.</span><span style="color:#0c4a6e;">#</span><span style="color:#1e293b;">playing</span><span style="color:#475569;">));
</span><span style="color:#1e293b;">this</span><span style="color:#475569;">.</span><span style="color:#0c4a6e;">#</span><span style="color:#1e293b;">button</span><span style="color:#475569;">.</span><span style="color:#0284c7;">setAttribute</span><span style="color:#475569;">("</span><span style="color:#0369a1;">aria-label</span><span style="color:#475569;">", `${</span><span style="color:#1e293b;">this</span><span style="color:#475569;">.</span><span style="color:#0c4a6e;">#</span><span style="color:#1e293b;">playing </span><span style="font-weight:bold;color:#0369a1;">? </span><span style="color:#475569;">"</span><span style="color:#0369a1;">Pause</span><span style="color:#475569;">" </span><span style="font-weight:bold;color:#0369a1;">: </span><span style="color:#475569;">"</span><span style="color:#0369a1;">Play</span><span style="color:#475569;">"}</span><span style="color:#0369a1;"> animation: </span><span style="color:#475569;">${</span><span style="color:#1e293b;">this</span><span style="color:#475569;">.</span><span style="color:#0c4a6e;">alt</span><span style="color:#475569;">}`);
</span><span style="color:#0c4a6e;">
</span><span style="color:#1e293b;">this</span><span style="color:#475569;">.</span><span style="color:#0c4a6e;">#</span><span style="color:#1e293b;">button</span><span style="color:#475569;">.</span><span style="color:#0c4a6e;">textContent </span><span style="font-weight:bold;color:#0369a1;">= </span><span style="color:#1e293b;">this</span><span style="color:#475569;">.</span><span style="color:#0c4a6e;">#</span><span style="color:#1e293b;">playing </span><span style="font-weight:bold;color:#0369a1;">? </span><span style="color:#475569;">"</span><span style="color:#0369a1;">Pause</span><span style="color:#475569;">" </span><span style="font-weight:bold;color:#0369a1;">: </span><span style="color:#475569;">"</span><span style="color:#0369a1;">Play</span><span style="color:#475569;">";
</span></code></pre>
<p>Two things are happening. <a href="https://developer.mozilla.org/en-US/docs/Web/Accessibility/ARIA/Reference/Attributes/aria-pressed"><code>aria-pressed</code></a> tells assistive tech this is a toggle and whether it’s on. The dynamic <code>aria-label</code> does something cool: it bakes the image’s <code>alt</code> text right into the control. A screen reader user hears “Play animation: a confetti cannon going off at a launch party” instead of a bare “Play”. The visible text says “Play” or “Pause” for sighted users, while the label carries the context.</p>
<p>And the <code>alt</code> isn’t an afterthought. It flows straight through to the underlying <code>&lt;img&gt;</code>:</p>
<pre lang="javascript" style="background-color:#f8fafc;"><code><span style="color:#1e293b;">this</span><span style="color:#475569;">.</span><span style="color:#0c4a6e;">#</span><span style="color:#1e293b;">img</span><span style="color:#475569;">.</span><span style="color:#0c4a6e;">alt </span><span style="font-weight:bold;color:#0369a1;">= </span><span style="color:#1e293b;">this</span><span style="color:#475569;">.</span><span style="color:#0c4a6e;">alt</span><span style="color:#475569;">;
</span></code></pre>
<p>If you forget the <code>alt</code> attribute, it becomes an empty string, which is the correct signal that the image is decorative (the button label already describes it).</p>
<p><code>decoding = "async"</code> on the image keeps the poster from blocking the main thread. And because <code>src</code>, <code>poster</code>, <code>alt</code> and <code>button-class</code> are all observed attributes, the element re-renders correctly when any of them change after mount.</p>
<hr>
<p>I keep coming back to web components/elements: the platform already solved accessibility for buttons, images and toggles. Build the control out of native elements, mirror state into ARIA and pause the motion by default. Everything else is detail.</p>
<p>As always, <a href="https://github.com/rails-designer-repos/paused-gif">the code can be found on GitHub</a>. If you ship it somewhere, I’d love to see how you theme the button. ❤️</p>
]]></content>


  </entry>
  
  <entry>
    <id>https://railsdesigner.com/beyond-click-stimulus/?ref=rss</id>
    <title>More than click and submit: use any event with Stimulus</title>
    <link href="https://railsdesigner.com/beyond-click-stimulus/?ref=rss" rel="alternate" type="text/html"/>
    <published>2026-10-01T07:30:00Z</published>
    <updated>2026-10-01T07:30:00Z</updated>

    
      <author>
        <name>Rails Designer</name>
        <email>support@railsdesigner.com</email>
      </author>


      <content type="html" xml:base="https://railsdesigner.com/beyond-click-stimulus/?ref=rss"><![CDATA[<p>I recently surprised someone by showing you can use <em>any</em> event besides the common <code>click</code>, <code>submit</code> and <code>keydown</code> events. The Stimulus docs list those seven default events and their shorthand equivalents. Enough for most cases. But the <code>data-action</code> descriptor is <code>event-&gt;controller#method</code> where you can bind to anything the DOM throws at you: native element events, global document events, even custom dispatched events. All work the same way.</p>
<p>I put together <a href="https://github.com/rails-designer-repos/stimulus-dispatched-events">a small demo repo</a> to show a handful of these in action. Lets go over them and maybe you find a way to refactor and simplify one of your Stimulus controllers.</p>
<p>First a few you probably have used before. A <code>&lt;textarea&gt;</code> fires <code>input</code> on every keystroke. The <code>character-counter</code> controller subtracts the current length from <code>maxLength</code> and updates a live counter.</p>
<pre lang="html" style="background-color:#f8fafc;"><code><span style="color:#475569;">&lt;</span><span style="font-weight:bold;color:#dc2626;">textarea </span><span style="color:#0369a1;">data-controller</span><span style="color:#475569;">="</span><span style="color:#0369a1;">character-counter</span><span style="color:#475569;">" </span><span style="color:#0369a1;">data-action</span><span style="color:#475569;">="</span><span style="color:#0369a1;">input-&gt;character-counter#update</span><span style="color:#475569;">" </span><span style="color:#0369a1;">maxlength</span><span style="color:#475569;">="</span><span style="color:#0369a1;">200</span><span style="color:#475569;">"&gt;
</span></code></pre>
<p>Note the difference. <code>input</code> fires on every change. <code>change</code> fires only on blur. For real-time feedback, <code>input</code> is what you want.</p>
<p>A range slider works the same way. The <code>range-display</code> controller grabs <code>event.target.value</code> and writes it into an <code>&lt;output&gt;</code> element. As the user drags, the displayed number updates instantly.</p>
<pre lang="html" style="background-color:#f8fafc;"><code><span style="color:#475569;">&lt;</span><span style="font-weight:bold;color:#dc2626;">input </span><span style="color:#0369a1;">type</span><span style="color:#475569;">="</span><span style="color:#0369a1;">range</span><span style="color:#475569;">" </span><span style="color:#0369a1;">data-action</span><span style="color:#475569;">="</span><span style="color:#0369a1;">input-&gt;range-display#update</span><span style="color:#475569;">"&gt;
</span><span style="color:#475569;">&lt;</span><span style="font-weight:bold;color:#dc2626;">output </span><span style="color:#0369a1;">data-range-display-target</span><span style="color:#475569;">="</span><span style="color:#0369a1;">value</span><span style="color:#475569;">"&gt;</span><span style="color:#0c4a6e;">42</span><span style="color:#475569;">&lt;/</span><span style="font-weight:bold;color:#dc2626;">output</span><span style="color:#475569;">&gt;
</span></code></pre>
<p>A checkbox fires <code>change</code> when its checked state toggles. The <code>checkbox-reveal</code> controller inspects <code>event.target.checked</code> and toggles a <code>hidden</code> class on a content section.</p>
<pre lang="html" style="background-color:#f8fafc;"><code><span style="color:#475569;">&lt;</span><span style="font-weight:bold;color:#dc2626;">input </span><span style="color:#0369a1;">type</span><span style="color:#475569;">="</span><span style="color:#0369a1;">checkbox</span><span style="color:#475569;">" </span><span style="color:#0369a1;">data-action</span><span style="color:#475569;">="</span><span style="color:#0369a1;">change-&gt;checkbox-reveal#toggle</span><span style="color:#475569;">"&gt;
</span><span style="color:#475569;">&lt;</span><span style="font-weight:bold;color:#dc2626;">div </span><span style="color:#0369a1;">data-checkbox-reveal-target</span><span style="color:#475569;">="</span><span style="color:#0369a1;">content</span><span style="color:#475569;">" </span><span style="color:#0369a1;">class</span><span style="color:#475569;">="</span><span style="color:#0369a1;">hidden</span><span style="color:#475569;">"&gt;</span><span style="color:#0c4a6e;">…</span><span style="color:#475569;">&lt;/</span><span style="font-weight:bold;color:#dc2626;">div</span><span style="color:#475569;">&gt;
</span></code></pre>
<p>A <code>&lt;details&gt;</code> element fires <code>toggle</code> every time it opens or closes. The <code>accordion</code> controller uses this to persist state to <code>localStorage</code>.</p>
<pre lang="html" style="background-color:#f8fafc;"><code><span style="color:#475569;">&lt;</span><span style="font-weight:bold;color:#dc2626;">details </span><span style="color:#0369a1;">data-controller</span><span style="color:#475569;">="</span><span style="color:#0369a1;">accordion</span><span style="color:#475569;">" </span><span style="color:#0369a1;">data-action</span><span style="color:#475569;">="</span><span style="color:#0369a1;">toggle-&gt;accordion#persist</span><span style="color:#475569;">"&gt;
</span></code></pre>
<p>The controller reads <code>event.target.open</code> to know whether the element was opened or closed and saves a boolean. On <code>connect</code>, it restores the saved state. Native event, no wrapper library.</p>
<p>A code block fires <code>copy</code> when the user selects text and presses Cmd+C. The <code>clipboard</code> controller shows a “Copied!” tooltip for 1.5 seconds, then hides it.</p>
<pre lang="html" style="background-color:#f8fafc;"><code><span style="color:#475569;">&lt;</span><span style="font-weight:bold;color:#dc2626;">pre </span><span style="color:#0369a1;">data-controller</span><span style="color:#475569;">="</span><span style="color:#0369a1;">clipboard</span><span style="color:#475569;">" </span><span style="color:#0369a1;">data-action</span><span style="color:#475569;">="</span><span style="color:#0369a1;">copy-&gt;clipboard#showTooltip</span><span style="color:#475569;">"&gt;
</span><span style="color:#0c4a6e;">  </span><span style="color:#475569;">&lt;</span><span style="font-weight:bold;color:#dc2626;">code</span><span style="color:#475569;">&gt;</span><span style="color:#0c4a6e;">$ rails g controller pages show</span><span style="color:#475569;">&lt;/</span><span style="font-weight:bold;color:#dc2626;">code</span><span style="color:#475569;">&gt;
</span><span style="color:#0c4a6e;">
</span><span style="color:#0c4a6e;">  </span><span style="color:#475569;">&lt;</span><span style="font-weight:bold;color:#dc2626;">span </span><span style="color:#0369a1;">data-clipboard-target</span><span style="color:#475569;">="</span><span style="color:#0369a1;">tooltip</span><span style="color:#475569;">" </span><span style="color:#0369a1;">class</span><span style="color:#475569;">="</span><span style="color:#0369a1;">clipboard-tooltip</span><span style="color:#475569;">"&gt;</span><span style="color:#0c4a6e;">Copied!</span><span style="color:#475569;">&lt;/</span><span style="font-weight:bold;color:#dc2626;">span</span><span style="color:#475569;">&gt;
</span><span style="color:#475569;">&lt;/</span><span style="font-weight:bold;color:#dc2626;">pre</span><span style="color:#475569;">&gt;
</span></code></pre>
<p>The <code>copy</code> event fires before the clipboard is populated, so there is time to show feedback.</p>
<p>A <code>&lt;dialog&gt;</code> fires two distinct events. <code>close</code> fires when the dialog closes via a form submission or button click. <code>cancel</code> fires when the user dismisses it with the Esc key. The <code>modal</code> controller tracks both to display the correct status.</p><p><a href="https://spinalcms.com/">[AD] Spinal CMS: Git-based CMS for static site generators</a></p>

<pre lang="html" style="background-color:#f8fafc;"><code><span style="color:#475569;">&lt;</span><span style="font-weight:bold;color:#dc2626;">dialog </span><span style="color:#0369a1;">data-action</span><span style="color:#475569;">="</span><span style="color:#0369a1;">close-&gt;modal#close cancel-&gt;modal#cancel</span><span style="color:#475569;">" </span><span style="color:#0369a1;">data-modal-target</span><span style="color:#475569;">="</span><span style="color:#0369a1;">dialog</span><span style="color:#475569;">"&gt;
</span></code></pre>
<p>When Esc is pressed, <code>cancel</code> fires first. The controller sets a flag so <code>close</code> (which fires right after) can distinguish between “closed via button” and “cancelled via Esc”.</p>
<p>A form fires <code>submit</code> as a default event (similar to the Turbo events for form submissions). The <code>form</code> controller shows the <code>:prevent</code> action option to stop the browser from reloading.</p>
<pre lang="html" style="background-color:#f8fafc;"><code><span style="color:#475569;">&lt;</span><span style="font-weight:bold;color:#dc2626;">form </span><span style="color:#0369a1;">data-controller</span><span style="color:#475569;">="</span><span style="color:#0369a1;">form</span><span style="color:#475569;">" </span><span style="color:#0369a1;">data-action</span><span style="color:#475569;">="</span><span style="color:#0369a1;">submit-&gt;form#validating:prevent</span><span style="color:#475569;">"&gt;
</span></code></pre>
<p>Stimulus uses <code>@</code> to scope the event listener to a different element. The full descriptor is <code>event@target-&gt;controller#method</code>. Leave off <code>@target</code> and it listens on the controller’s element. Set it to <code>@document</code> or <code>@window</code> and it listens globally.</p>
<pre lang="html" style="background-color:#f8fafc;"><code><span style="color:#475569;">&lt;</span><span style="font-weight:bold;color:#dc2626;">section </span><span style="color:#0369a1;">data-controller</span><span style="color:#475569;">="</span><span style="color:#0369a1;">visibility</span><span style="color:#475569;">" </span><span style="color:#0369a1;">data-action</span><span style="color:#475569;">="</span><span style="color:#0369a1;">visibilitychange@document-&gt;visibility#toggle</span><span style="color:#475569;">"&gt;
</span></code></pre>
<p>The <code>visibility</code> controller toggles <code>document.title</code> depending on whether the tab is hidden or visible. The <code>@document</code> suffix is the only way to make this work since <code>visibilitychange</code> fires on the document, not on the controller’s element.</p>
<p>This is also how you hook into Turbo events:</p>
<pre lang="html" style="background-color:#f8fafc;"><code><span style="color:#475569;">&lt;</span><span style="font-weight:bold;color:#dc2626;">turbo-frame </span><span style="color:#0369a1;">id</span><span style="color:#475569;">="</span><span style="color:#0369a1;">comments</span><span style="color:#475569;">" </span><span style="color:#0369a1;">data-action</span><span style="color:#475569;">="</span><span style="color:#0369a1;">turbo:frame-render@document-&gt;comments#highlight</span><span style="color:#475569;">"&gt;
</span></code></pre>
<p>And how you listen to <a href="https://developer.mozilla.org/en-US/docs/Web/API/CustomEvent/CustomEvent">custom dispatched events</a> from anywhere. A Stimulus controller, a Turbo Stream response, a WebSocket handler. Call <code>dispatchEvent</code> and bind with the exact same syntax.</p>
<pre lang="js" style="background-color:#f8fafc;"><code><span style="color:#1e293b;">element</span><span style="color:#475569;">.</span><span style="color:#1e293b;">dispatchEvent</span><span style="color:#475569;">(</span><span style="font-weight:bold;color:#0369a1;">new </span><span style="color:#1e293b;">CustomEvent</span><span style="color:#475569;">("</span><span style="color:#0369a1;">cart:updated</span><span style="color:#475569;">", { </span><span style="color:#0c4a6e;">detail</span><span style="color:#475569;">: { </span><span style="color:#0c4a6e;">count</span><span style="color:#475569;">: </span><span style="font-weight:bold;color:#d97706;">5 </span><span style="color:#475569;">} }))
</span></code></pre>
<pre lang="html" style="background-color:#f8fafc;"><code><span style="color:#475569;">&lt;</span><span style="font-weight:bold;color:#dc2626;">span </span><span style="color:#0369a1;">data-controller</span><span style="color:#475569;">="</span><span style="color:#0369a1;">cart</span><span style="color:#475569;">" </span><span style="color:#0369a1;">data-action</span><span style="color:#475569;">="</span><span style="color:#0369a1;">cart:updated@document-&gt;cart#updateBadge</span><span style="color:#475569;">"&gt;&lt;/</span><span style="font-weight:bold;color:#dc2626;">span</span><span style="color:#475569;">&gt;
</span></code></pre>
<p>Custom events are just DOM events with a custom name. Stimulus treats them identically to native ones.</p>
<hr>
<p>One more thing. You can go further with custom action options. I <a href="https://railsdesigner.com/stimulus-custom-action-options/">wrote about them here</a>. They let you gate whether an action fires based on custom logic. For example, you could register an <code>open</code> option so the accordion’s <code>persist</code> action only runs when the <code>&lt;details&gt;</code> element opens, not when it closes. All declarative in the HTML, no conditionals in the controller.</p>
<p>The seven default events are convenient, but every DOM event works the same way in Stimulus. Knowing this allows you to write more advanced controllers, simpler. 😊</p>
]]></content>


  </entry>
  
  <entry>
    <id>https://railsdesigner.com/using-attractive-in-rails/?ref=rss</id>
    <title>Lazy loading, optimistic UI and more in Rails with Attractive.js</title>
    <link href="https://railsdesigner.com/using-attractive-in-rails/?ref=rss" rel="alternate" type="text/html"/>
    <published>2026-09-24T07:30:00Z</published>
    <updated>2026-09-24T07:30:00Z</updated>

    
      <author>
        <name>Rails Designer</name>
        <email>support@railsdesigner.com</email>
      </author>


      <content type="html" xml:base="https://railsdesigner.com/using-attractive-in-rails/?ref=rss"><![CDATA[<p>This is the last article of a series where I introduce Attractive.js 1.0.0 (in pre-release now).</p>
<ul>
<li><a href="/announcing-attractive-1-0/">Attractive.js 1.0.0: interactive HTML without one line of JavaScript</a></li>
<li><a href="/custom-actions-in-attractive/">Custom Actions in Attractive.js: one interface, from small to big</a></li>
</ul>
<p>In this last article I want to highlight how Attractive can be a nice addition and in some cases a <strong>complete replacement for Hotwire</strong>.</p>
<p>I <a href="https://github.com/rails-designer-repos/rails-attractive-demo">created a simple message board in Rails</a>. No Stimulus anywhere, nor Turbo Streams. Check it out!</p>
<p><img src="https://railsdesigner.com/images/posts/rails-attractive-demo.jpg" alt="rails-attractive-demo.jpg"></p>
<p>Most of the features of the is build one Attractive extension I intentionaly left out last week; <a href="https://attractivejs.railsdesigner.com/docs/attract/">Attract</a>. It serves two purposes:</p>
<ul>
<li>intercept form request and send fetch instead (we know that technique!), and:</li>
<li>work with attract JSON responses to render HTML based off of template elements</li>
</ul>
<h3>
<a href="#one-partial-three-uses" aria-hidden="true" class="anchor" id="one-partial-three-uses"></a>One partial, three uses</h3>
<p>The whole thing uses one single partial for a message:</p>
<pre lang="javascript" style="background-color:#f8fafc;"><code><span style="font-weight:bold;color:#0369a1;">&lt;%</span><span style="color:#0c4a6e;"># locals</span><span style="color:#475569;">: (</span><span style="color:#1e293b;">message</span><span style="color:#0c4a6e;">:</span><span style="color:#475569;">) </span><span style="font-weight:bold;color:#0369a1;">%&gt;
</span><span style="font-weight:bold;color:#0369a1;">&lt;</span><span style="color:#1e293b;">li </span><span style="font-weight:bold;color:#dc2626;">class</span><span style="color:#0c4a6e;">="</span><span style="font-weight:bold;color:#b91c1c;">message</span><span style="color:#0c4a6e;">" </span><span style="font-weight:bold;color:#b91c1c;">id</span><span style="color:#0c4a6e;">="</span><span style="font-weight:bold;color:#b91c1c;">message</span><span style="color:#0c4a6e;">-&lt;%= </span><span style="font-weight:bold;color:#b91c1c;">message</span><span style="color:#0c4a6e;">.</span><span style="font-weight:bold;color:#b91c1c;">id</span><span style="color:#0c4a6e;"> %&gt;"&gt;
</span><span style="color:#0c4a6e;">  &lt;</span><span style="font-weight:bold;color:#b91c1c;">small class</span><span style="color:#0c4a6e;">="</span><span style="font-weight:bold;color:#b91c1c;">author</span><span style="color:#0c4a6e;">" </span><span style="font-weight:bold;color:#b91c1c;">attract</span><span style="color:#0c4a6e;">-</span><span style="font-weight:bold;color:#b91c1c;">field</span><span style="color:#0c4a6e;">="</span><span style="font-weight:bold;color:#b91c1c;">author</span><span style="color:#0c4a6e;">"&gt;&lt;%= </span><span style="font-weight:bold;color:#b91c1c;">message</span><span style="color:#0c4a6e;">.</span><span style="font-weight:bold;color:#b91c1c;">author</span><span style="color:#0c4a6e;"> %&gt;&lt;/</span><span style="font-weight:bold;color:#b91c1c;">small</span><span style="color:#0c4a6e;">&gt;
</span><span style="color:#0c4a6e;">
</span><span style="color:#0c4a6e;">  &lt;</span><span style="font-weight:bold;color:#b91c1c;">p class</span><span style="color:#0c4a6e;">="</span><span style="font-weight:bold;color:#b91c1c;">body</span><span style="color:#0c4a6e;">" </span><span style="font-weight:bold;color:#b91c1c;">attract</span><span style="color:#0c4a6e;">-</span><span style="font-weight:bold;color:#b91c1c;">field</span><span style="color:#0c4a6e;">="</span><span style="font-weight:bold;color:#b91c1c;">body</span><span style="color:#0c4a6e;">"&gt;&lt;%= </span><span style="font-weight:bold;color:#b91c1c;">message</span><span style="color:#0c4a6e;">.</span><span style="font-weight:bold;color:#b91c1c;">body</span><span style="color:#0c4a6e;"> %&gt;&lt;/</span><span style="font-weight:bold;color:#b91c1c;">p</span><span style="color:#0c4a6e;">&gt;
</span><span style="color:#0c4a6e;">&lt;/</span><span style="font-weight:bold;color:#b91c1c;">li</span><span style="color:#0c4a6e;">&gt;
</span></code></pre>
<p>This one partial renders the initial page, drives the optimistic UI and powers the lazy load. Say what?! 🤯 The <code>attract-field</code> attributes tell Attractive’s Attract where to slot data when it renders the template.</p>
<h3>
<a href="#client-and-server-validation" aria-hidden="true" class="anchor" id="client-and-server-validation"></a>Client and server validation</h3>
<p>The message body validates on the client with the native Constraint Validation API, via the <a href="https://attractivejs.railsdesigner.com/docs/validate/"><code>@validate</code></a> extensions (mentioned last week). Just <code>required</code> and <code>minlength</code> attributes, plus one attribute on the form:</p>
<pre lang="javascript" style="background-color:#f8fafc;"><code><span style="font-weight:bold;color:#0369a1;">&lt;</span><span style="color:#1e293b;">form</span><span style="color:#0c4a6e;"> @</span><span style="color:#1e293b;">validate</span><span style="color:#0c4a6e;"> @</span><span style="color:#1e293b;">attract</span><span style="color:#0c4a6e;"> …</span><span style="font-weight:bold;color:#0369a1;">&gt;
</span><span style="color:#0c4a6e;">  </span><span style="font-weight:bold;color:#0369a1;">&lt;</span><span style="color:#1e293b;">input id</span><span style="font-weight:bold;color:#0369a1;">=</span><span style="color:#475569;">"</span><span style="color:#0369a1;">author</span><span style="color:#475569;">" </span><span style="color:#1e293b;">name</span><span style="font-weight:bold;color:#0369a1;">=</span><span style="color:#475569;">"</span><span style="color:#0369a1;">author</span><span style="color:#475569;">" </span><span style="color:#1e293b;">type</span><span style="font-weight:bold;color:#0369a1;">=</span><span style="color:#475569;">"</span><span style="color:#0369a1;">text</span><span style="color:#475569;">" </span><span style="color:#1e293b;">placeholder</span><span style="font-weight:bold;color:#0369a1;">=</span><span style="color:#475569;">"</span><span style="color:#0369a1;">Your name</span><span style="color:#475569;">"</span><span style="font-weight:bold;color:#0369a1;">&gt;
</span><span style="color:#0c4a6e;">
</span><span style="color:#0c4a6e;">  </span><span style="font-weight:bold;color:#0369a1;">&lt;</span><span style="color:#1e293b;">textarea name</span><span style="font-weight:bold;color:#0369a1;">=</span><span style="color:#475569;">"</span><span style="color:#0369a1;">body</span><span style="color:#475569;">" </span><span style="color:#1e293b;">required minlength</span><span style="font-weight:bold;color:#0369a1;">=</span><span style="color:#475569;">"</span><span style="color:#0369a1;">3</span><span style="color:#475569;">"</span><span style="font-weight:bold;color:#0369a1;">&gt;&lt;</span><span style="color:#475569;">/</span><span style="color:#0369a1;">textarea&gt;
</span><span style="color:#0369a1;">&lt;</span><span style="color:#475569;">/</span><span style="color:#1e293b;">form</span><span style="font-weight:bold;color:#0369a1;">&gt;
</span></code></pre>
<p>The name field, by contrast, is deliberately left without a client rule. Its validation comes from the server. When Rails rejects it, the errors come back as JSON and get wired into the same native validation UI. Client and server errors render identically.</p>
<h3>
<a href="#optimistic-ui" aria-hidden="true" class="anchor" id="optimistic-ui"></a>Optimistic UI</h3>
<p>The form has <code>@attract</code>, so submitting it sends a fetch instead of a page reload. A cached <code>&lt;template&gt;</code> renders an optimistic preview instantly, from that same partial, while the server processes the request:</p>
<pre lang="javascript" style="background-color:#f8fafc;"><code><span style="font-weight:bold;color:#0369a1;">&lt;</span><span style="color:#1e293b;">p</span><span style="font-weight:bold;color:#0369a1;">&gt;&lt;</span><span style="color:#1e293b;">strong</span><span style="color:#0c4a6e;"> @</span><span style="color:#1e293b;">text</span><span style="font-weight:bold;color:#0369a1;">=</span><span style="color:#475569;">"</span><span style="color:#0369a1;">message_count</span><span style="color:#475569;">"</span><span style="font-weight:bold;color:#0369a1;">&gt;</span><span style="font-weight:bold;color:#d97706;">41</span><span style="font-weight:bold;color:#0369a1;">&lt;</span><span style="color:#475569;">/</span><span style="color:#0369a1;">strong&gt; messages&lt;</span><span style="color:#475569;">/</span><span style="color:#1e293b;">p</span><span style="font-weight:bold;color:#0369a1;">&gt;
</span><span style="color:#0c4a6e;">
</span><span style="font-weight:bold;color:#0369a1;">&lt;</span><span style="color:#1e293b;">form
</span><span style="color:#0c4a6e;">  </span><span style="color:#1e293b;">id</span><span style="font-weight:bold;color:#0369a1;">=</span><span style="color:#475569;">"</span><span style="color:#0369a1;">new-message</span><span style="color:#475569;">"
</span><span style="color:#0c4a6e;">  @</span><span style="color:#1e293b;">attract
</span><span style="color:#0c4a6e;">  </span><span style="color:#1e293b;">data</span><span style="font-weight:bold;color:#0369a1;">-</span><span style="color:#1e293b;">attract</span><span style="font-weight:bold;color:#0369a1;">-</span><span style="color:#1e293b;">template</span><span style="font-weight:bold;color:#0369a1;">=</span><span style="color:#475569;">"</span><span style="color:#0369a1;">message</span><span style="color:#475569;">"
</span><span style="color:#0c4a6e;">  </span><span style="color:#1e293b;">data</span><span style="font-weight:bold;color:#0369a1;">-</span><span style="color:#1e293b;">attract</span><span style="font-weight:bold;color:#0369a1;">-</span><span style="color:#1e293b;">target</span><span style="font-weight:bold;color:#0369a1;">=</span><span style="color:#475569;">"</span><span style="color:#0369a1;">messages</span><span style="color:#475569;">"
</span><span style="color:#0c4a6e;">  </span><span style="color:#1e293b;">data</span><span style="font-weight:bold;color:#0369a1;">-</span><span style="color:#1e293b;">attract</span><span style="font-weight:bold;color:#0369a1;">-</span><span style="color:#1e293b;">position</span><span style="font-weight:bold;color:#0369a1;">=</span><span style="color:#475569;">"</span><span style="color:#0369a1;">prepend</span><span style="color:#475569;">"
</span><span style="font-weight:bold;color:#0369a1;">&gt;&lt;</span><span style="color:#475569;">/</span><span style="color:#0369a1;">form&gt;
</span><span style="color:#0369a1;">
</span><span style="color:#0369a1;">&lt;ul id="messages"&gt;
</span><span style="color:#0369a1;">  &lt;%= render @messages %&gt;
</span><span style="color:#0369a1;">&lt;</span><span style="color:#475569;">/</span><span style="font-weight:bold;color:#dc2626;">u</span><span style="color:#1e293b;">l</span><span style="font-weight:bold;color:#0369a1;">&gt;
</span><span style="color:#0c4a6e;">
</span><span style="font-weight:bold;color:#0369a1;">&lt;</span><span style="color:#1e293b;">template id</span><span style="font-weight:bold;color:#0369a1;">=</span><span style="color:#475569;">"</span><span style="color:#0369a1;">message</span><span style="color:#475569;">"</span><span style="font-weight:bold;color:#0369a1;">&gt;
</span><span style="color:#0c4a6e;">  </span><span style="font-weight:bold;color:#0369a1;">&lt;%= </span><span style="color:#1e293b;">render </span><span style="color:#475569;">"</span><span style="color:#0369a1;">messages/message</span><span style="color:#475569;">", </span><span style="color:#1e293b;">message</span><span style="color:#0c4a6e;">: Message</span><span style="color:#475569;">.</span><span style="color:#0c4a6e;">new </span><span style="font-weight:bold;color:#0369a1;">%&gt;
</span><span style="font-weight:bold;color:#0369a1;">&lt;</span><span style="color:#475569;">/</span><span style="color:#0369a1;">template&gt;
</span></code></pre>
<p>In the example app, the create request sleeps for a second so you can actually see the optimistic message appear before the real response. When it comes back, it holds the actions:</p>
<pre lang="javascript" style="background-color:#f8fafc;"><code><span style="color:#475569;">{
</span><span style="color:#0c4a6e;">  </span><span style="color:#475569;">"</span><span style="color:#0369a1;">actions</span><span style="color:#475569;">"</span><span style="color:#0c4a6e;">: </span><span style="color:#475569;">[
</span><span style="color:#0c4a6e;">    </span><span style="color:#475569;">{ "</span><span style="color:#0369a1;">action</span><span style="color:#475569;">": "</span><span style="color:#0369a1;">setStore#message_count=42</span><span style="color:#475569;">" },
</span><span style="color:#0c4a6e;">    </span><span style="color:#475569;">{ "</span><span style="color:#0369a1;">action</span><span style="color:#475569;">": "</span><span style="color:#0369a1;">reset</span><span style="color:#475569;">", "</span><span style="color:#0369a1;">target</span><span style="color:#475569;">": "</span><span style="color:#0369a1;">new-message</span><span style="color:#475569;">" }
</span><span style="color:#0c4a6e;">  </span><span style="color:#475569;">]
</span><span style="color:#475569;">}
</span></code></pre>
<p>Multiple actions in one response once the message is saved: set the message count using <a href="https://attractivejs.railsdesigner.com/docs/reactive/">Reactive’s store</a> and a (bundled) action to reset the form.</p>
<p>Attract brings 6 more actions to the table. They almost all clone a cached template (like <code>#message</code> above):</p>
<ul>
<li>
<code>append</code> to append to target</li>
<li>
<code>prepend</code> to prepend to target</li>
<li>
<code>replace</code> to replace target element</li>
<li>
<code>before</code> to insert before target</li>
<li>
<code>after</code> to clone template, insert after target</li>
</ul>
<p>And the odd one:</p>
<ul>
<li>
<code>remove</code> to remove target element(s)</li>
</ul>
<p>The nice thing is, you can use these actions solo without attract as well, like I do for my flash (toast) messages:</p>
<pre lang="javascript" style="background-color:#f8fafc;"><code><span style="font-weight:bold;color:#0369a1;">&lt;%</span><span style="color:#0c4a6e;"># locals</span><span style="color:#475569;">: (</span><span style="color:#1e293b;">message</span><span style="color:#0c4a6e;">:</span><span style="color:#475569;">, </span><span style="color:#1e293b;">icon</span><span style="color:#0c4a6e;">: :</span><span style="color:#1e293b;">check</span><span style="color:#475569;">, </span><span style="color:#1e293b;">icon_css</span><span style="color:#0c4a6e;">: …</span><span style="color:#475569;">, </span><span style="color:#1e293b;">css</span><span style="color:#0c4a6e;">: …</span><span style="color:#475569;">) </span><span style="font-weight:bold;color:#0369a1;">%&gt;
</span><span style="font-weight:bold;color:#0369a1;">&lt;</span><span style="color:#1e293b;">li</span><span style="color:#0c4a6e;"> @</span><span style="color:#1e293b;">action</span><span style="font-weight:bold;color:#0369a1;">=</span><span style="color:#475569;">"</span><span style="color:#0369a1;">remove:mounted</span><span style="color:#475569;">" </span><span style="color:#1e293b;">data</span><span style="font-weight:bold;color:#0369a1;">-</span><span style="color:#1e293b;">delay</span><span style="font-weight:bold;color:#0369a1;">=</span><span style="color:#475569;">"</span><span style="color:#0369a1;">7500</span><span style="color:#475569;">" </span><span style="font-weight:bold;color:#dc2626;">class</span><span style="color:#0c4a6e;">="…"&gt;
</span><span style="color:#0c4a6e;">  &lt;%= </span><span style="font-weight:bold;color:#b91c1c;">tag</span><span style="color:#0c4a6e;">.</span><span style="font-weight:bold;color:#b91c1c;">p safe_join</span><span style="color:#0c4a6e;">([</span><span style="font-weight:bold;color:#b91c1c;">icon</span><span style="color:#0c4a6e;">(</span><span style="font-weight:bold;color:#b91c1c;">icon</span><span style="color:#0c4a6e;">, </span><span style="font-weight:bold;color:#b91c1c;">class</span><span style="color:#0c4a6e;">: </span><span style="font-weight:bold;color:#b91c1c;">icon_css</span><span style="color:#0c4a6e;">), </span><span style="font-weight:bold;color:#b91c1c;">message</span><span style="color:#0c4a6e;">]), </span><span style="font-weight:bold;color:#b91c1c;">aria</span><span style="color:#0c4a6e;">: </span><span style="color:#475569;">{</span><span style="color:#0c4a6e;">live: :polite</span><span style="color:#475569;">}, </span><span style="font-weight:bold;color:#dc2626;">class</span><span style="color:#0c4a6e;">: </span><span style="font-weight:bold;color:#b91c1c;">css</span><span style="color:#0c4a6e;"> %&gt;
</span><span style="color:#0c4a6e;">&lt;/</span><span style="font-weight:bold;color:#b91c1c;">li</span><span style="color:#0c4a6e;">&gt;
</span></code></pre>
<p>The message gets removed from the DOM after a delay of 7500ms.</p>
<h3>
<a href="#lazy-loading-messages" aria-hidden="true" class="anchor" id="lazy-loading-messages"></a>Lazy loading messages</h3>
<p>The message list loads five at a time. At the bottom, a simple form GET request that is triggered <em>when in view</em> (using the <a href="https://attractivejs.railsdesigner.com/docs/directives/">bundled <code>whenInView</code> trigger</a>):</p>
<pre lang="javascript" style="background-color:#f8fafc;"><code><span style="font-weight:bold;color:#0369a1;">&lt;</span><span style="color:#1e293b;">form
</span><span style="color:#0c4a6e;">  </span><span style="color:#1e293b;">method</span><span style="font-weight:bold;color:#0369a1;">=</span><span style="color:#475569;">"</span><span style="color:#0369a1;">get</span><span style="color:#475569;">"
</span><span style="color:#0c4a6e;">  </span><span style="color:#1e293b;">action</span><span style="font-weight:bold;color:#0369a1;">=</span><span style="color:#475569;">"</span><span style="color:#0369a1;">/messages?offset=5</span><span style="color:#475569;">"
</span><span style="color:#0c4a6e;">  @</span><span style="color:#1e293b;">action</span><span style="font-weight:bold;color:#0369a1;">=</span><span style="color:#475569;">"</span><span style="color:#0369a1;">submit:whenInView</span><span style="color:#475569;">"
</span><span style="color:#0c4a6e;">  @</span><span style="color:#1e293b;">attract
</span><span style="font-weight:bold;color:#0369a1;">&gt;&lt;</span><span style="color:#475569;">/</span><span style="color:#0369a1;">form&gt;
</span></code></pre>
<p>The server replies with a sequence of actions: append the next batch, when there are more, swap in a fresh “lazy load action” and point it at the next offset or remove it when the list runs out.</p>
<pre lang="javascript" style="background-color:#f8fafc;"><code><span style="color:#1e293b;">render </span><span style="color:#0c4a6e;">json</span><span style="color:#475569;">: {
</span><span style="color:#0c4a6e;">  actions</span><span style="color:#475569;">: [
</span><span style="color:#0c4a6e;">    </span><span style="color:#475569;">{ </span><span style="color:#0c4a6e;">action</span><span style="color:#475569;">: "</span><span style="color:#0369a1;">append</span><span style="color:#475569;">", </span><span style="color:#0c4a6e;">target</span><span style="color:#475569;">: "</span><span style="color:#0369a1;">messages</span><span style="color:#475569;">", </span><span style="color:#0c4a6e;">template</span><span style="color:#475569;">: "</span><span style="color:#0369a1;">message</span><span style="color:#475569;">", </span><span style="color:#0c4a6e;">data</span><span style="color:#475569;">: </span><span style="color:#1e293b;">batch </span><span style="color:#475569;">},
</span><span style="color:#0c4a6e;">    </span><span style="color:#475569;">{ </span><span style="color:#0c4a6e;">action</span><span style="color:#475569;">: "</span><span style="color:#0369a1;">replace</span><span style="color:#475569;">", </span><span style="color:#0c4a6e;">target</span><span style="color:#475569;">: "</span><span style="color:#0369a1;">load-more</span><span style="color:#475569;">", </span><span style="color:#0c4a6e;">template</span><span style="color:#475569;">: "</span><span style="color:#0369a1;">load-more</span><span style="color:#475569;">", </span><span style="color:#0c4a6e;">data</span><span style="color:#475569;">: {} },
</span><span style="color:#0c4a6e;">    </span><span style="color:#475569;">{ </span><span style="color:#0c4a6e;">action</span><span style="color:#475569;">: "</span><span style="color:#0369a1;">setAttribute#action=/messages?offset=10</span><span style="color:#475569;">", </span><span style="color:#0c4a6e;">target</span><span style="color:#475569;">: "</span><span style="color:#0369a1;">load-more</span><span style="color:#475569;">" }
</span><span style="color:#0c4a6e;">  </span><span style="color:#475569;">]
</span><span style="color:#475569;">}
</span></code></pre>
<p>Three actions, one request.</p>
<h3>
<a href="#keyboard-shortcuts" aria-hidden="true" class="anchor" id="keyboard-shortcuts"></a>Keyboard shortcuts</h3>
<p>The Attractive Element scopes the filter and the keyboard extension wires the shortcuts. <code>@hotkey.meta+k</code> focuses the filter, <code>@keydown.escape</code> clears it, <code>@keydown.meta+enter</code> submits the form.</p>
<hr>
<p>And that is how Attractive can work alongside Hotwire or replace it; depending on your needs. I am quite excited how this all turned out. It has been multiple months in the making (excluding the time noodling it over in my brain).</p>
<p>I would love for you to give it a try, just the bundled actions for your (<a href="https://perron.railsdesigner.com/">Perron-powered</a> 💡) site, along-side Hotwire or even replacing it. Let met know how it goes.</p>
<p>Things I am thinking about adding is support for SSE so you can “broadcast” actions to many and also an <code>attractivejs-rails</code> gem (to remove some of the ceremony you see in the Rails demo app).</p>
<p>Get started with the <a href="https://attractivejs.railsdesigner.com/docs/quickstart/">quickstart</a> and give the <a href="https://github.com/rails-designer/attractivejs">repo</a> a star or fix a bug you find! ✨😊</p>
]]></content>


  </entry>
  
  <entry>
    <id>https://railsdesigner.com/custom-actions-in-attractive/?ref=rss</id>
    <title>Custom Actions in Attractive.js: one interface, from small to big</title>
    <link href="https://railsdesigner.com/custom-actions-in-attractive/?ref=rss" rel="alternate" type="text/html"/>
    <published>2026-09-17T07:30:00Z</published>
    <updated>2026-09-17T07:30:00Z</updated>

    
      <author>
        <name>Rails Designer</name>
        <email>support@railsdesigner.com</email>
      </author>


      <content type="html" xml:base="https://railsdesigner.com/custom-actions-in-attractive/?ref=rss"><![CDATA[<p>In <a href="https://railsdesigner.com/announcing-attractive-1-0/">last week’s announcement</a>, I promised that when the built-in actions aren’t enough, you can write your own. Let me show you how, because this is what was bugging me most: why pull in another library when Attractive.js can do it as well?</p>
<p>Next to that I will also highlight some extra goodies and the bundled extensions that can now be (optionally) added.</p>
<h2>
<a href="#start-with-a-one-liner" aria-hidden="true" class="anchor" id="start-with-a-one-liner"></a>Start with a one-liner</h2>
<p>The quickest custom action is the <code>js:</code> prefix. It evaluates a JavaScript expression on the element, so you can do things too small for a full action:</p>
<pre lang="javascript" style="background-color:#f8fafc;"><code><span style="font-weight:bold;color:#0369a1;">&lt;</span><span style="color:#1e293b;">button</span><span style="color:#0c4a6e;"> @</span><span style="color:#1e293b;">click</span><span style="font-weight:bold;color:#0369a1;">=</span><span style="color:#475569;">"</span><span style="color:#0369a1;">js:this.textContent=1</span><span style="color:#475569;">"</span><span style="font-weight:bold;color:#0369a1;">&gt;</span><span style="font-weight:bold;color:#d97706;">0 </span><span style="color:#475569;">(</span><span style="color:#1e293b;">I will become </span><span style="font-weight:bold;color:#d97706;">1</span><span style="color:#475569;">)</span><span style="font-weight:bold;color:#0369a1;">&lt;</span><span style="color:#475569;">/</span><span style="color:#0369a1;">button&gt;
</span></code></pre>
<p>Use it for one-liners only. It goes through the full action pipeline (so all events works as well as <code>data-debounce</code> and <code>data-delay</code>). It runs <code>new Function()</code> under the hood (which needs <code>unsafe-eval</code> in your CSP).</p>
<h2>
<a href="#a-custom-action-as-a-function" aria-hidden="true" class="anchor" id="a-custom-action-as-a-function"></a>A custom action as a function</h2>
<p>The step up from <code>js:</code> is a plain function. Register it with <code>addActions</code> on <code>activate()</code>:</p>
<pre lang="javascript" style="background-color:#f8fafc;"><code><span style="font-weight:bold;color:#dc2626;">import </span><span style="color:#1e293b;">Attractive </span><span style="font-weight:bold;color:#dc2626;">from </span><span style="color:#475569;">"</span><span style="color:#0369a1;">attractivejs</span><span style="color:#475569;">";
</span><span style="color:#0c4a6e;">
</span><span style="font-weight:bold;color:#dc2626;">const </span><span style="color:#0284c7;">sharePage </span><span style="font-weight:bold;color:#0369a1;">= </span><span style="color:#475569;">(</span><span style="color:#1e293b;">element</span><span style="color:#475569;">, { </span><span style="color:#1e293b;">dataset </span><span style="color:#475569;">}) </span><span style="font-weight:bold;color:#dc2626;">=&gt; </span><span style="color:#475569;">{
</span><span style="color:#0c4a6e;">  </span><span style="font-weight:bold;color:#dc2626;">const </span><span style="color:#1e293b;">title </span><span style="font-weight:bold;color:#0369a1;">= </span><span style="color:#1e293b;">dataset</span><span style="color:#475569;">.</span><span style="color:#0c4a6e;">shareTitle </span><span style="font-weight:bold;color:#0369a1;">|| </span><span style="color:#0c4a6e;">document</span><span style="color:#475569;">.</span><span style="color:#0c4a6e;">title</span><span style="color:#475569;">;
</span><span style="color:#0c4a6e;">  </span><span style="font-weight:bold;color:#dc2626;">const </span><span style="color:#0c4a6e;">url </span><span style="font-weight:bold;color:#0369a1;">= </span><span style="color:#1e293b;">dataset</span><span style="color:#475569;">.</span><span style="color:#0c4a6e;">shareUrl </span><span style="font-weight:bold;color:#0369a1;">|| </span><span style="color:#0c4a6e;">window</span><span style="color:#475569;">.</span><span style="color:#0c4a6e;">location</span><span style="color:#475569;">.</span><span style="color:#0c4a6e;">href</span><span style="color:#475569;">;
</span><span style="color:#0c4a6e;">
</span><span style="color:#0c4a6e;">  </span><span style="font-weight:bold;color:#dc2626;">if </span><span style="color:#475569;">(</span><span style="color:#0c4a6e;">navigator</span><span style="color:#475569;">.</span><span style="color:#0c4a6e;">share</span><span style="color:#475569;">) {
</span><span style="color:#0c4a6e;">    navigator</span><span style="color:#475569;">.</span><span style="color:#1e293b;">share</span><span style="color:#475569;">({ </span><span style="color:#1e293b;">title</span><span style="color:#475569;">, </span><span style="color:#1e293b;">url </span><span style="color:#475569;">});
</span><span style="color:#0c4a6e;">  </span><span style="color:#475569;">} </span><span style="font-weight:bold;color:#dc2626;">else </span><span style="color:#475569;">{
</span><span style="color:#0c4a6e;">    </span><span style="font-style:italic;color:#475569;">//</span><span style="font-style:italic;color:#64748b;"> write to clipboard or however you want to handle this
</span><span style="color:#0c4a6e;">  </span><span style="color:#475569;">}
</span><span style="color:#475569;">};
</span><span style="color:#0c4a6e;">
</span><span style="color:#1e293b;">Attractive</span><span style="color:#475569;">.</span><span style="color:#1e293b;">activate</span><span style="color:#475569;">({
</span><span style="color:#0c4a6e;">  addActions</span><span style="color:#475569;">: { </span><span style="color:#1e293b;">sharePage </span><span style="color:#475569;">}
</span><span style="color:#475569;">});
</span></code></pre>
<pre lang="javascript" style="background-color:#f8fafc;"><code><span style="font-weight:bold;color:#0369a1;">&lt;</span><span style="color:#1e293b;">button</span><span style="color:#0c4a6e;"> @</span><span style="color:#1e293b;">action</span><span style="font-weight:bold;color:#0369a1;">=</span><span style="color:#475569;">"</span><span style="color:#0369a1;">sharePage</span><span style="color:#475569;">" </span><span style="color:#1e293b;">data</span><span style="font-weight:bold;color:#0369a1;">-</span><span style="color:#1e293b;">share</span><span style="font-weight:bold;color:#0369a1;">-</span><span style="color:#1e293b;">title</span><span style="font-weight:bold;color:#0369a1;">=</span><span style="color:#475569;">"</span><span style="color:#0369a1;">Check this out</span><span style="color:#475569;">"</span><span style="font-weight:bold;color:#0369a1;">&gt;</span><span style="color:#1e293b;">Share</span><span style="font-weight:bold;color:#0369a1;">&lt;</span><span style="color:#475569;">/</span><span style="color:#0369a1;">button&gt;
</span></code></pre>
<p>The function receives the element and a context object with <code>value</code>, <code>target</code>, <code>targets</code>, <code>event</code> and <code>dataset</code>. In a Rails app you’d put this in <code>app/javascript/application.js</code> and you’re done. The markup stays identical to a built-in action.</p>
<h2>
<a href="#a-custom-action-as-a-class" aria-hidden="true" class="anchor" id="a-custom-action-as-a-class"></a>A custom action as a class</h2>
<p>When an action grows beyond a reasonable size, it becomes a class. Any class with a <code>run()</code> method works:</p>
<pre lang="javascript" style="background-color:#f8fafc;"><code><span style="font-weight:bold;color:#dc2626;">class </span><span style="font-weight:bold;color:#b91c1c;">Reorder </span><span style="color:#475569;">{
</span><span style="color:#0c4a6e;">  </span><span style="color:#0284c7;">run</span><span style="color:#475569;">() {
</span><span style="color:#0c4a6e;">    </span><span style="color:#1e293b;">this</span><span style="color:#475569;">.</span><span style="color:#0c4a6e;">element</span><span style="color:#475569;">;  </span><span style="font-style:italic;color:#475569;">//</span><span style="font-style:italic;color:#64748b;"> the element with @action
</span><span style="color:#0c4a6e;">    </span><span style="color:#1e293b;">this</span><span style="color:#475569;">.</span><span style="color:#0c4a6e;">options</span><span style="color:#475569;">;  </span><span style="font-style:italic;color:#475569;">//</span><span style="font-style:italic;color:#64748b;"> { value, target, targets, event, dataset, … }
</span><span style="color:#0c4a6e;">  </span><span style="color:#475569;">}
</span><span style="color:#475569;">}
</span></code></pre>
<p>Register it the same way as the function:</p>
<pre lang="javascript" style="background-color:#f8fafc;"><code><span style="color:#1e293b;">Attractive</span><span style="color:#475569;">.</span><span style="color:#1e293b;">activate</span><span style="color:#475569;">({
</span><span style="color:#0c4a6e;">  addActions</span><span style="color:#475569;">: { </span><span style="color:#0c4a6e;">reorder</span><span style="color:#475569;">: </span><span style="color:#1e293b;">Reorder </span><span style="color:#475569;">}
</span><span style="color:#475569;">});
</span></code></pre>
<p>There’s an optional <code>Action</code> base class that gives you <code>value</code>, <code>dataset</code> and a <code>dispatchEvent</code> helper:</p>
<pre lang="javascript" style="background-color:#f8fafc;"><code><span style="font-weight:bold;color:#dc2626;">import </span><span style="color:#475569;">{ </span><span style="color:#1e293b;">Action </span><span style="color:#475569;">} </span><span style="font-weight:bold;color:#dc2626;">from </span><span style="color:#475569;">"</span><span style="color:#0369a1;">attractivejs</span><span style="color:#475569;">";
</span><span style="color:#0c4a6e;">
</span><span style="font-weight:bold;color:#dc2626;">export default class </span><span style="font-weight:bold;color:#b91c1c;">Reorder </span><span style="font-weight:bold;color:#dc2626;">extends </span><span style="color:#0c4a6e;">Action </span><span style="color:#475569;">{
</span><span style="color:#0c4a6e;">  </span><span style="color:#0284c7;">run</span><span style="color:#475569;">() {
</span><span style="color:#0c4a6e;">    </span><span style="color:#1e293b;">this</span><span style="color:#475569;">.</span><span style="color:#0c4a6e;">value</span><span style="color:#475569;">;  </span><span style="font-style:italic;color:#475569;">//</span><span style="font-style:italic;color:#64748b;"> the string after # in @action="reorder#…"
</span><span style="color:#0c4a6e;">    </span><span style="color:#1e293b;">this</span><span style="color:#475569;">.</span><span style="color:#0c4a6e;">dataset</span><span style="color:#475569;">;
</span><span style="color:#0c4a6e;">
</span><span style="color:#0c4a6e;">    </span><span style="color:#1e293b;">this</span><span style="color:#475569;">.</span><span style="color:#1e293b;">dispatchEvent</span><span style="color:#475569;">("</span><span style="color:#0369a1;">reorder:done</span><span style="color:#475569;">", { </span><span style="color:#0c4a6e;">ids</span><span style="color:#475569;">: [</span><span style="font-weight:bold;color:#d97706;">1</span><span style="color:#475569;">, </span><span style="font-weight:bold;color:#d97706;">2</span><span style="color:#475569;">, </span><span style="font-weight:bold;color:#d97706;">3</span><span style="color:#475569;">] });
</span><span style="color:#0c4a6e;">  </span><span style="color:#475569;">}
</span><span style="color:#475569;">}
</span></code></pre>
<p>Notice what didn’t change: registration is the same as the function version. You started with a one-liner, then a function, then a class and the interface stayed the same the whole way. Pretty cool, right?</p>
<h2>
<a href="#organizing-actions" aria-hidden="true" class="anchor" id="organizing-actions"></a>Organizing actions</h2>
<p>When you have a handful of actions, keep each in its own file and collect them in a barrel (same as how Stimulus is organized):</p>
<pre lang="javascript" style="background-color:#f8fafc;"><code><span style="color:#1e293b;">app</span><span style="font-weight:bold;color:#0369a1;">/</span><span style="color:#1e293b;">javascript</span><span style="font-weight:bold;color:#0369a1;">/
</span><span style="color:#0c4a6e;">  </span><span style="color:#1e293b;">actions</span><span style="font-weight:bold;color:#0369a1;">/
</span><span style="color:#0c4a6e;">    </span><span style="color:#1e293b;">reorder</span><span style="color:#475569;">.</span><span style="color:#0c4a6e;">js
</span><span style="color:#0c4a6e;">    </span><span style="color:#1e293b;">syntax_highlighting</span><span style="color:#475569;">.</span><span style="color:#0c4a6e;">js
</span><span style="color:#0c4a6e;">    </span><span style="color:#1e293b;">index</span><span style="color:#475569;">.</span><span style="color:#0c4a6e;">js
</span></code></pre>
<p>Each file exports a single function or class as default. The barrel collects them:</p>
<pre lang="javascript" style="background-color:#f8fafc;"><code><span style="font-style:italic;color:#475569;">//</span><span style="font-style:italic;color:#64748b;"> app/javascript/actions/index.js
</span><span style="font-weight:bold;color:#dc2626;">import </span><span style="color:#1e293b;">syntax_highlighting </span><span style="font-weight:bold;color:#dc2626;">from </span><span style="color:#475569;">"</span><span style="color:#0369a1;">./syntax_highlighting.js</span><span style="color:#475569;">";
</span><span style="font-weight:bold;color:#dc2626;">import </span><span style="color:#1e293b;">reorder </span><span style="font-weight:bold;color:#dc2626;">from </span><span style="color:#475569;">"</span><span style="color:#0369a1;">./reorder.js</span><span style="color:#475569;">";
</span><span style="color:#0c4a6e;">
</span><span style="font-weight:bold;color:#dc2626;">export default </span><span style="color:#475569;">{ </span><span style="color:#1e293b;">syntax_highlighting</span><span style="color:#475569;">, </span><span style="color:#1e293b;">reorder </span><span style="color:#475569;">};
</span></code></pre>
<p>Then your application file imports the barrel and activates:</p>
<pre lang="javascript" style="background-color:#f8fafc;"><code><span style="font-weight:bold;color:#dc2626;">import </span><span style="color:#1e293b;">Attractive </span><span style="font-weight:bold;color:#dc2626;">from </span><span style="color:#475569;">"</span><span style="color:#0369a1;">attractivejs</span><span style="color:#475569;">";
</span><span style="font-weight:bold;color:#dc2626;">import </span><span style="color:#1e293b;">actions </span><span style="font-weight:bold;color:#dc2626;">from </span><span style="color:#475569;">"</span><span style="color:#0369a1;">./actions/index.js</span><span style="color:#475569;">";
</span><span style="color:#0c4a6e;">
</span><span style="color:#1e293b;">Attractive</span><span style="color:#475569;">.</span><span style="color:#1e293b;">activate</span><span style="color:#475569;">({ </span><span style="color:#0c4a6e;">addActions</span><span style="color:#475569;">: </span><span style="color:#1e293b;">actions </span><span style="color:#475569;">});
</span></code></pre>
<h2>
<a href="#hooks-and-error-handling" aria-hidden="true" class="anchor" id="hooks-and-error-handling"></a>Hooks and error handling</h2>
<p>Hooks let you run code around every action and handle errors in one place.</p>
<p><code>beforeAction</code> runs before each action, return <code>false</code> to cancel it. <code>afterAction</code> runs after a success. <code>onError</code> handles a thrown action:</p>
<pre lang="javascript" style="background-color:#f8fafc;"><code><span style="color:#1e293b;">attractive</span><span style="color:#475569;">.</span><span style="color:#1e293b;">onError</span><span style="color:#475569;">(({ </span><span style="color:#1e293b;">name</span><span style="color:#475569;">, </span><span style="color:#1e293b;">element</span><span style="color:#475569;">, </span><span style="color:#1e293b;">options</span><span style="color:#475569;">, </span><span style="color:#1e293b;">event</span><span style="color:#475569;">, </span><span style="color:#1e293b;">error </span><span style="color:#475569;">}) </span><span style="font-weight:bold;color:#dc2626;">=&gt; </span><span style="color:#475569;">{
</span><span style="color:#0c4a6e;">  console</span><span style="color:#475569;">.</span><span style="color:#0284c7;">warn</span><span style="color:#475569;">(`</span><span style="color:#0369a1;">Action </span><span style="color:#475569;">${</span><span style="color:#1e293b;">name</span><span style="color:#475569;">}</span><span style="color:#0369a1;"> failed:</span><span style="color:#475569;">`, </span><span style="color:#1e293b;">error</span><span style="color:#475569;">.</span><span style="color:#0c4a6e;">message</span><span style="color:#475569;">);
</span><span style="color:#475569;">});
</span></code></pre>
<p>There are no unhandled rejections, the rest of a chained action still runs. There’s a global <code>Attractive.onError</code> fallback too, handy for wiring up a monitoring service.</p>
<h2>
<a href="#the-extensions" aria-hidden="true" class="anchor" id="the-extensions"></a>The extensions</h2>
<p>Attractive ships a few optional extensions you opt into with <code>extendWith</code>.</p>
<h3>
<a href="#keyboard" aria-hidden="true" class="anchor" id="keyboard"></a>Keyboard</h3>
<p>The keyboard extension gives you <code>@keydown.enter</code>, combos like <code>@keydown.ctrl+k</code> and global <code>@hotkey</code> shortcuts:</p>
<pre lang="javascript" style="background-color:#f8fafc;"><code><span style="font-weight:bold;color:#dc2626;">import </span><span style="color:#475569;">{ </span><span style="color:#1e293b;">keyboard </span><span style="color:#475569;">} </span><span style="font-weight:bold;color:#dc2626;">from </span><span style="color:#475569;">"</span><span style="color:#0369a1;">attractivejs/keyboard</span><span style="color:#475569;">";
</span><span style="color:#0c4a6e;">
</span><span style="color:#1e293b;">Attractive</span><span style="color:#475569;">.</span><span style="color:#1e293b;">activate</span><span style="color:#475569;">({ </span><span style="color:#0c4a6e;">extendWith</span><span style="color:#475569;">: [</span><span style="color:#1e293b;">keyboard</span><span style="color:#475569;">] });
</span></code></pre>
<pre lang="javascript" style="background-color:#f8fafc;"><code><span style="font-weight:bold;color:#0369a1;">&lt;</span><span style="color:#1e293b;">input</span><span style="color:#0c4a6e;"> @</span><span style="color:#1e293b;">keydown</span><span style="color:#475569;">.</span><span style="color:#0c4a6e;">mod</span><span style="font-weight:bold;color:#0369a1;">+</span><span style="color:#1e293b;">enter</span><span style="font-weight:bold;color:#0369a1;">=</span><span style="color:#475569;">"</span><span style="color:#0369a1;">submit</span><span style="color:#475569;">"</span><span style="color:#0c4a6e;"> @</span><span style="color:#1e293b;">target</span><span style="font-weight:bold;color:#0369a1;">=</span><span style="color:#475569;">"</span><span style="color:#0369a1;">form</span><span style="color:#475569;">"</span><span style="font-weight:bold;color:#0369a1;">&gt;
</span><span style="color:#0c4a6e;">
</span><span style="font-weight:bold;color:#0369a1;">&lt;</span><span style="color:#1e293b;">a href</span><span style="font-weight:bold;color:#0369a1;">=</span><span style="color:#475569;">"</span><span style="color:#0369a1;">/</span><span style="color:#475569;">" </span><span style="color:#1e293b;">aria</span><span style="font-weight:bold;color:#0369a1;">-</span><span style="color:#1e293b;">hidden</span><span style="font-weight:bold;color:#0369a1;">=</span><span style="color:#475569;">"</span><span style="color:#0369a1;">true</span><span style="color:#475569;">"</span><span style="color:#0c4a6e;"> @</span><span style="color:#1e293b;">hotkey</span><span style="color:#475569;">.</span><span style="color:#0c4a6e;">g</span><span style="color:#475569;">.</span><span style="color:#0c4a6e;">h</span><span style="font-weight:bold;color:#0369a1;">=</span><span style="color:#475569;">"</span><span style="color:#0369a1;">/</span><span style="color:#475569;">"</span><span style="font-weight:bold;color:#0369a1;">&gt;</span><span style="color:#1e293b;">Homepage</span><span style="font-weight:bold;color:#0369a1;">&lt;</span><span style="color:#475569;">/</span><span style="color:#0369a1;">a&gt;
</span></code></pre>
<h3>
<a href="#validate" aria-hidden="true" class="anchor" id="validate"></a>Validate</h3>
<p>The validate extension brings client-side form validation using the browser’s native Constraint Validation API. Just add <code>@validate</code> to a form and style the invalid state:</p>
<pre lang="javascript" style="background-color:#f8fafc;"><code><span style="font-weight:bold;color:#dc2626;">import </span><span style="color:#475569;">{ </span><span style="color:#1e293b;">validate </span><span style="color:#475569;">} </span><span style="font-weight:bold;color:#dc2626;">from </span><span style="color:#475569;">"</span><span style="color:#0369a1;">attractivejs/validate</span><span style="color:#475569;">";
</span><span style="color:#0c4a6e;">
</span><span style="color:#1e293b;">Attractive</span><span style="color:#475569;">.</span><span style="color:#1e293b;">activate</span><span style="color:#475569;">({ </span><span style="color:#0c4a6e;">extendWith</span><span style="color:#475569;">: [</span><span style="color:#1e293b;">validate</span><span style="color:#475569;">] });
</span></code></pre>
<pre lang="css" style="background-color:#f8fafc;"><code><span style="font-weight:bold;color:#dc2626;">input</span><span style="color:#475569;">:</span><span style="color:#0c4a6e;">user-invalid </span><span style="color:#475569;">{
</span><span style="color:#0c4a6e;">  border-color</span><span style="color:#475569;">: </span><span style="color:#0c4a6e;">red</span><span style="color:#475569;">;
</span><span style="color:#475569;">}
</span></code></pre>
<h3>
<a href="#reactive" aria-hidden="true" class="anchor" id="reactive"></a>Reactive</h3>
<p>The reactive extension adds a shared JSON store with <code>@text</code> bindings and a <code>setStore</code>:</p>
<pre lang="javascript" style="background-color:#f8fafc;"><code><span style="font-weight:bold;color:#0369a1;">&lt;</span><span style="color:#1e293b;">input</span><span style="color:#0c4a6e;"> @</span><span style="color:#1e293b;">input</span><span style="font-weight:bold;color:#0369a1;">=</span><span style="color:#475569;">"</span><span style="color:#0369a1;">setStore#name</span><span style="color:#475569;">" </span><span style="font-weight:bold;color:#0369a1;">/&gt;
</span><span style="color:#0c4a6e;">
</span><span style="font-weight:bold;color:#0369a1;">&lt;</span><span style="color:#1e293b;">p</span><span style="font-weight:bold;color:#0369a1;">&gt;</span><span style="color:#1e293b;">Hello</span><span style="color:#475569;">, </span><span style="font-weight:bold;color:#0369a1;">&lt;</span><span style="color:#1e293b;">span</span><span style="color:#0c4a6e;"> @</span><span style="color:#1e293b;">text</span><span style="font-weight:bold;color:#0369a1;">=</span><span style="color:#475569;">"</span><span style="color:#0369a1;">name</span><span style="color:#475569;">"</span><span style="font-weight:bold;color:#0369a1;">&gt;&lt;</span><span style="color:#475569;">/</span><span style="color:#0369a1;">span&gt;&lt;</span><span style="color:#475569;">/</span><span style="color:#1e293b;">p</span><span style="font-weight:bold;color:#0369a1;">&gt;
</span></code></pre>
<h2>
<a href="#attractive-element" aria-hidden="true" class="anchor" id="attractive-element"></a>Attractive Element</h2>
<p>Attractive Element is the last piece I want to highlight today: a custom element base class. It scopes Attractive to a component, so actions and targets work inside it without a <code>connectedCallback</code>, a <code>querySelector</code> or manual teardown.</p>
<pre lang="javascript" style="background-color:#f8fafc;"><code><span style="font-weight:bold;color:#dc2626;">import </span><span style="color:#475569;">{ </span><span style="color:#1e293b;">AttractiveElement </span><span style="color:#475569;">} </span><span style="font-weight:bold;color:#dc2626;">from </span><span style="color:#475569;">"</span><span style="color:#0369a1;">attractivejs/element</span><span style="color:#475569;">";
</span><span style="color:#0c4a6e;">
</span><span style="font-weight:bold;color:#dc2626;">class </span><span style="font-weight:bold;color:#b91c1c;">Counter </span><span style="font-weight:bold;color:#dc2626;">extends </span><span style="color:#0c4a6e;">AttractiveElement </span><span style="color:#475569;">{
</span><span style="color:#0c4a6e;">  </span><span style="color:#0284c7;">connect</span><span style="color:#475569;">() {
</span><span style="color:#0c4a6e;">    </span><span style="color:#1e293b;">this</span><span style="color:#475569;">.</span><span style="color:#0c4a6e;">count </span><span style="font-weight:bold;color:#0369a1;">= </span><span style="font-weight:bold;color:#d97706;">0</span><span style="color:#475569;">;
</span><span style="color:#0c4a6e;">  </span><span style="color:#475569;">}
</span><span style="color:#0c4a6e;">
</span><span style="color:#0c4a6e;">  </span><span style="color:#0284c7;">increment</span><span style="color:#475569;">() {
</span><span style="color:#0c4a6e;">    </span><span style="color:#1e293b;">this</span><span style="color:#475569;">.</span><span style="color:#1e293b;">target</span><span style="color:#475569;">("</span><span style="color:#0369a1;">count</span><span style="color:#475569;">").</span><span style="color:#0c4a6e;">textContent </span><span style="font-weight:bold;color:#0369a1;">= ++</span><span style="color:#1e293b;">this</span><span style="color:#475569;">.</span><span style="color:#0c4a6e;">count</span><span style="color:#475569;">;
</span><span style="color:#0c4a6e;">  </span><span style="color:#475569;">}
</span><span style="color:#475569;">}
</span><span style="color:#0c4a6e;">
</span><span style="color:#1e293b;">customElements</span><span style="color:#475569;">.</span><span style="color:#1e293b;">define</span><span style="color:#475569;">("</span><span style="color:#0369a1;">ui-counter</span><span style="color:#475569;">", </span><span style="color:#1e293b;">Counter</span><span style="color:#475569;">);
</span></code></pre>
<pre lang="javascript" style="background-color:#f8fafc;"><code><span style="font-weight:bold;color:#0369a1;">&lt;</span><span style="color:#1e293b;">ui</span><span style="font-weight:bold;color:#0369a1;">-</span><span style="color:#1e293b;">counter</span><span style="font-weight:bold;color:#0369a1;">&gt;
</span><span style="color:#0c4a6e;">  </span><span style="font-weight:bold;color:#0369a1;">&lt;</span><span style="color:#1e293b;">button</span><span style="color:#0c4a6e;"> @</span><span style="color:#1e293b;">click</span><span style="font-weight:bold;color:#0369a1;">=</span><span style="color:#475569;">"</span><span style="color:#0369a1;">increment</span><span style="color:#475569;">"</span><span style="font-weight:bold;color:#0369a1;">&gt;+&lt;</span><span style="color:#475569;">/</span><span style="color:#0369a1;">button&gt;
</span><span style="color:#0369a1;">
</span><span style="color:#0369a1;">  &lt;output id="count"&gt;0&lt;</span><span style="color:#475569;">/</span><span style="color:#1e293b;">output</span><span style="font-weight:bold;color:#0369a1;">&gt;
</span><span style="font-weight:bold;color:#0369a1;">&lt;</span><span style="color:#475569;">/</span><span style="color:#0369a1;">ui-counter&gt;
</span></code></pre>
<p><code>connect()</code> and <code>disconnect()</code> replace the lifecycle callbacks. Methods in the HTML become actions. <code>this.target("id")</code> and <code>this.targets(".selector")</code> query within the component, so each component resolves its own targets even when the same id appears twice. It works alongside a document-wide activation without actions firing twice.</p>
<hr>
<p>One interface for everything, from a one-liner to a function to a class to a custom element. That’s why I am so excited about Attractive: it works neatly alongside your bigger frameworks but can also stand on its own feet.</p>
<p>Everything you need is in the <a href="https://attractivejs.railsdesigner.com/docs/custom-actions/">docs</a> and the <a href="https://github.com/rails-designer/attractivejs">repo</a> is always open for a star and improvement and bugfixes. ☺️</p>
<p>Next week, it comes all together: all of this inside a real Rails app (optimistic UI included 🤫).</p>
]]></content>


  </entry>
  
  <entry>
    <id>https://railsdesigner.com/announcing-attractive-1-0/?ref=rss</id>
    <title>Attractive.js 1.0.0: interactive HTML without one line of JavaScript</title>
    <link href="https://railsdesigner.com/announcing-attractive-1-0/?ref=rss" rel="alternate" type="text/html"/>
    <published>2026-09-10T09:08:09Z</published>
    <updated>2026-09-10T09:08:10Z</updated>

    
      <author>
        <name>Rails Designer</name>
        <email>support@railsdesigner.com</email>
      </author>


      <content type="html" xml:base="https://railsdesigner.com/announcing-attractive-1-0/?ref=rss"><![CDATA[<p>I wrote a JavaScript library. Again (or rather I rewrote the JavaScript library I wrote <a href="https://railsdesigner.com/announcing-attractive-js/">some time ago</a>).</p>
<p>I had the idea for Attractive for quite some time, based on the following thought: why do I reach for a framework to toggle a class, add an attribute or copy a bit of text?</p>
<p>So I made Attractive.js: a humble set of declarative HTML actions. You put the behavior on the element itself. No virtual DOM, no state management, no component lifecycle to learn or more of things like that. Reading the markup tells you what the page does. In that regard it is much like Stimulus, but with less ceremony/setup (and Attractive gives you actions out of the gate).</p>
<p>This is an overview of what 1.0.0 looks like (currently available as pre-release).</p>
<p>In a nutshell:</p>
<ul>
<li>complete new syntax</li>
<li>extensibility (create your own custom actions)</li>
<li>addons like keyboard, reactive, validate and attract (to make Attractive.js a worthy competitor for Hotwire!)</li>
<li>A base class to write custom elements, named Attractive Element</li>
</ul>
<p>This week I cover the basics of Attractive.js, next week I go over how to write custom actions and the week following it all comes together in a real Rails app where I show how it can replace Hotwire. But first…</p>
<h2>
<a href="#whats-new-in-100" aria-hidden="true" class="anchor" id="whats-new-in-100"></a>What’s new in 1.0.0</h2>
<p>The biggest change is the syntax. Actions used to live in <code>data-action</code> and <code>data-target</code>. Now they’re just <code>@action</code> and <code>@target</code>.</p>
<pre lang="javascript" style="background-color:#f8fafc;"><code><span style="font-weight:bold;color:#0369a1;">&lt;</span><span style="color:#1e293b;">button</span><span style="color:#0c4a6e;"> @</span><span style="color:#1e293b;">action</span><span style="font-weight:bold;color:#0369a1;">=</span><span style="color:#475569;">"</span><span style="color:#0369a1;">toggleClass#active</span><span style="color:#475569;">"</span><span style="color:#0c4a6e;"> @</span><span style="color:#1e293b;">target</span><span style="font-weight:bold;color:#0369a1;">=</span><span style="color:#475569;">"</span><span style="color:#0369a1;">panel</span><span style="color:#475569;">"</span><span style="font-weight:bold;color:#0369a1;">&gt;</span><span style="color:#1e293b;">Toggle</span><span style="font-weight:bold;color:#0369a1;">&lt;</span><span style="color:#475569;">/</span><span style="color:#0369a1;">button&gt;
</span><span style="color:#0369a1;">
</span><span style="color:#0369a1;">&lt;div id="panel"&gt;Content&lt;</span><span style="color:#475569;">/</span><span style="color:#1e293b;">div</span><span style="font-weight:bold;color:#0369a1;">&gt;
</span></code></pre>
<p>That’s the whole interaction: an attribute that says <em>what</em> happens and one that says <em>where</em>.</p>
<p>For existing users, it is just a rename:</p>
<pre lang="javascript" style="background-color:#f8fafc;"><code><span style="font-weight:bold;color:#0369a1;">-&lt;</span><span style="color:#1e293b;">button data</span><span style="font-weight:bold;color:#0369a1;">-</span><span style="color:#1e293b;">action</span><span style="font-weight:bold;color:#0369a1;">=</span><span style="color:#475569;">"</span><span style="color:#0369a1;">mouseenter-&gt;addClass#hovered</span><span style="color:#475569;">"</span><span style="font-weight:bold;color:#0369a1;">&gt;
</span><span style="font-weight:bold;color:#0369a1;">+&lt;</span><span style="color:#1e293b;">button</span><span style="color:#0c4a6e;"> @</span><span style="color:#1e293b;">mouseenter</span><span style="font-weight:bold;color:#0369a1;">=</span><span style="color:#475569;">"</span><span style="color:#0369a1;">addClass#hovered</span><span style="color:#475569;">"</span><span style="font-weight:bold;color:#0369a1;">&gt;
</span></code></pre>
<p>The event-type attributes read like sentences, they’re easier to find in a grep and the old <code>-&gt;</code> bulky syntax is gone. The <code>@</code> shorthand means the same as <code>@action</code>. And simple setups now work from a single script tag with the <code>activate</code> attribute, no manual <code>Attractive.activate()</code> call:</p>
<pre lang="javascript" style="background-color:#f8fafc;"><code><span style="font-weight:bold;color:#0369a1;">&lt;</span><span style="color:#1e293b;">script src</span><span style="font-weight:bold;color:#0369a1;">=</span><span style="color:#475569;">"</span><span style="color:#0369a1;">//unpkg.com/attractivejs</span><span style="color:#475569;">" </span><span style="color:#1e293b;">type</span><span style="font-weight:bold;color:#0369a1;">=</span><span style="color:#475569;">"</span><span style="color:#0369a1;">module</span><span style="color:#475569;">" </span><span style="color:#1e293b;">activate</span><span style="font-weight:bold;color:#0369a1;">&gt;&lt;</span><span style="color:#475569;">/</span><span style="color:#0369a1;">script&gt;
</span></code></pre>
<h2>
<a href="#the-actions" aria-hidden="true" class="anchor" id="the-actions"></a>The actions</h2>
<p>Everyday interactions are covered out of the box. Class and attribute actions (<code>toggleClass</code>, <code>addClass</code>, <code>removeClass</code>, <code>cycleClass</code>, the same for attributes and data attributes), style actions, copy to clipboard, confirm, dialogs, focus, form submit and reset, scroll to and more.</p>
<p>There’s also a <code>js:</code> prefix for the occasional one-liner:</p>
<pre lang="javascript" style="background-color:#f8fafc;"><code><span style="font-weight:bold;color:#0369a1;">&lt;</span><span style="color:#1e293b;">button</span><span style="color:#0c4a6e;"> @</span><span style="color:#1e293b;">action</span><span style="font-weight:bold;color:#0369a1;">=</span><span style="color:#475569;">"</span><span style="color:#0369a1;">js:this.textContent=1</span><span style="color:#475569;">"</span><span style="font-weight:bold;color:#0369a1;">&gt;</span><span style="font-weight:bold;color:#d97706;">0</span><span style="font-weight:bold;color:#0369a1;">&lt;</span><span style="color:#475569;">/</span><span style="color:#0369a1;">button&gt;
</span></code></pre>
<p>Handy when a custom action is a bit too much. For anything bigger, you can write your own action (which is next week’s post).</p>
<h2>
<a href="#triggers-and-gates" aria-hidden="true" class="anchor" id="triggers-and-gates"></a>Triggers and gates</h2>
<p>Beyond actions, you can control <em>when</em> they run with triggers and gates, appended to the value with a colon.</p>
<p>Triggers run an action without user input. <code>:mounted</code> runs immediately when the element appears. <code>:whenVisible</code> fires when it scrolls into view:</p>
<pre lang="javascript" style="background-color:#f8fafc;"><code><span style="font-weight:bold;color:#0369a1;">&lt;</span><span style="color:#1e293b;">img
</span><span style="color:#0c4a6e;">  @</span><span style="color:#1e293b;">action</span><span style="font-weight:bold;color:#0369a1;">=</span><span style="color:#475569;">"</span><span style="color:#0369a1;">addClass#loaded:whenVisible</span><span style="color:#475569;">"
</span><span style="color:#0c4a6e;">  </span><span style="color:#1e293b;">data</span><span style="font-weight:bold;color:#0369a1;">-</span><span style="color:#1e293b;">src</span><span style="font-weight:bold;color:#0369a1;">=</span><span style="color:#475569;">"</span><span style="color:#0369a1;">/image.jpg</span><span style="color:#475569;">"
</span><span style="color:#0c4a6e;">  </span><span style="color:#1e293b;">loading</span><span style="font-weight:bold;color:#0369a1;">=</span><span style="color:#475569;">"</span><span style="color:#0369a1;">lazy</span><span style="color:#475569;">"
</span><span style="font-weight:bold;color:#0369a1;">/&gt;
</span></code></pre>
<p>Gates guard an action. <code>:once</code> runs it a single time. <code>:preventDefault</code> calls <code>event.preventDefault()</code>. <code>:whenOutside</code> only fires when the click target is outside the element, which is how the dropdown example from below closes itself:</p>
<pre lang="javascript" style="background-color:#f8fafc;"><code><span style="font-weight:bold;color:#0369a1;">&lt;</span><span style="color:#1e293b;">button</span><span style="color:#0c4a6e;"> @</span><span style="color:#1e293b;">action</span><span style="font-weight:bold;color:#0369a1;">=</span><span style="color:#475569;">"</span><span style="color:#0369a1;">toggleClass#open:once</span><span style="color:#475569;">"</span><span style="font-weight:bold;color:#0369a1;">&gt;</span><span style="color:#1e293b;">Click once</span><span style="font-weight:bold;color:#0369a1;">&lt;</span><span style="color:#475569;">/</span><span style="color:#0369a1;">button&gt;
</span><span style="color:#0369a1;">
</span><span style="color:#0369a1;">&lt;div @action="removeClass#open:whenOutside" @target="menu"&gt;…&lt;</span><span style="color:#475569;">/</span><span style="color:#1e293b;">div</span><span style="font-weight:bold;color:#0369a1;">&gt;
</span></code></pre>
<p>You can register your own triggers and gates too, with <code>addTriggers</code> and <code>addGates</code>.</p>
<h2>
<a href="#what-you-can-build-with-zero-javascript" aria-hidden="true" class="anchor" id="what-you-can-build-with-zero-javascript"></a>What you can build with zero JavaScript</h2>
<p>To show what this means in practice, here are a few components you can write without a line of your own JavaScript.</p>
<p>A copy button is one attribute pointing at the target to copy an API key , code example and so on:</p>
<pre lang="javascript" style="background-color:#f8fafc;"><code><span style="font-weight:bold;color:#0369a1;">&lt;</span><span style="color:#1e293b;">button</span><span style="color:#0c4a6e;"> @</span><span style="color:#1e293b;">action</span><span style="font-weight:bold;color:#0369a1;">=</span><span style="color:#475569;">"</span><span style="color:#0369a1;">copy</span><span style="color:#475569;">"</span><span style="color:#0c4a6e;"> @</span><span style="color:#1e293b;">target</span><span style="font-weight:bold;color:#0369a1;">=</span><span style="color:#475569;">"</span><span style="color:#0369a1;">card-example</span><span style="color:#475569;">"</span><span style="font-weight:bold;color:#0369a1;">&gt;</span><span style="color:#1e293b;">Copy</span><span style="font-weight:bold;color:#0369a1;">&lt;</span><span style="color:#475569;">/</span><span style="color:#0369a1;">button&gt;
</span><span style="color:#0369a1;">
</span><span style="color:#0369a1;">&lt;code id="card-example"&gt;…&lt;</span><span style="color:#475569;">/</span><span style="color:#1e293b;">code</span><span style="font-weight:bold;color:#0369a1;">&gt;
</span></code></pre>
<p>A dialog (with a newsletter sign up) opens at a certain point within your article:</p>
<pre lang="javascript" style="background-color:#f8fafc;"><code><span style="font-weight:bold;color:#0369a1;">&lt;</span><span style="color:#1e293b;">div</span><span style="color:#0c4a6e;"> @</span><span style="color:#1e293b;">action</span><span style="font-weight:bold;color:#0369a1;">=</span><span style="color:#475569;">"</span><span style="color:#0369a1;">openModal:whenInView</span><span style="color:#475569;">"</span><span style="color:#0c4a6e;"> @</span><span style="color:#1e293b;">target</span><span style="font-weight:bold;color:#0369a1;">=</span><span style="color:#475569;">"</span><span style="color:#0369a1;">newsletter</span><span style="color:#475569;">"</span><span style="font-weight:bold;color:#0369a1;">&gt;&lt;</span><span style="color:#475569;">/</span><span style="color:#0369a1;">div&gt;
</span><span style="color:#0369a1;">
</span><span style="color:#0369a1;">&lt;dialog id="newletter"&gt;…&lt;</span><span style="color:#475569;">/</span><span style="color:#1e293b;">dialog</span><span style="font-weight:bold;color:#0369a1;">&gt;
</span></code></pre>
<p>Auto-save form data with a debounce:</p>
<pre lang="javascript" style="background-color:#f8fafc;"><code><span style="font-weight:bold;color:#0369a1;">&lt;</span><span style="color:#1e293b;">form action</span><span style="font-weight:bold;color:#0369a1;">=</span><span style="color:#475569;">"</span><span style="color:#0369a1;">POST</span><span style="color:#475569;">" </span><span style="color:#1e293b;">id</span><span style="font-weight:bold;color:#0369a1;">=</span><span style="color:#475569;">"</span><span style="color:#0369a1;">post</span><span style="color:#475569;">"</span><span style="font-weight:bold;color:#0369a1;">&gt;
</span><span style="color:#0c4a6e;">  </span><span style="font-weight:bold;color:#0369a1;">&lt;</span><span style="color:#1e293b;">textarea name</span><span style="font-weight:bold;color:#0369a1;">=</span><span style="color:#475569;">"</span><span style="color:#0369a1;">body</span><span style="color:#475569;">"</span><span style="color:#0c4a6e;"> @</span><span style="color:#1e293b;">action</span><span style="font-weight:bold;color:#0369a1;">=</span><span style="color:#475569;">"</span><span style="color:#0369a1;">submit</span><span style="color:#475569;">"</span><span style="color:#0c4a6e;"> @</span><span style="color:#1e293b;">target</span><span style="font-weight:bold;color:#0369a1;">=</span><span style="color:#475569;">"</span><span style="color:#0369a1;">post</span><span style="color:#475569;">" </span><span style="color:#1e293b;">data</span><span style="font-weight:bold;color:#0369a1;">-</span><span style="color:#1e293b;">debounce</span><span style="font-weight:bold;color:#0369a1;">=</span><span style="color:#475569;">"</span><span style="color:#0369a1;">400</span><span style="color:#475569;">"</span><span style="font-weight:bold;color:#0369a1;">&gt;&lt;</span><span style="color:#475569;">/</span><span style="color:#0369a1;">textarea&gt;
</span><span style="color:#0369a1;">&lt;</span><span style="color:#475569;">/</span><span style="color:#1e293b;">form</span><span style="font-weight:bold;color:#0369a1;">&gt;
</span></code></pre>
<p>Tabs and accordions are <code>toggleAttribute</code> against the right target. Toasts remove themselves with a <code>:mounted</code> trigger and a <code>data-delay=8000</code>. Even a carousel is just <code>cycleClass</code> on a custom property.</p>
<p>The default event per element type means a button just works with <code>@action</code> alone.</p>
<p>You can see all <a href="https://attractivejs.railsdesigner.com/docs/actions/">actions in action in the docs</a>.</p>
<h2>
<a href="#how-small-is-it" aria-hidden="true" class="anchor" id="how-small-is-it"></a>How small is it?</h2>
<p>The full build is <strong>about <span data-escaped-char>~</span>7 KB gzipped</strong> (no external dependencies). If you’re feeling fancy, the core engine is <strong>less than 5 KB</strong> and you can import only the actions you use. That only applies to a bundler setup, though. With importmap, you pin one minified file and you’re done. Either way, it’s a fraction of what you’d drag in for a framework.</p>
<h2>
<a href="#where-id-use-this" aria-hidden="true" class="anchor" id="where-id-use-this"></a>Where I’d use this</h2>
<p>Attractive.js works great on static sites for those small bits of interactivity, but above examples also show how it works great for server-rendered apps or to replace those bulky <code>toggle_class_controller.js</code> 😅</p>
<p>The core has been solid for a while. Try it with the script tag from the <a href="https://attractivejs.railsdesigner.com/docs/quickstart/">quickstart</a> and if you want to make me happy (besides giving Attractive a try), <a href="https://github.com/rails-designer/attractivejs">star the repo</a>. 🌟</p>
<p>Next week: writing your own actions. After that: putting all of it to work in a Rails app.</p>
]]></content>


  </entry>
  
  <entry>
    <id>https://railsdesigner.com/storage-agnostic-configuration/?ref=rss</id>
    <title>Re-Organized configuration in Rails</title>
    <link href="https://railsdesigner.com/storage-agnostic-configuration/?ref=rss" rel="alternate" type="text/html"/>
    <published>2026-09-03T07:30:00Z</published>
    <updated>2026-09-03T07:30:00Z</updated>

    
      <author>
        <name>Rails Designer</name>
        <email>support@railsdesigner.com</email>
      </author>


      <content type="html" xml:base="https://railsdesigner.com/storage-agnostic-configuration/?ref=rss"><![CDATA[<p>A while back I wrote about <a href="/saas/articles/configuration/">organizing configuration in Rails</a>. The idea was simple: drop YAML files into <code>config/configurations/</code> and get namespaced constants like <code>Config::Bot.api_key</code> instead of the clunky <code>Rails.application.config.bot.api_key</code>.</p>
<p>It worked well. But every YAML file needed manual wiring: <code>&lt;%= ENV.fetch("BOT_API_KEY", Rails.application.credentials.dig(:bot, :api_key)) %&gt;</code>. For every key. Across every file. Ugh!</p>
<p>So I rebuilt it. Same clean <code>Config::Namespace.key</code> API, but now it chains through all three sources automatically.</p>
<p><strong>Before</strong> (old module’s YAML):</p>
<pre lang="yaml" style="background-color:#f8fafc;"><code><span style="font-style:italic;color:#475569;">#</span><span style="font-style:italic;color:#64748b;"> config/bot.yml
</span><span style="font-weight:bold;color:#dc2626;">shared</span><span style="color:#475569;">:
</span><span style="color:#0c4a6e;">  </span><span style="font-weight:bold;color:#dc2626;">api_key</span><span style="color:#475569;">: </span><span style="color:#0369a1;">&lt;%= ENV.fetch("BOT_API_KEY", Rails.application.credentials.dig(:bot, :api_key)) %&gt;
</span><span style="color:#0c4a6e;">  </span><span style="font-weight:bold;color:#dc2626;">user_agent</span><span style="color:#475569;">: "</span><span style="color:#0369a1;">MyAwesomeBot/1.0</span><span style="color:#475569;">"
</span><span style="color:#0c4a6e;">  </span><span style="font-weight:bold;color:#dc2626;">timeout</span><span style="color:#475569;">: </span><span style="font-weight:bold;color:#d97706;">10
</span></code></pre>
<p><strong>After</strong> (new module’s YAML):</p>
<pre lang="yaml" style="background-color:#f8fafc;"><code><span style="font-style:italic;color:#475569;">#</span><span style="font-style:italic;color:#64748b;"> config/bot.yml
</span><span style="font-weight:bold;color:#dc2626;">shared</span><span style="color:#475569;">:
</span><span style="color:#0c4a6e;">  </span><span style="font-style:italic;color:#475569;">#</span><span style="font-style:italic;color:#64748b;"> Config::Bot.api_key is still available and will check environment variables and then check credentials
</span><span style="color:#0c4a6e;">  </span><span style="font-weight:bold;color:#dc2626;">user_agent</span><span style="color:#475569;">: "</span><span style="color:#0369a1;">MyAwesomeBot/1.0</span><span style="color:#475569;">"
</span><span style="color:#0c4a6e;">  </span><span style="font-weight:bold;color:#dc2626;">timeout</span><span style="color:#475569;">: </span><span style="font-weight:bold;color:#d97706;">10
</span></code></pre>
<p>One API. Three sources. No more guessing where a value lives.</p>
<p>You can find <a href="https://github.com/rails-designer-repos/configuration">the full code on GitHub</a>. What follows are the parts I find most interesting.</p>
<h3>
<a href="#lazy-namespaces-with-const_missing" aria-hidden="true" class="anchor" id="lazy-namespaces-with-const_missing"></a>Lazy namespaces with const<span data-escaped-char>_</span>missing</h3>
<p>The old version scanned a directory at boot and called <code>const_set</code> for every YAML file. That works, but it means every namespace is loaded whether you use it or not.</p>
<p>This version uses <code>const_missing</code> instead. Reference <code>Config::Bot</code> for the first time and a <code>Namespace</code> object is created lazily:</p>
<pre lang="ruby" style="background-color:#f8fafc;"><code><span style="font-weight:bold;color:#dc2626;">def </span><span style="color:#1e293b;">self</span><span style="color:#475569;">.</span><span style="color:#0284c7;">const_missing</span><span style="color:#475569;">(</span><span style="color:#1e293b;">name</span><span style="color:#475569;">)
</span><span style="color:#0c4a6e;">  MUTEX</span><span style="color:#475569;">.</span><span style="color:#0c4a6e;">synchronize </span><span style="font-weight:bold;color:#dc2626;">do
</span><span style="color:#0c4a6e;">    </span><span style="color:#475569;">@</span><span style="color:#1e293b;">namespaces </span><span style="font-weight:bold;color:#0369a1;">||= </span><span style="color:#475569;">{}
</span><span style="color:#0c4a6e;">    </span><span style="color:#475569;">@</span><span style="color:#1e293b;">namespaces</span><span style="color:#475569;">[</span><span style="color:#0284c7;">name</span><span style="color:#475569;">] </span><span style="font-weight:bold;color:#0369a1;">||= </span><span style="color:#0c4a6e;">Namespace</span><span style="color:#475569;">.</span><span style="font-weight:bold;color:#dc2626;">new</span><span style="color:#475569;">(</span><span style="color:#0284c7;">name</span><span style="color:#475569;">)
</span><span style="color:#0c4a6e;">  </span><span style="font-weight:bold;color:#dc2626;">end
</span><span style="font-weight:bold;color:#dc2626;">end
</span></code></pre>
<p>The <code>Mutex</code> isn’t there by accident. In threaded environments (Puma, Solid Queue), two threads could hit <code>const_missing</code> simultaneously. Mutex makes sure only one namespace object gets created.</p>
<h3>
<a href="#the-three-source-chain" aria-hidden="true" class="anchor" id="the-three-source-chain"></a>The three source chain</h3>
<p>Each <code>Namespace</code> uses <code>method_missing</code> to resolve a key:</p>
<pre lang="ruby" style="background-color:#f8fafc;"><code><span style="font-weight:bold;color:#dc2626;">def </span><span style="color:#0284c7;">method_missing</span><span style="color:#475569;">(</span><span style="color:#1e293b;">method</span><span style="color:#475569;">,</span><span style="color:#0c4a6e;"> ...</span><span style="color:#475569;">)
</span><span style="color:#0c4a6e;">  key </span><span style="font-weight:bold;color:#0369a1;">= </span><span style="color:#0284c7;">method</span><span style="color:#475569;">.</span><span style="color:#0284c7;">to_s</span><span style="color:#475569;">.</span><span style="color:#0c4a6e;">delete_suffix</span><span style="color:#475569;">("</span><span style="color:#0369a1;">!</span><span style="color:#475569;">")
</span><span style="color:#0c4a6e;">  bang </span><span style="font-weight:bold;color:#0369a1;">= </span><span style="color:#0284c7;">method</span><span style="color:#475569;">.</span><span style="color:#0284c7;">to_s</span><span style="color:#475569;">.</span><span style="color:#0c4a6e;">end_with?</span><span style="color:#475569;">("</span><span style="color:#0369a1;">!</span><span style="color:#475569;">")
</span><span style="color:#0c4a6e;">
</span><span style="color:#0c4a6e;">  environment_key </span><span style="font-weight:bold;color:#0369a1;">= </span><span style="color:#475569;">"#{@</span><span style="color:#1e293b;">prefix</span><span style="color:#475569;">}</span><span style="color:#0369a1;">_</span><span style="color:#475569;">#{</span><span style="color:#0369a1;">key</span><span style="color:#475569;">.</span><span style="color:#0369a1;">upcase</span><span style="color:#475569;">}"
</span><span style="color:#0c4a6e;">  </span><span style="font-weight:bold;color:#dc2626;">return </span><span style="color:#475569;">@</span><span style="color:#1e293b;">environment_cache</span><span style="color:#475569;">[</span><span style="color:#0c4a6e;">environment_key</span><span style="color:#475569;">] </span><span style="font-weight:bold;color:#dc2626;">if </span><span style="color:#475569;">@</span><span style="color:#1e293b;">environment_cache</span><span style="color:#475569;">.</span><span style="color:#0c4a6e;">key?</span><span style="color:#475569;">(</span><span style="color:#0c4a6e;">environment_key</span><span style="color:#475569;">)
</span><span style="color:#0c4a6e;">
</span><span style="color:#0c4a6e;">  value </span><span style="font-weight:bold;color:#0369a1;">= </span><span style="color:#0c4a6e;">Rails</span><span style="color:#475569;">.</span><span style="color:#0c4a6e;">application</span><span style="color:#475569;">.</span><span style="color:#0c4a6e;">credentials</span><span style="color:#475569;">.</span><span style="color:#0c4a6e;">dig</span><span style="color:#475569;">(@</span><span style="color:#1e293b;">credentials_key</span><span style="color:#475569;">.</span><span style="color:#0284c7;">to_sym</span><span style="color:#475569;">,</span><span style="color:#0c4a6e;"> key</span><span style="color:#475569;">.</span><span style="color:#0284c7;">to_sym</span><span style="color:#475569;">)
</span><span style="color:#0c4a6e;">  </span><span style="font-weight:bold;color:#dc2626;">return</span><span style="color:#0c4a6e;"> value </span><span style="font-weight:bold;color:#dc2626;">unless</span><span style="color:#0c4a6e;"> value</span><span style="color:#475569;">.</span><span style="color:#0284c7;">nil?
</span><span style="color:#0c4a6e;">
</span><span style="color:#0c4a6e;">  value </span><span style="font-weight:bold;color:#0369a1;">=</span><span style="color:#0c4a6e;"> from_yaml</span><span style="color:#475569;">(</span><span style="color:#0c4a6e;">key</span><span style="color:#475569;">)
</span><span style="color:#0c4a6e;">  </span><span style="font-weight:bold;color:#dc2626;">return</span><span style="color:#0c4a6e;"> value </span><span style="font-weight:bold;color:#dc2626;">unless</span><span style="color:#0c4a6e;"> value</span><span style="color:#475569;">.</span><span style="color:#0284c7;">nil?
</span><span style="color:#0c4a6e;">
</span><span style="color:#0c4a6e;">  </span><span style="font-weight:bold;color:#dc2626;">raise</span><span style="color:#475569;">(</span><span style="color:#1e293b;">NotFoundError</span><span style="color:#475569;">, "</span><span style="color:#0369a1;">Config::</span><span style="color:#475569;">#{@</span><span style="color:#1e293b;">name</span><span style="color:#475569;">}</span><span style="color:#0369a1;">.</span><span style="color:#475569;">#{</span><span style="color:#0369a1;">key</span><span style="color:#475569;">}</span><span style="color:#0369a1;"> not found</span><span style="color:#475569;">") </span><span style="font-weight:bold;color:#dc2626;">if</span><span style="color:#0c4a6e;"> bang
</span><span style="color:#0c4a6e;">
</span><span style="color:#0c4a6e;">  </span><span style="font-weight:bold;color:#075985;">nil
</span><span style="font-weight:bold;color:#dc2626;">end
</span></code></pre>
<p>ENV is checked first. It caches a snapshot at boot via <code>ENV.to_h</code>, so there’s no hash lookup penalty on every access. Then credentials. Then the YAML file via <code>Rails.application.config_for</code>. Bang methods raise instead of returning nil.</p>
<p>The convention for ENV keys follows the namespace: <code>Config::Bot.timeout</code> checks <code>ENV["BOT_TIMEOUT"]</code>. <code>Config::Stripe.api_key</code> checks <code>ENV["STRIPE_API_KEY"]</code>. Predictable and consistent (change to your likings though).</p>
<h3>
<a href="#bang-methods-and-discovery" aria-hidden="true" class="anchor" id="bang-methods-and-discovery"></a>Bang methods and discovery</h3>
<p>I added two small quality of life features. <code>Config::Bot.api_key!</code> raises if nothing is found (useful in initializers where a missing secret should fail fast). And <code>Config::Bot.keys</code> lists everything available for that namespace, merging credential keys and YAML keys:</p>
<pre lang="ruby" style="background-color:#f8fafc;"><code><span style="font-weight:bold;color:#dc2626;">def </span><span style="color:#0284c7;">keys
</span><span style="color:#0c4a6e;">  credential_keys </span><span style="font-weight:bold;color:#0369a1;">= </span><span style="color:#0c4a6e;">Rails</span><span style="color:#475569;">.</span><span style="color:#0c4a6e;">application</span><span style="color:#475569;">.</span><span style="color:#0c4a6e;">credentials</span><span style="color:#475569;">.</span><span style="color:#0c4a6e;">dig</span><span style="color:#475569;">(@</span><span style="color:#1e293b;">credentials_key</span><span style="color:#475569;">.</span><span style="color:#0284c7;">to_sym</span><span style="color:#475569;">)
</span><span style="color:#0c4a6e;">
</span><span style="color:#0c4a6e;">  </span><span style="color:#475569;">[</span><span style="color:#0c4a6e;">credential_keys</span><span style="color:#475569;">,</span><span style="color:#0c4a6e;"> yaml_config</span><span style="color:#475569;">].</span><span style="color:#0c4a6e;">compact</span><span style="color:#475569;">.</span><span style="color:#0c4a6e;">flat_map </span><span style="color:#475569;">{</span><span style="color:#0c4a6e;"> it</span><span style="color:#475569;">.</span><span style="color:#0c4a6e;">keys </span><span style="color:#475569;">}.</span><span style="color:#0c4a6e;">uniq
</span><span style="font-weight:bold;color:#dc2626;">end
</span></code></pre>
<p>There’s also a <code>reload</code> method that clears the ENV cache and YAML cache (for when you’re changing values in the console during development).</p>
<h3>
<a href="#what-about-rails-82s-creds" aria-hidden="true" class="anchor" id="what-about-rails-82s-creds"></a>What about Rails 8.2’s creds?</h3>
<p>Rails 8.2 (currently on <code>main</code>) is <a href="https://github.com/rails/rails/pull/56404">introducing <code>Rails.app.creds</code></a>, which provides <code>Rails.app.creds.require(:stripe, :api_key)</code> and <code>Rails.app.creds.option(:stripe, :api_key)</code>. It checks ENV first, then encrypted credentials. Same layered idea, same bang and regular pattern.</p>
<p>The difference is scope. <code>Rails.app.creds</code> focuses on secrets (things that belong in encrypted credentials or ENV). My Config module adds YAML as a third tier, which is where I keep public configuration like URLs, timeouts, API versions and feature flags.</p>
<p>Both solve the same fundamental problem: stop guessing where a value lives and let a unified lookup handle it. <code>Rails.app.creds</code> is the Rails core answer (less setup, more opinionated). My Config module is the DIY answer (flexible, more tiers, yours to tweak).</p>
<hr>
<p>I’ve been using this version of the Config module in production for some time now. The bang methods alone have caught two misconfigured deployments before they reached customers (the app refuses to boot if a required key is missing). The triple lookup means I can move a value from YAML to credentials to ENV without touching application code. Each tier handles what it’s best at.</p>
<p>The code is <a href="https://github.com/rails-designer-repos/configuration">on GitHub</a> if you want to drop it into your own app or adapt it.</p>
]]></content>


  </entry>
  
  <entry>
    <id>https://railsdesigner.com/svg-sprites/?ref=rss</id>
    <title>SVG sprites: improve performance (and keep configurability)</title>
    <link href="https://railsdesigner.com/svg-sprites/?ref=rss" rel="alternate" type="text/html"/>
    <published>2026-08-27T07:30:00Z</published>
    <updated>2026-08-27T07:30:00Z</updated>

    
      <author>
        <name>Rails Designer</name>
        <email>support@railsdesigner.com</email>
      </author>


      <content type="html" xml:base="https://railsdesigner.com/svg-sprites/?ref=rss"><![CDATA[<p>A table with 200 rows and 5 action icons per row. That’s 1,000 inline SVGs dropped into your HTML. When does that start to impact your performance?</p>
<p>By default, <a href="https://github.com/Rails-Designer/rails_icons/">Rails Icons</a> renders each icon as a full <code>&lt;svg&gt;</code> element. Fine for a handful of icons. But at scale, it adds up.</p>
<p>I built a simple benchmark to measure exactly how much (feel free to fork and improve ❤️). Two pages, identical layout, 1,000 icons each. One uses inline SVGs you use and love. The other uses an SVG sprite you will surely start to love after reading this. 😬</p>
<p><a href="https://github.com/rails-designer-repos/sprite-icons">The benchmark is on GitHub.</a></p>
<h2>
<a href="#how-svg-sprites-work" aria-hidden="true" class="anchor" id="how-svg-sprites-work"></a>How SVG sprites work</h2>
<p>A SVG sprite is a single file (but can also be embedded) with multiple icon definitions wrapped in <code>&lt;symbol&gt;</code> tags:</p>
<pre lang="javascript" style="background-color:#f8fafc;"><code><span style="font-weight:bold;color:#0369a1;">&lt;</span><span style="color:#1e293b;">svg xmlns</span><span style="font-weight:bold;color:#0369a1;">=</span><span style="color:#475569;">"</span><span style="color:#0369a1;">http://www.w3.org/2000/svg</span><span style="color:#475569;">"</span><span style="font-weight:bold;color:#0369a1;">&gt;
</span><span style="color:#0c4a6e;">  </span><span style="font-weight:bold;color:#0369a1;">&lt;</span><span style="color:#1e293b;">symbol id</span><span style="font-weight:bold;color:#0369a1;">=</span><span style="color:#475569;">"</span><span style="color:#0369a1;">user</span><span style="color:#475569;">" </span><span style="color:#1e293b;">viewBox</span><span style="font-weight:bold;color:#0369a1;">=</span><span style="color:#475569;">"</span><span style="color:#0369a1;">0 0 24 24</span><span style="color:#475569;">"</span><span style="font-weight:bold;color:#0369a1;">&gt;
</span><span style="color:#0c4a6e;">    </span><span style="font-weight:bold;color:#0369a1;">&lt;!-- </span><span style="color:#0c4a6e;">path </span><span style="font-weight:bold;color:#0369a1;">--&gt;
</span><span style="color:#0c4a6e;">  </span><span style="font-weight:bold;color:#0369a1;">&lt;</span><span style="color:#475569;">/</span><span style="color:#0369a1;">symbol&gt;
</span><span style="color:#0369a1;">  &lt;symbol id="pencil" viewBox="0 0 24 24"&gt;
</span><span style="color:#0369a1;">    &lt;!-- path --&gt;
</span><span style="color:#0369a1;">  &lt;</span><span style="color:#475569;">/</span><span style="color:#1e293b;">symbol</span><span style="font-weight:bold;color:#0369a1;">&gt;
</span><span style="font-weight:bold;color:#0369a1;">&lt;</span><span style="color:#475569;">/</span><span style="color:#0369a1;">svg&gt;
</span></code></pre>
<p>To render an icon, reference it with <code>&lt;use&gt;</code>:</p>
<pre lang="javascript" style="background-color:#f8fafc;"><code><span style="font-weight:bold;color:#0369a1;">&lt;</span><span style="color:#1e293b;">svg </span><span style="font-weight:bold;color:#dc2626;">class</span><span style="color:#0c4a6e;">="</span><span style="font-weight:bold;color:#b91c1c;">icon</span><span style="color:#0c4a6e;">"&gt;&lt;</span><span style="font-weight:bold;color:#b91c1c;">use href</span><span style="color:#0c4a6e;">="/</span><span style="font-weight:bold;color:#b91c1c;">sprite</span><span style="color:#0c4a6e;">.</span><span style="font-weight:bold;color:#b91c1c;">svg</span><span style="color:#0c4a6e;">#</span><span style="font-weight:bold;color:#b91c1c;">user</span><span style="color:#0c4a6e;">"/&gt;&lt;/</span><span style="font-weight:bold;color:#b91c1c;">svg</span><span style="color:#0c4a6e;">&gt;
</span></code></pre>
<p>The browser downloads the sprite file once and caches it. Every <code>&lt;use&gt;</code> is a lightweight DOM reference, not a full SVG subtree. Compare that to inline SVGs where every single icon is a complete <code>&lt;svg&gt;</code> element with all its paths. 1,000 icons means 1,000 unique SVG subtrees parsed, styled and laid out by the browser.</p>
<h2>
<a href="#why-not-font-icons-or-image-tags" aria-hidden="true" class="anchor" id="why-not-font-icons-or-image-tags"></a>Why not font icons or image tags?</h2>
<p>Before SVGs became the standard, font icons were the go-to (if you been around for some time, you surely have used them; I thought they were really cool!). They have problems: limited to one color (unless you stack multiple fonts), inconsistent rendering across browsers and operating systems and poor accessibility. And you’re loading an entire font file for a handful of icons.</p>
<p>Image tags (<code>&lt;img src="icon.svg"&gt;</code>) solve the accessibility issue but you lose all styling control. You can’t change the color, stroke width or size via CSS. Every variant needs a separate file. Ouch!</p>
<p>SVG sprites give you the best of both. The <code>&lt;use&gt;-</code>element inherits CSS from the parent <code>&lt;svg&gt;</code>, so you can control color, size and stroke width the same way you do with inline SVGs.</p>
<p>Fully configurable, single HTTP request, accessible by default.</p>
<h2>
<a href="#the-benchmark" aria-hidden="true" class="anchor" id="the-benchmark"></a>The benchmark</h2>
<p>Two pages, identical layout, 1,000 icons each:</p>
<ul>
<li>200 users in a table, 5 icons per row</li>
<li>Same ERB template, same CSS, same layout</li>
<li>Only difference: one page uses <code>icon</code>, the other uses <code>sprite_icon</code> (both helper methods from Rails Icons)</li>
</ul>
<p>Inline:</p>
<pre lang="ruby" style="background-color:#f8fafc;"><code><span style="font-weight:bold;color:#0369a1;">&lt;%=</span><span style="color:#0c4a6e;"> icon </span><span style="color:#475569;">"</span><span style="color:#0369a1;">user</span><span style="color:#475569;">" %&gt;
</span><span style="color:#0369a1;">&lt;%= icon "pencil" %</span><span style="color:#475569;">&gt;
</span><span style="font-weight:bold;color:#0369a1;">&lt;%=</span><span style="color:#0c4a6e;"> icon </span><span style="color:#475569;">"</span><span style="color:#0369a1;">arrow-path</span><span style="color:#475569;">" %&gt;
</span><span style="color:#0369a1;">&lt;%= icon "lock-closed" %</span><span style="color:#475569;">&gt;
</span><span style="font-weight:bold;color:#0369a1;">&lt;%=</span><span style="color:#0c4a6e;"> icon </span><span style="color:#475569;">"</span><span style="color:#0369a1;">trash</span><span style="color:#475569;">" %&gt;
</span></code></pre>
<p>Sprite:</p>
<pre lang="ruby" style="background-color:#f8fafc;"><code><span style="font-weight:bold;color:#0369a1;">&lt;%=</span><span style="color:#0c4a6e;"> sprite_icon </span><span style="color:#475569;">"</span><span style="color:#0369a1;">user</span><span style="color:#475569;">" %&gt;
</span><span style="color:#0369a1;">&lt;%= sprite_icon "pencil" %</span><span style="color:#475569;">&gt;
</span><span style="font-weight:bold;color:#0369a1;">&lt;%=</span><span style="color:#0c4a6e;"> sprite_icon </span><span style="color:#475569;">"</span><span style="color:#0369a1;">arrow-path</span><span style="color:#475569;">" %&gt;
</span><span style="color:#0369a1;">&lt;%= sprite_icon "lock-closed" %</span><span style="color:#475569;">&gt;
</span><span style="font-weight:bold;color:#0369a1;">&lt;%=</span><span style="color:#0c4a6e;"> sprite_icon </span><span style="color:#475569;">"</span><span style="color:#0369a1;">trash</span><span style="color:#475569;">" %&gt;
</span></code></pre>
<h3>
<a href="#the-numbers" aria-hidden="true" class="anchor" id="the-numbers"></a>The numbers</h3>
<table>
<thead>
<tr>
<th>Metric</th>
<th>Inline SVGs</th>
<th>SVG Sprite</th>
<th>Difference</th>
</tr>
</thead>
<tbody>
<tr>
<td>Single icon markup</td>
<td>
<span data-escaped-char>~</span>1.7 KB</td>
<td>
<span data-escaped-char>~</span>170 bytes</td>
<td><strong>90% smaller</strong></td>
</tr>
<tr>
<td>Total icon HTML (1,000x)</td>
<td>
<span data-escaped-char>~</span>1.7 MB</td>
<td>
<span data-escaped-char>~</span>170 KB</td>
<td><strong>90% smaller</strong></td>
</tr>
<tr>
<td>Rendered page size</td>
<td>
<span data-escaped-char>~</span>1.8 MB</td>
<td>
<span data-escaped-char>~</span>250 KB</td>
<td><strong>86% smaller</strong></td>
</tr>
<tr>
<td>DOM nodes</td>
<td>
<span data-escaped-char>~</span>13,000</td>
<td>
<span data-escaped-char>~</span>7,000</td>
<td><strong>46% fewer</strong></td>
</tr>
<tr>
<td>DOM loaded</td>
<td>
<span data-escaped-char>~</span>320ms</td>
<td>
<span data-escaped-char>~</span>210ms</td>
<td><strong>34% faster</strong></td>
</tr>
</tbody>
</table>
<p>The sprite page loads faster, transfers less data and creates a simpler DOM tree.</p>
<h2>
<a href="#using-sprites-with-rails-icons" aria-hidden="true" class="anchor" id="using-sprites-with-rails-icons"></a>Using sprites with Rails Icons</h2>
<p>Rails Icons 1.9+ ships with built-in sprite support. Configure which icons to include in your initializer:</p>
<pre lang="ruby" style="background-color:#f8fafc;"><code><span style="font-style:italic;color:#475569;">#</span><span style="font-style:italic;color:#64748b;"> config/initializers/rails_icons.rb
</span><span style="color:#0c4a6e;">RailsIcons</span><span style="color:#475569;">.</span><span style="color:#0c4a6e;">configure </span><span style="font-weight:bold;color:#dc2626;">do </span><span style="color:#475569;">|</span><span style="color:#1e293b;">config</span><span style="color:#475569;">|
</span><span style="color:#0c4a6e;">  config</span><span style="color:#475569;">.</span><span style="color:#0c4a6e;">default_library </span><span style="font-weight:bold;color:#0369a1;">= </span><span style="color:#475569;">"</span><span style="color:#0369a1;">heroicons</span><span style="color:#475569;">"
</span><span style="color:#0c4a6e;">
</span><span style="color:#0c4a6e;">  config</span><span style="color:#475569;">.</span><span style="color:#0c4a6e;">sprite </span><span style="font-weight:bold;color:#0369a1;">= </span><span style="color:#475569;">{
</span><span style="color:#0c4a6e;">    </span><span style="font-weight:bold;color:#075985;">heroicons</span><span style="font-weight:bold;color:#475569;">: </span><span style="color:#475569;">{
</span><span style="color:#0c4a6e;">      </span><span style="font-weight:bold;color:#075985;">outline</span><span style="font-weight:bold;color:#475569;">: </span><span style="color:#475569;">%w[</span><span style="color:#0369a1;">user pencil arrow-path lock-closed trash</span><span style="color:#475569;">]
</span><span style="color:#0c4a6e;">    </span><span style="color:#475569;">}
</span><span style="color:#0c4a6e;">  </span><span style="color:#475569;">}
</span><span style="font-weight:bold;color:#dc2626;">end
</span></code></pre>
<p>Then use <code>sprite_icon</code> in your views:</p>
<pre lang="ruby" style="background-color:#f8fafc;"><code><span style="font-weight:bold;color:#0369a1;">&lt;%=</span><span style="color:#0c4a6e;"> sprite_icon </span><span style="color:#475569;">"</span><span style="color:#0369a1;">user</span><span style="color:#475569;">" %&gt;
</span><span style="color:#0369a1;">&lt;%= sprite_icon "pencil" %</span><span style="color:#475569;">&gt;
</span></code></pre>
<p>That’s it. The sprite file is served at <code>/rails_icons/sprite.svg</code>. This means you can:</p>
<ul>
<li>
<strong>Cache it</strong>; it changes only when you add or remove icons</li>
<li>
<strong>Put it behind a CDN</strong>; it’s a static asset</li>
</ul>
<h2>
<a href="#when-to-reach-for-sprites" aria-hidden="true" class="anchor" id="when-to-reach-for-sprites"></a>When to reach for sprites</h2>
<p>Inline SVGs are fine when you have a couple dozen of icons per page. Landing pages, simple forms, blog posts. The extra bytes don’t matter.</p>
<p>Sprites are a good choice when icons multiply. Like with data tables, kanban boards and activity feeds.</p>
<p>The trade-off is one extra HTTP request for the sprite file. On an icon-heavy page, that request pays for itself many times over. 💪</p>
<hr>
<p><a href="https://github.com/Rails-Designer/rails_icons">SVG sprites are available in Rails Icons 1.9</a>. Add them to your next icon-heavy view and see the difference.</p>
]]></content>


  </entry>
  
  <entry>
    <id>https://railsdesigner.com/onboarding-with-js-and-css/?ref=rss</id>
    <title>Minimal JS, modern CSS anchored product tours</title>
    <link href="https://railsdesigner.com/onboarding-with-js-and-css/?ref=rss" rel="alternate" type="text/html"/>
    <published>2026-08-20T07:30:00Z</published>
    <updated>2026-08-20T07:30:00Z</updated>

    
      <author>
        <name>Rails Designer</name>
        <email>support@railsdesigner.com</email>
      </author>


      <content type="html" xml:base="https://railsdesigner.com/onboarding-with-js-and-css/?ref=rss"><![CDATA[<p>Ever wondered how to build those interactive product tours that spotlight elements and walk users through your app? Ever wondered how you could with just roughly 100 lines of JS and modern CSS? Wonder now more, I will show and it will look like this:</p>
<p><img src="https://railsdesigner.com/images/posts/onboarding-preview.gif" alt="onboarding-preview.gif"></p>
<p>Yes, just around 100 LoC 🤯</p>
<p>I built one using CSS Anchor Positioning and a Stimulus controller. The approach uses two techniques worth talking about: a clip-path spotlight effect (useful in all sorts of contexts) and CSS anchor positioning for the dialog (still very new as of mid-2026).</p>
<p><a href="https://github.com/rails-designer-repos/onboarding-tips">The full code, as always, is on GitHub</a>.</p>
<h2>
<a href="#the-clip-path-trick" aria-hidden="true" class="anchor" id="the-clip-path-trick"></a>The clip-path trick</h2>
<p>The overlay covers the viewport with a semi-transparent background. But instead of sitting on top of everything, it uses <code>clip-path: polygon()</code> to cut a hole around the target element, creating a spotlight effect.</p>
<pre lang="javascript" style="background-color:#f8fafc;"><code><span style="color:#0c4a6e;">#</span><span style="color:#1e293b;">clipPath</span><span style="color:#475569;">(</span><span style="color:#1e293b;">target</span><span style="color:#475569;">) {
</span><span style="color:#0c4a6e;">  </span><span style="font-weight:bold;color:#dc2626;">const </span><span style="color:#475569;">{ </span><span style="color:#1e293b;">top</span><span style="color:#475569;">, </span><span style="color:#1e293b;">right</span><span style="color:#475569;">, </span><span style="color:#1e293b;">bottom</span><span style="color:#475569;">, </span><span style="color:#1e293b;">left </span><span style="color:#475569;">} </span><span style="font-weight:bold;color:#0369a1;">= </span><span style="color:#1e293b;">target</span><span style="color:#475569;">.</span><span style="color:#1e293b;">getBoundingClientRect</span><span style="color:#475569;">()
</span><span style="color:#0c4a6e;">  </span><span style="font-weight:bold;color:#dc2626;">const </span><span style="color:#1e293b;">gap </span><span style="font-weight:bold;color:#0369a1;">= </span><span style="font-weight:bold;color:#d97706;">8
</span><span style="color:#0c4a6e;">
</span><span style="color:#0c4a6e;">  </span><span style="color:#1e293b;">this</span><span style="color:#475569;">.</span><span style="color:#0c4a6e;">#</span><span style="color:#1e293b;">overlay</span><span style="color:#475569;">.</span><span style="color:#0c4a6e;">style</span><span style="color:#475569;">.</span><span style="color:#0c4a6e;">clipPath </span><span style="font-weight:bold;color:#0369a1;">=
</span><span style="color:#0c4a6e;">    </span><span style="color:#475569;">`</span><span style="color:#0369a1;">polygon(0% 0%, 100% 0%, 100% 100%, 0% 100%, </span><span style="color:#475569;">` </span><span style="font-weight:bold;color:#0369a1;">+
</span><span style="color:#0c4a6e;">    </span><span style="color:#475569;">`</span><span style="color:#0369a1;">0% </span><span style="color:#475569;">${</span><span style="color:#1e293b;">top </span><span style="font-weight:bold;color:#0369a1;">- </span><span style="color:#1e293b;">gap</span><span style="color:#475569;">}</span><span style="color:#0369a1;">px, </span><span style="color:#475569;">${</span><span style="color:#1e293b;">left </span><span style="font-weight:bold;color:#0369a1;">- </span><span style="color:#1e293b;">gap</span><span style="color:#475569;">}</span><span style="color:#0369a1;">px </span><span style="color:#475569;">${</span><span style="color:#1e293b;">top </span><span style="font-weight:bold;color:#0369a1;">- </span><span style="color:#1e293b;">gap</span><span style="color:#475569;">}</span><span style="color:#0369a1;">px, </span><span style="color:#475569;">` </span><span style="font-weight:bold;color:#0369a1;">+
</span><span style="color:#0c4a6e;">    </span><span style="color:#475569;">`${</span><span style="color:#1e293b;">left </span><span style="font-weight:bold;color:#0369a1;">- </span><span style="color:#1e293b;">gap</span><span style="color:#475569;">}</span><span style="color:#0369a1;">px </span><span style="color:#475569;">${</span><span style="color:#1e293b;">bottom </span><span style="font-weight:bold;color:#0369a1;">+ </span><span style="color:#1e293b;">gap</span><span style="color:#475569;">}</span><span style="color:#0369a1;">px, </span><span style="color:#475569;">${</span><span style="color:#1e293b;">right </span><span style="font-weight:bold;color:#0369a1;">+ </span><span style="color:#1e293b;">gap</span><span style="color:#475569;">}</span><span style="color:#0369a1;">px </span><span style="color:#475569;">${</span><span style="color:#1e293b;">bottom </span><span style="font-weight:bold;color:#0369a1;">+ </span><span style="color:#1e293b;">gap</span><span style="color:#475569;">}</span><span style="color:#0369a1;">px, </span><span style="color:#475569;">` </span><span style="font-weight:bold;color:#0369a1;">+
</span><span style="color:#0c4a6e;">    </span><span style="color:#475569;">`${</span><span style="color:#1e293b;">right </span><span style="font-weight:bold;color:#0369a1;">+ </span><span style="color:#1e293b;">gap</span><span style="color:#475569;">}</span><span style="color:#0369a1;">px </span><span style="color:#475569;">${</span><span style="color:#1e293b;">top </span><span style="font-weight:bold;color:#0369a1;">- </span><span style="color:#1e293b;">gap</span><span style="color:#475569;">}</span><span style="color:#0369a1;">px, 0% </span><span style="color:#475569;">${</span><span style="color:#1e293b;">top </span><span style="font-weight:bold;color:#0369a1;">- </span><span style="color:#1e293b;">gap</span><span style="color:#475569;">}</span><span style="color:#0369a1;">px)</span><span style="color:#475569;">`
</span><span style="color:#475569;">}
</span></code></pre>
<p>The polygon traces the full viewport boundary, then cuts inward around the target’s bounding box with an 8px gap. A <code>requestAnimationFrame</code> loop keeps the hole positioned correctly during scroll and resize.</p>
<p>This technique works for any overlay-with-a-hole scenario: tooltips, walkthroughs, masking, focus modes.</p>
<h2>
<a href="#anchoring-the-dialog" aria-hidden="true" class="anchor" id="anchoring-the-dialog"></a>Anchoring the dialog</h2>
<p>The dialog card attaches itself to the target element using CSS Anchor Positioning. No JS position calculation, no ResizeObserver.</p>
<pre lang="css" style="background-color:#f8fafc;"><code><span style="color:#475569;">[</span><span style="color:#0369a1;">data-controller</span><span style="font-weight:bold;color:#0369a1;">=</span><span style="color:#475569;">"</span><span style="color:#0369a1;">onboarding</span><span style="color:#475569;">"] &gt; .</span><span style="color:#0369a1;">card </span><span style="color:#475569;">{
</span><span style="color:#0c4a6e;">  position</span><span style="color:#475569;">: </span><span style="color:#0c4a6e;">fixed</span><span style="color:#475569;">;
</span><span style="color:#0c4a6e;">  position-anchor</span><span style="color:#475569;">: </span><span style="color:#0c4a6e;">--onboarding-target</span><span style="color:#475569;">;
</span><span style="color:#0c4a6e;">  left</span><span style="color:#475569;">: </span><span style="color:#0c4a6e;">anchor(--onboarding-target right);
</span><span style="color:#0c4a6e;">  top</span><span style="color:#475569;">: </span><span style="color:#0c4a6e;">anchor(--onboarding-target top);
</span><span style="color:#0c4a6e;">  position-try-fallbacks</span><span style="color:#475569;">: </span><span style="color:#0c4a6e;">flip-inline, flip-block, flip-start</span><span style="color:#475569;">;
</span><span style="color:#475569;">}
</span></code></pre>
<p>The JS sets <code>anchor-name: --onboarding-target</code> on whichever element the current step targets. The card’s CSS declares <code>position-anchor: --onboarding-target</code>, and <code>anchor()</code> functions read the target’s position. The card places itself at the target’s right edge, top-aligned.</p>
<p>If there isn’t room to the right, <code>position-try-fallbacks</code> lets the browser try alternatives: flip to the left, flip above, flip both axes. Each fallback is tested in order until one fits the viewport. No media queries, no JS overflow detection.</p>
<p>As of mid-2026, Anchor Positioning ships in <a href="https://caniuse.com/css-anchor-positioning">most browsers</a>. Without support, the card renders without anchoring (the <code>anchor()</code> values fall back to <code>auto</code>). The tour still works, the spotlight still works, the dialog just won’t track the target’s position. That’s a reasonable degradation for an enhancement like this.</p>
<blockquote>
<p><span data-escaped-char>[</span>!TIP<span data-escaped-char>]</span><br>
<a href="https://www.joshwcomeau.com/css/anchor-positioning/">Read this article for a great primer on anchor positioning</a></p>
</blockquote>
<h2>
<a href="#one-small-stimulus-controller" aria-hidden="true" class="anchor" id="one-small-stimulus-controller"></a>One small Stimulus controller</h2>
<p>One Stimulus controller to get it all together. On connect it creates the overlay and card elements. Each step is a JSON object with an element selector, title, description, and optional image. Moving through steps updates the <code>anchor-name</code> target, repopulates the dialog content, and the <code>requestAnimationFrame</code> loop keeps the clip-path in sync.</p>
<p>It is the kind of Stimulus controller you can drop into any project, update the step data and you have a working tour. The kind of Stimulus controller I like.</p>
<hr>
<p>The two techniques are independently useful. The clip-path polygon approach works for any spotlight or masking use case. Anchor positioning removes an entire category of JS positioning code. Combined, they make a feature that usually requires a library into about 100 lines of Stimulus.</p>
<p><code>position-try-fallbacks</code> is a CSS property that I love to see available! ❤️ Overflow handling has always been a JS problem. Now the browser handles it natively. Look for opportunities to use it anywhere you’re positioning elements! 🛝</p>
]]></content>


  </entry>
  
  <entry>
    <id>https://railsdesigner.com/color-for-rails-developers/?ref=rss</id>
    <title>Choosing colors (for developers)</title>
    <link href="https://railsdesigner.com/color-for-rails-developers/?ref=rss" rel="alternate" type="text/html"/>
    <published>2026-08-13T07:30:00Z</published>
    <updated>2026-08-13T07:30:00Z</updated>

    
      <author>
        <name>Rails Designer</name>
        <email>support@railsdesigner.com</email>
      </author>


      <content type="html" xml:base="https://railsdesigner.com/color-for-rails-developers/?ref=rss"><![CDATA[<p>The eleven-shade color scale from Tailwind CSS is one of those ideas I keep stealing. You know the one: <code>50</code> through <code>950</code> gives you enough stops for backgrounds, borders, hover states, text, everything. I use it even when I’m not using Tailwind.</p>
<p>But I almost never use the defaults (your site/app ends up looking like every other site built by LLMs).</p>
<p>The fix is not complicated. You don’t need a color theory degree or a five-color palette generator (you know the ones 🥹). You only need two or three color scales, and you can derive them all from a single value.</p>
<h2>
<a href="#how-to-choose-your-brand-hue" aria-hidden="true" class="anchor" id="how-to-choose-your-brand-hue"></a>How to choose your brand hue</h2>
<p>Rule of thumb: pick a color that fits the problem, not your personal taste (I like pink but not use it all the time).</p>
<ul>
<li>Finance, B2B and enterprise sites use blues (hue <code>200-250</code>).</li>
<li>Trust, stability, conservative. Health and wellness lean green or teal (<code>120-200</code>). Calm, natural.</li>
<li>Creative and entertainment go purple, pink, orange (<code>270-360</code>). Energy, fun.</li>
<li>Food and hospitality use reds, oranges, warm yellows (<code>0-60</code>). Appetite, warmth.</li>
</ul>
<p>These are guidelines, not rules. A creative agency can use blue. A bank can use orange. But the defaults exist for a reason. They match user expectations.</p>
<p>Still stuck? Steal from a site you like. Find an app or landing page whose color feels right for your domain. Open DevTools, grab the hue from any OKLCH color on the page. That is your starting point. Adjust from there.</p>
<p>If you have an image (hero photo, logo, brand asset), sample a prominent color from it. Drop it into a color picker, get the OKLCH hue. Images that already look good together contain colors that already work together.</p>
<p>You do not need to nail it on the first try. Pick something reasonable, build the palette, see it on a real page. If it feels wrong, shift the hue by <code>30</code> and check again. Five minutes of tweaking beats an hour of analysis. 💪</p>
<h2>
<a href="#pick-a-neutral-name-it---gray" aria-hidden="true" class="anchor" id="pick-a-neutral-name-it---gray"></a>Pick a neutral, name it <code>--gray</code>
</h2>
<p>First, a naming trick. Whatever neutral you settle on, alias it to <code>--gray-*</code>. This way your templates reference <code>--gray-500</code> regardless of which tone you picked.</p>
<pre lang="css" style="background-color:#f8fafc;"><code><span style="color:#475569;">:</span><span style="color:#0c4a6e;">root </span><span style="color:#475569;">{
</span><span style="color:#0c4a6e;">  </span><span style="color:#475569;">--</span><span style="color:#0c4a6e;">gray-50</span><span style="color:#475569;">: </span><span style="font-weight:bold;color:#475569;">#</span><span style="font-weight:bold;color:#075985;">f8fafc</span><span style="color:#475569;">;
</span><span style="color:#0c4a6e;">  </span><span style="color:#475569;">--</span><span style="color:#0c4a6e;">gray-100</span><span style="color:#475569;">: </span><span style="font-weight:bold;color:#475569;">#</span><span style="font-weight:bold;color:#075985;">f1f5f9</span><span style="color:#475569;">;
</span><span style="color:#0c4a6e;">  </span><span style="color:#475569;">--</span><span style="color:#0c4a6e;">gray-200</span><span style="color:#475569;">: </span><span style="font-weight:bold;color:#475569;">#</span><span style="font-weight:bold;color:#075985;">e2e8f0</span><span style="color:#475569;">;
</span><span style="color:#0c4a6e;">  </span><span style="font-style:italic;color:#475569;">/*</span><span style="font-style:italic;color:#64748b;"> … </span><span style="font-style:italic;color:#475569;">*/
</span><span style="color:#475569;">}
</span></code></pre>
<p>The point is the name <code>--gray</code> stays the same. Want a warmer tone next month? Change the values, not every template.</p>
<p>If I use Tailwind, I use the same trick (but map them with the <code>--color-</code> prefix so <code>bg-gray-500</code> works):</p>
<pre lang="css" style="background-color:#f8fafc;"><code><span style="color:#0c4a6e;">@theme </span><span style="color:#475569;">{
</span><span style="color:#0c4a6e;">  </span><span style="color:#475569;">--</span><span style="color:#0c4a6e;">color-gray-50</span><span style="color:#475569;">: </span><span style="color:#0284c7;">var</span><span style="color:#475569;">(--</span><span style="color:#0c4a6e;">gray-50</span><span style="color:#475569;">);
</span><span style="color:#0c4a6e;">  </span><span style="color:#475569;">--</span><span style="color:#0c4a6e;">color-gray-100</span><span style="color:#475569;">: </span><span style="color:#0284c7;">var</span><span style="color:#475569;">(--</span><span style="color:#0c4a6e;">gray-100</span><span style="color:#475569;">);
</span><span style="color:#475569;">}
</span></code></pre>
<h2>
<a href="#one-hue-to-rule-them" aria-hidden="true" class="anchor" id="one-hue-to-rule-them"></a>One hue to rule them</h2>
<p>OKLCH makes this easy. Instead of hardcoding eleven hex values for your brand, derive them from a single hue variable.</p>
<p>I covered the technique before in <a href="/building-customizable-tailwind-themes/">Building user-customizable themes with Tailwind CSS</a>. The idea: OKLCH separates color into lightness, chroma and hue. Keep lightness and chroma constant per shade level, vary only the hue.</p>
<pre lang="css" style="background-color:#f8fafc;"><code><span style="color:#475569;">:</span><span style="color:#0c4a6e;">root </span><span style="color:#475569;">{
</span><span style="color:#0c4a6e;">  </span><span style="color:#475569;">--</span><span style="color:#0c4a6e;">brand-hue</span><span style="color:#475569;">: </span><span style="font-weight:bold;color:#d97706;">250</span><span style="color:#475569;">;
</span><span style="color:#0c4a6e;">
</span><span style="color:#0c4a6e;">  </span><span style="color:#475569;">--</span><span style="color:#0c4a6e;">brand-50</span><span style="color:#475569;">: </span><span style="color:#0c4a6e;">oklch(</span><span style="font-weight:bold;color:#d97706;">.99 .01 </span><span style="color:#0284c7;">var</span><span style="color:#475569;">(--</span><span style="color:#0c4a6e;">brand-hue</span><span style="color:#475569;">)</span><span style="color:#0c4a6e;">);
</span><span style="color:#0c4a6e;">  </span><span style="color:#475569;">--</span><span style="color:#0c4a6e;">brand-100</span><span style="color:#475569;">: </span><span style="color:#0c4a6e;">oklch(</span><span style="font-weight:bold;color:#d97706;">.98 .02 </span><span style="color:#0284c7;">var</span><span style="color:#475569;">(--</span><span style="color:#0c4a6e;">brand-hue</span><span style="color:#475569;">)</span><span style="color:#0c4a6e;">);
</span><span style="color:#0c4a6e;">  </span><span style="color:#475569;">--</span><span style="color:#0c4a6e;">brand-200</span><span style="color:#475569;">: </span><span style="color:#0c4a6e;">oklch(</span><span style="font-weight:bold;color:#d97706;">.94 .04 </span><span style="color:#0284c7;">var</span><span style="color:#475569;">(--</span><span style="color:#0c4a6e;">brand-hue</span><span style="color:#475569;">)</span><span style="color:#0c4a6e;">);
</span><span style="color:#0c4a6e;">  </span><span style="color:#475569;">--</span><span style="color:#0c4a6e;">brand-300</span><span style="color:#475569;">: </span><span style="color:#0c4a6e;">oklch(</span><span style="font-weight:bold;color:#d97706;">.86 .08 </span><span style="color:#0284c7;">var</span><span style="color:#475569;">(--</span><span style="color:#0c4a6e;">brand-hue</span><span style="color:#475569;">)</span><span style="color:#0c4a6e;">);
</span><span style="color:#0c4a6e;">  </span><span style="color:#475569;">--</span><span style="color:#0c4a6e;">brand-400</span><span style="color:#475569;">: </span><span style="color:#0c4a6e;">oklch(</span><span style="font-weight:bold;color:#d97706;">.74 .14 </span><span style="color:#0284c7;">var</span><span style="color:#475569;">(--</span><span style="color:#0c4a6e;">brand-hue</span><span style="color:#475569;">)</span><span style="color:#0c4a6e;">);
</span><span style="color:#0c4a6e;">  </span><span style="color:#475569;">--</span><span style="color:#0c4a6e;">brand-500</span><span style="color:#475569;">: </span><span style="color:#0c4a6e;">oklch(</span><span style="font-weight:bold;color:#d97706;">.6 .18 </span><span style="color:#0284c7;">var</span><span style="color:#475569;">(--</span><span style="color:#0c4a6e;">brand-hue</span><span style="color:#475569;">)</span><span style="color:#0c4a6e;">);
</span><span style="color:#0c4a6e;">  </span><span style="color:#475569;">--</span><span style="color:#0c4a6e;">brand-600</span><span style="color:#475569;">: </span><span style="color:#0c4a6e;">oklch(</span><span style="font-weight:bold;color:#d97706;">.52 .16 </span><span style="color:#0284c7;">var</span><span style="color:#475569;">(--</span><span style="color:#0c4a6e;">brand-hue</span><span style="color:#475569;">)</span><span style="color:#0c4a6e;">);
</span><span style="color:#0c4a6e;">  </span><span style="color:#475569;">--</span><span style="color:#0c4a6e;">brand-700</span><span style="color:#475569;">: </span><span style="color:#0c4a6e;">oklch(</span><span style="font-weight:bold;color:#d97706;">.44 .14 </span><span style="color:#0284c7;">var</span><span style="color:#475569;">(--</span><span style="color:#0c4a6e;">brand-hue</span><span style="color:#475569;">)</span><span style="color:#0c4a6e;">);
</span><span style="color:#0c4a6e;">  </span><span style="color:#475569;">--</span><span style="color:#0c4a6e;">brand-800</span><span style="color:#475569;">: </span><span style="color:#0c4a6e;">oklch(</span><span style="font-weight:bold;color:#d97706;">.36 .12 </span><span style="color:#0284c7;">var</span><span style="color:#475569;">(--</span><span style="color:#0c4a6e;">brand-hue</span><span style="color:#475569;">)</span><span style="color:#0c4a6e;">);
</span><span style="color:#0c4a6e;">  </span><span style="color:#475569;">--</span><span style="color:#0c4a6e;">brand-900</span><span style="color:#475569;">: </span><span style="color:#0c4a6e;">oklch(</span><span style="font-weight:bold;color:#d97706;">.26 .08 </span><span style="color:#0284c7;">var</span><span style="color:#475569;">(--</span><span style="color:#0c4a6e;">brand-hue</span><span style="color:#475569;">)</span><span style="color:#0c4a6e;">);
</span><span style="color:#0c4a6e;">  </span><span style="color:#475569;">--</span><span style="color:#0c4a6e;">brand-950</span><span style="color:#475569;">: </span><span style="color:#0c4a6e;">oklch(</span><span style="font-weight:bold;color:#d97706;">.16 .04 </span><span style="color:#0284c7;">var</span><span style="color:#475569;">(--</span><span style="color:#0c4a6e;">brand-hue</span><span style="color:#475569;">)</span><span style="color:#0c4a6e;">);
</span><span style="color:#475569;">}
</span></code></pre>
<p>Change <code>--brand-hue</code> from 250 to 10 and every shade updates. The palette stays harmonious because lightness and chroma never shift.</p>
<p>One thing to watch: OKLCH math gets you 90% of the way there. Different hues at the same lightness and chroma can feel slightly different to the eye — a purple at <code>.6 .18</code> reads differently than a yellow at <code>.6 .18</code>. You might need to bump a stop or two for balance. That is normal. Tweak and move on.</p>
<h2>
<a href="#gray-from-your-brand-tint" aria-hidden="true" class="anchor" id="gray-from-your-brand-tint"></a>Gray from your brand tint</h2>
<p>Create a neutral palette the same way. Drop the chroma near zero:</p>
<pre lang="css" style="background-color:#f8fafc;"><code><span style="color:#475569;">:</span><span style="color:#0c4a6e;">root </span><span style="color:#475569;">{
</span><span style="color:#0c4a6e;">  </span><span style="color:#475569;">--</span><span style="color:#0c4a6e;">gray-50</span><span style="color:#475569;">: </span><span style="color:#0c4a6e;">oklch(</span><span style="font-weight:bold;color:#d97706;">.99 .005 </span><span style="color:#0284c7;">var</span><span style="color:#475569;">(--</span><span style="color:#0c4a6e;">brand-hue</span><span style="color:#475569;">)</span><span style="color:#0c4a6e;">);
</span><span style="color:#0c4a6e;">  </span><span style="color:#475569;">--</span><span style="color:#0c4a6e;">gray-100</span><span style="color:#475569;">: </span><span style="color:#0c4a6e;">oklch(</span><span style="font-weight:bold;color:#d97706;">.97 .005 </span><span style="color:#0284c7;">var</span><span style="color:#475569;">(--</span><span style="color:#0c4a6e;">brand-hue</span><span style="color:#475569;">)</span><span style="color:#0c4a6e;">);
</span><span style="color:#0c4a6e;">  </span><span style="color:#475569;">--</span><span style="color:#0c4a6e;">gray-200</span><span style="color:#475569;">: </span><span style="color:#0c4a6e;">oklch(</span><span style="font-weight:bold;color:#d97706;">.93 .005 </span><span style="color:#0284c7;">var</span><span style="color:#475569;">(--</span><span style="color:#0c4a6e;">brand-hue</span><span style="color:#475569;">)</span><span style="color:#0c4a6e;">);
</span><span style="color:#0c4a6e;">  </span><span style="color:#475569;">--</span><span style="color:#0c4a6e;">gray-300</span><span style="color:#475569;">: </span><span style="color:#0c4a6e;">oklch(</span><span style="font-weight:bold;color:#d97706;">.86 .008 </span><span style="color:#0284c7;">var</span><span style="color:#475569;">(--</span><span style="color:#0c4a6e;">brand-hue</span><span style="color:#475569;">)</span><span style="color:#0c4a6e;">);
</span><span style="color:#0c4a6e;">  </span><span style="color:#475569;">--</span><span style="color:#0c4a6e;">gray-400</span><span style="color:#475569;">: </span><span style="color:#0c4a6e;">oklch(</span><span style="font-weight:bold;color:#d97706;">.76 .01 </span><span style="color:#0284c7;">var</span><span style="color:#475569;">(--</span><span style="color:#0c4a6e;">brand-hue</span><span style="color:#475569;">)</span><span style="color:#0c4a6e;">);
</span><span style="color:#0c4a6e;">  </span><span style="color:#475569;">--</span><span style="color:#0c4a6e;">gray-500</span><span style="color:#475569;">: </span><span style="color:#0c4a6e;">oklch(</span><span style="font-weight:bold;color:#d97706;">.64 .01 </span><span style="color:#0284c7;">var</span><span style="color:#475569;">(--</span><span style="color:#0c4a6e;">brand-hue</span><span style="color:#475569;">)</span><span style="color:#0c4a6e;">);
</span><span style="color:#0c4a6e;">  </span><span style="color:#475569;">--</span><span style="color:#0c4a6e;">gray-600</span><span style="color:#475569;">: </span><span style="color:#0c4a6e;">oklch(</span><span style="font-weight:bold;color:#d97706;">.54 .01 </span><span style="color:#0284c7;">var</span><span style="color:#475569;">(--</span><span style="color:#0c4a6e;">brand-hue</span><span style="color:#475569;">)</span><span style="color:#0c4a6e;">);
</span><span style="color:#0c4a6e;">  </span><span style="color:#475569;">--</span><span style="color:#0c4a6e;">gray-700</span><span style="color:#475569;">: </span><span style="color:#0c4a6e;">oklch(</span><span style="font-weight:bold;color:#d97706;">.44 .01 </span><span style="color:#0284c7;">var</span><span style="color:#475569;">(--</span><span style="color:#0c4a6e;">brand-hue</span><span style="color:#475569;">)</span><span style="color:#0c4a6e;">);
</span><span style="color:#0c4a6e;">  </span><span style="color:#475569;">--</span><span style="color:#0c4a6e;">gray-800</span><span style="color:#475569;">: </span><span style="color:#0c4a6e;">oklch(</span><span style="font-weight:bold;color:#d97706;">.34 .008 </span><span style="color:#0284c7;">var</span><span style="color:#475569;">(--</span><span style="color:#0c4a6e;">brand-hue</span><span style="color:#475569;">)</span><span style="color:#0c4a6e;">);
</span><span style="color:#0c4a6e;">  </span><span style="color:#475569;">--</span><span style="color:#0c4a6e;">gray-900</span><span style="color:#475569;">: </span><span style="color:#0c4a6e;">oklch(</span><span style="font-weight:bold;color:#d97706;">.24 .005 </span><span style="color:#0284c7;">var</span><span style="color:#475569;">(--</span><span style="color:#0c4a6e;">brand-hue</span><span style="color:#475569;">)</span><span style="color:#0c4a6e;">);
</span><span style="color:#0c4a6e;">  </span><span style="color:#475569;">--</span><span style="color:#0c4a6e;">gray-950</span><span style="color:#475569;">: </span><span style="color:#0c4a6e;">oklch(</span><span style="font-weight:bold;color:#d97706;">.14 .005 </span><span style="color:#0284c7;">var</span><span style="color:#475569;">(--</span><span style="color:#0c4a6e;">brand-hue</span><span style="color:#475569;">)</span><span style="color:#0c4a6e;">);
</span><span style="color:#475569;">}
</span></code></pre>
<p>These read as neutral grays. But they carry a faint undertone of your brand color. The result is cohesive without being matchy-matchy.</p>
<h2>
<a href="#color-theory-with-math" aria-hidden="true" class="anchor" id="color-theory-with-math"></a>Color theory with math</h2>
<p>Complementary colors sit opposite each other on the color wheel. In OKLCH that is <code>+ 180</code> degrees.</p>
<pre lang="css" style="background-color:#f8fafc;"><code><span style="color:#475569;">:</span><span style="color:#0c4a6e;">root </span><span style="color:#475569;">{
</span><span style="color:#0c4a6e;">  </span><span style="color:#475569;">--</span><span style="color:#0c4a6e;">accent-50</span><span style="color:#475569;">: </span><span style="color:#0c4a6e;">oklch(</span><span style="font-weight:bold;color:#d97706;">.99 .01 </span><span style="color:#0284c7;">calc</span><span style="color:#475569;">(</span><span style="color:#0284c7;">var</span><span style="color:#475569;">(--</span><span style="color:#0c4a6e;">brand-hue</span><span style="color:#475569;">) </span><span style="font-weight:bold;color:#0369a1;">+ </span><span style="font-weight:bold;color:#d97706;">180</span><span style="color:#475569;">)</span><span style="color:#0c4a6e;">);
</span><span style="color:#0c4a6e;">  </span><span style="color:#475569;">--</span><span style="color:#0c4a6e;">accent-100</span><span style="color:#475569;">: </span><span style="color:#0c4a6e;">oklch(</span><span style="font-weight:bold;color:#d97706;">.98 .02 </span><span style="color:#0284c7;">calc</span><span style="color:#475569;">(</span><span style="color:#0284c7;">var</span><span style="color:#475569;">(--</span><span style="color:#0c4a6e;">brand-hue</span><span style="color:#475569;">) </span><span style="font-weight:bold;color:#0369a1;">+ </span><span style="font-weight:bold;color:#d97706;">180</span><span style="color:#475569;">)</span><span style="color:#0c4a6e;">);
</span><span style="color:#0c4a6e;">  </span><span style="color:#475569;">--</span><span style="color:#0c4a6e;">accent-200</span><span style="color:#475569;">: </span><span style="color:#0c4a6e;">oklch(</span><span style="font-weight:bold;color:#d97706;">.94 .04 </span><span style="color:#0284c7;">calc</span><span style="color:#475569;">(</span><span style="color:#0284c7;">var</span><span style="color:#475569;">(--</span><span style="color:#0c4a6e;">brand-hue</span><span style="color:#475569;">) </span><span style="font-weight:bold;color:#0369a1;">+ </span><span style="font-weight:bold;color:#d97706;">180</span><span style="color:#475569;">)</span><span style="color:#0c4a6e;">);
</span><span style="color:#0c4a6e;">  </span><span style="color:#475569;">--</span><span style="color:#0c4a6e;">accent-300</span><span style="color:#475569;">: </span><span style="color:#0c4a6e;">oklch(</span><span style="font-weight:bold;color:#d97706;">.86 .08 </span><span style="color:#0284c7;">calc</span><span style="color:#475569;">(</span><span style="color:#0284c7;">var</span><span style="color:#475569;">(--</span><span style="color:#0c4a6e;">brand-hue</span><span style="color:#475569;">) </span><span style="font-weight:bold;color:#0369a1;">+ </span><span style="font-weight:bold;color:#d97706;">180</span><span style="color:#475569;">)</span><span style="color:#0c4a6e;">);
</span><span style="color:#0c4a6e;">  </span><span style="color:#475569;">--</span><span style="color:#0c4a6e;">accent-400</span><span style="color:#475569;">: </span><span style="color:#0c4a6e;">oklch(</span><span style="font-weight:bold;color:#d97706;">.74 .14 </span><span style="color:#0284c7;">calc</span><span style="color:#475569;">(</span><span style="color:#0284c7;">var</span><span style="color:#475569;">(--</span><span style="color:#0c4a6e;">brand-hue</span><span style="color:#475569;">) </span><span style="font-weight:bold;color:#0369a1;">+ </span><span style="font-weight:bold;color:#d97706;">180</span><span style="color:#475569;">)</span><span style="color:#0c4a6e;">);
</span><span style="color:#0c4a6e;">  </span><span style="color:#475569;">--</span><span style="color:#0c4a6e;">accent-500</span><span style="color:#475569;">: </span><span style="color:#0c4a6e;">oklch(</span><span style="font-weight:bold;color:#d97706;">.6 .18 </span><span style="color:#0284c7;">calc</span><span style="color:#475569;">(</span><span style="color:#0284c7;">var</span><span style="color:#475569;">(--</span><span style="color:#0c4a6e;">brand-hue</span><span style="color:#475569;">) </span><span style="font-weight:bold;color:#0369a1;">+ </span><span style="font-weight:bold;color:#d97706;">180</span><span style="color:#475569;">)</span><span style="color:#0c4a6e;">);
</span><span style="color:#0c4a6e;">  </span><span style="color:#475569;">--</span><span style="color:#0c4a6e;">accent-600</span><span style="color:#475569;">: </span><span style="color:#0c4a6e;">oklch(</span><span style="font-weight:bold;color:#d97706;">.52 .16 </span><span style="color:#0284c7;">calc</span><span style="color:#475569;">(</span><span style="color:#0284c7;">var</span><span style="color:#475569;">(--</span><span style="color:#0c4a6e;">brand-hue</span><span style="color:#475569;">) </span><span style="font-weight:bold;color:#0369a1;">+ </span><span style="font-weight:bold;color:#d97706;">180</span><span style="color:#475569;">)</span><span style="color:#0c4a6e;">);
</span><span style="color:#0c4a6e;">  </span><span style="color:#475569;">--</span><span style="color:#0c4a6e;">accent-700</span><span style="color:#475569;">: </span><span style="color:#0c4a6e;">oklch(</span><span style="font-weight:bold;color:#d97706;">.44 .14 </span><span style="color:#0284c7;">calc</span><span style="color:#475569;">(</span><span style="color:#0284c7;">var</span><span style="color:#475569;">(--</span><span style="color:#0c4a6e;">brand-hue</span><span style="color:#475569;">) </span><span style="font-weight:bold;color:#0369a1;">+ </span><span style="font-weight:bold;color:#d97706;">180</span><span style="color:#475569;">)</span><span style="color:#0c4a6e;">);
</span><span style="color:#0c4a6e;">  </span><span style="color:#475569;">--</span><span style="color:#0c4a6e;">accent-800</span><span style="color:#475569;">: </span><span style="color:#0c4a6e;">oklch(</span><span style="font-weight:bold;color:#d97706;">.36 .12 </span><span style="color:#0284c7;">calc</span><span style="color:#475569;">(</span><span style="color:#0284c7;">var</span><span style="color:#475569;">(--</span><span style="color:#0c4a6e;">brand-hue</span><span style="color:#475569;">) </span><span style="font-weight:bold;color:#0369a1;">+ </span><span style="font-weight:bold;color:#d97706;">180</span><span style="color:#475569;">)</span><span style="color:#0c4a6e;">);
</span><span style="color:#0c4a6e;">  </span><span style="color:#475569;">--</span><span style="color:#0c4a6e;">accent-900</span><span style="color:#475569;">: </span><span style="color:#0c4a6e;">oklch(</span><span style="font-weight:bold;color:#d97706;">.26 .08 </span><span style="color:#0284c7;">calc</span><span style="color:#475569;">(</span><span style="color:#0284c7;">var</span><span style="color:#475569;">(--</span><span style="color:#0c4a6e;">brand-hue</span><span style="color:#475569;">) </span><span style="font-weight:bold;color:#0369a1;">+ </span><span style="font-weight:bold;color:#d97706;">180</span><span style="color:#475569;">)</span><span style="color:#0c4a6e;">);
</span><span style="color:#0c4a6e;">  </span><span style="color:#475569;">--</span><span style="color:#0c4a6e;">accent-950</span><span style="color:#475569;">: </span><span style="color:#0c4a6e;">oklch(</span><span style="font-weight:bold;color:#d97706;">.16 .04 </span><span style="color:#0284c7;">calc</span><span style="color:#475569;">(</span><span style="color:#0284c7;">var</span><span style="color:#475569;">(--</span><span style="color:#0c4a6e;">brand-hue</span><span style="color:#475569;">) </span><span style="font-weight:bold;color:#0369a1;">+ </span><span style="font-weight:bold;color:#d97706;">180</span><span style="color:#475569;">)</span><span style="color:#0c4a6e;">);
</span><span style="color:#475569;">}
</span></code></pre>
<p>That is the simplest color scheme: complementary. High contrast, punches hard.</p>
<p>But you have more options. Here is how color schemes translate to OKLCH math:</p>
<ul>
<li>
<strong>Analogous</strong> — hues next to your brand (<code>± 30</code>). Low contrast, harmonious. Good for backgrounds and subtle variety.</li>
<li>
<strong>Complementary</strong> — opposite hue (<code>+ 180</code>). High contrast, pops. Good for CTAs and accents.</li>
<li>
<strong>Split complementary</strong> — the two hues on either side of the complement (<code>+ 150</code> and <code>- 150</code>). Same contrast as complementary but safer. Less jarring.</li>
<li>
<strong>Triadic</strong> — three hues evenly spaced (<code>+ 120</code> and <code>+ 240</code>). Balanced. Gives you a third color for free.</li>
</ul>
<pre lang="css" style="background-color:#f8fafc;"><code><span style="color:#0c4a6e;">--</span><span style="font-weight:bold;color:#dc2626;">analogous-light</span><span style="color:#0c4a6e;">: calc(</span><span style="font-weight:bold;color:#dc2626;">var</span><span style="color:#0c4a6e;">(--</span><span style="font-weight:bold;color:#dc2626;">brand-hue</span><span style="color:#0c4a6e;">) + 30);
</span><span style="color:#0c4a6e;">--</span><span style="font-weight:bold;color:#dc2626;">analogous-dark</span><span style="color:#0c4a6e;">: calc(</span><span style="font-weight:bold;color:#dc2626;">var</span><span style="color:#0c4a6e;">(--</span><span style="font-weight:bold;color:#dc2626;">brand-hue</span><span style="color:#0c4a6e;">) - 30);
</span><span style="color:#0c4a6e;">--</span><span style="font-weight:bold;color:#dc2626;">split-a</span><span style="color:#0c4a6e;">: calc(</span><span style="font-weight:bold;color:#dc2626;">var</span><span style="color:#0c4a6e;">(--</span><span style="font-weight:bold;color:#dc2626;">brand-hue</span><span style="color:#0c4a6e;">) + 150);
</span><span style="color:#0c4a6e;">--</span><span style="font-weight:bold;color:#dc2626;">split-b</span><span style="color:#0c4a6e;">: calc(</span><span style="font-weight:bold;color:#dc2626;">var</span><span style="color:#0c4a6e;">(--</span><span style="font-weight:bold;color:#dc2626;">brand-hue</span><span style="color:#0c4a6e;">) - 150);
</span><span style="color:#0c4a6e;">--</span><span style="font-weight:bold;color:#dc2626;">triad-a</span><span style="color:#0c4a6e;">: calc(</span><span style="font-weight:bold;color:#dc2626;">var</span><span style="color:#0c4a6e;">(--</span><span style="font-weight:bold;color:#dc2626;">brand-hue</span><span style="color:#0c4a6e;">) + 120);
</span><span style="color:#0c4a6e;">--</span><span style="font-weight:bold;color:#dc2626;">triad-b</span><span style="color:#0c4a6e;">: calc(</span><span style="font-weight:bold;color:#dc2626;">var</span><span style="color:#0c4a6e;">(--</span><span style="font-weight:bold;color:#dc2626;">brand-hue</span><span style="color:#0c4a6e;">) + 240);
</span></code></pre>
<p>Pick one scheme and stick with it. The math guarantees the relationship. You just pick the starting hue.</p>
<h2>
<a href="#all-together-now" aria-hidden="true" class="anchor" id="all-together-now"></a>All together now</h2>
<pre lang="css" style="background-color:#f8fafc;"><code><span style="color:#475569;">:</span><span style="color:#0c4a6e;">root </span><span style="color:#475569;">{
</span><span style="color:#0c4a6e;">  </span><span style="color:#475569;">--</span><span style="color:#0c4a6e;">brand-hue</span><span style="color:#475569;">: </span><span style="font-weight:bold;color:#d97706;">250</span><span style="color:#475569;">;
</span><span style="color:#0c4a6e;">
</span><span style="color:#0c4a6e;">  </span><span style="font-style:italic;color:#475569;">/*</span><span style="font-style:italic;color:#64748b;"> Gray (low chroma, brand undertone) </span><span style="font-style:italic;color:#475569;">*/
</span><span style="color:#0c4a6e;">  </span><span style="color:#475569;">--</span><span style="color:#0c4a6e;">gray-50</span><span style="color:#475569;">: </span><span style="color:#0c4a6e;">oklch(</span><span style="font-weight:bold;color:#d97706;">.99 .005 </span><span style="color:#0284c7;">var</span><span style="color:#475569;">(--</span><span style="color:#0c4a6e;">brand-hue</span><span style="color:#475569;">)</span><span style="color:#0c4a6e;">);
</span><span style="color:#0c4a6e;">  </span><span style="color:#475569;">--</span><span style="color:#0c4a6e;">gray-100</span><span style="color:#475569;">: </span><span style="color:#0c4a6e;">oklch(</span><span style="font-weight:bold;color:#d97706;">.97 .005 </span><span style="color:#0284c7;">var</span><span style="color:#475569;">(--</span><span style="color:#0c4a6e;">brand-hue</span><span style="color:#475569;">)</span><span style="color:#0c4a6e;">);
</span><span style="color:#0c4a6e;">  </span><span style="color:#475569;">--</span><span style="color:#0c4a6e;">gray-200</span><span style="color:#475569;">: </span><span style="color:#0c4a6e;">oklch(</span><span style="font-weight:bold;color:#d97706;">.93 .005 </span><span style="color:#0284c7;">var</span><span style="color:#475569;">(--</span><span style="color:#0c4a6e;">brand-hue</span><span style="color:#475569;">)</span><span style="color:#0c4a6e;">);
</span><span style="color:#0c4a6e;">  </span><span style="color:#475569;">--</span><span style="color:#0c4a6e;">gray-300</span><span style="color:#475569;">: </span><span style="color:#0c4a6e;">oklch(</span><span style="font-weight:bold;color:#d97706;">.86 .008 </span><span style="color:#0284c7;">var</span><span style="color:#475569;">(--</span><span style="color:#0c4a6e;">brand-hue</span><span style="color:#475569;">)</span><span style="color:#0c4a6e;">);
</span><span style="color:#0c4a6e;">  </span><span style="color:#475569;">--</span><span style="color:#0c4a6e;">gray-400</span><span style="color:#475569;">: </span><span style="color:#0c4a6e;">oklch(</span><span style="font-weight:bold;color:#d97706;">.76 .01 </span><span style="color:#0284c7;">var</span><span style="color:#475569;">(--</span><span style="color:#0c4a6e;">brand-hue</span><span style="color:#475569;">)</span><span style="color:#0c4a6e;">);
</span><span style="color:#0c4a6e;">  </span><span style="color:#475569;">--</span><span style="color:#0c4a6e;">gray-500</span><span style="color:#475569;">: </span><span style="color:#0c4a6e;">oklch(</span><span style="font-weight:bold;color:#d97706;">.64 .01 </span><span style="color:#0284c7;">var</span><span style="color:#475569;">(--</span><span style="color:#0c4a6e;">brand-hue</span><span style="color:#475569;">)</span><span style="color:#0c4a6e;">);
</span><span style="color:#0c4a6e;">  </span><span style="color:#475569;">--</span><span style="color:#0c4a6e;">gray-600</span><span style="color:#475569;">: </span><span style="color:#0c4a6e;">oklch(</span><span style="font-weight:bold;color:#d97706;">.54 .01 </span><span style="color:#0284c7;">var</span><span style="color:#475569;">(--</span><span style="color:#0c4a6e;">brand-hue</span><span style="color:#475569;">)</span><span style="color:#0c4a6e;">);
</span><span style="color:#0c4a6e;">  </span><span style="color:#475569;">--</span><span style="color:#0c4a6e;">gray-700</span><span style="color:#475569;">: </span><span style="color:#0c4a6e;">oklch(</span><span style="font-weight:bold;color:#d97706;">.44 .01 </span><span style="color:#0284c7;">var</span><span style="color:#475569;">(--</span><span style="color:#0c4a6e;">brand-hue</span><span style="color:#475569;">)</span><span style="color:#0c4a6e;">);
</span><span style="color:#0c4a6e;">  </span><span style="color:#475569;">--</span><span style="color:#0c4a6e;">gray-800</span><span style="color:#475569;">: </span><span style="color:#0c4a6e;">oklch(</span><span style="font-weight:bold;color:#d97706;">.34 .008 </span><span style="color:#0284c7;">var</span><span style="color:#475569;">(--</span><span style="color:#0c4a6e;">brand-hue</span><span style="color:#475569;">)</span><span style="color:#0c4a6e;">);
</span><span style="color:#0c4a6e;">  </span><span style="color:#475569;">--</span><span style="color:#0c4a6e;">gray-900</span><span style="color:#475569;">: </span><span style="color:#0c4a6e;">oklch(</span><span style="font-weight:bold;color:#d97706;">.24 .005 </span><span style="color:#0284c7;">var</span><span style="color:#475569;">(--</span><span style="color:#0c4a6e;">brand-hue</span><span style="color:#475569;">)</span><span style="color:#0c4a6e;">);
</span><span style="color:#0c4a6e;">  </span><span style="color:#475569;">--</span><span style="color:#0c4a6e;">gray-950</span><span style="color:#475569;">: </span><span style="color:#0c4a6e;">oklch(</span><span style="font-weight:bold;color:#d97706;">.14 .005 </span><span style="color:#0284c7;">var</span><span style="color:#475569;">(--</span><span style="color:#0c4a6e;">brand-hue</span><span style="color:#475569;">)</span><span style="color:#0c4a6e;">);
</span><span style="color:#0c4a6e;">
</span><span style="color:#0c4a6e;">  </span><span style="font-style:italic;color:#475569;">/*</span><span style="font-style:italic;color:#64748b;"> Brand </span><span style="font-style:italic;color:#475569;">*/
</span><span style="color:#0c4a6e;">  </span><span style="color:#475569;">--</span><span style="color:#0c4a6e;">brand-50</span><span style="color:#475569;">: </span><span style="color:#0c4a6e;">oklch(</span><span style="font-weight:bold;color:#d97706;">.99 .01 </span><span style="color:#0284c7;">var</span><span style="color:#475569;">(--</span><span style="color:#0c4a6e;">brand-hue</span><span style="color:#475569;">)</span><span style="color:#0c4a6e;">);
</span><span style="color:#0c4a6e;">  </span><span style="color:#475569;">--</span><span style="color:#0c4a6e;">brand-100</span><span style="color:#475569;">: </span><span style="color:#0c4a6e;">oklch(</span><span style="font-weight:bold;color:#d97706;">.98 .02 </span><span style="color:#0284c7;">var</span><span style="color:#475569;">(--</span><span style="color:#0c4a6e;">brand-hue</span><span style="color:#475569;">)</span><span style="color:#0c4a6e;">);
</span><span style="color:#0c4a6e;">  </span><span style="color:#475569;">--</span><span style="color:#0c4a6e;">brand-200</span><span style="color:#475569;">: </span><span style="color:#0c4a6e;">oklch(</span><span style="font-weight:bold;color:#d97706;">.94 .04 </span><span style="color:#0284c7;">var</span><span style="color:#475569;">(--</span><span style="color:#0c4a6e;">brand-hue</span><span style="color:#475569;">)</span><span style="color:#0c4a6e;">);
</span><span style="color:#0c4a6e;">  </span><span style="color:#475569;">--</span><span style="color:#0c4a6e;">brand-300</span><span style="color:#475569;">: </span><span style="color:#0c4a6e;">oklch(</span><span style="font-weight:bold;color:#d97706;">.86 .08 </span><span style="color:#0284c7;">var</span><span style="color:#475569;">(--</span><span style="color:#0c4a6e;">brand-hue</span><span style="color:#475569;">)</span><span style="color:#0c4a6e;">);
</span><span style="color:#0c4a6e;">  </span><span style="color:#475569;">--</span><span style="color:#0c4a6e;">brand-400</span><span style="color:#475569;">: </span><span style="color:#0c4a6e;">oklch(</span><span style="font-weight:bold;color:#d97706;">.74 .14 </span><span style="color:#0284c7;">var</span><span style="color:#475569;">(--</span><span style="color:#0c4a6e;">brand-hue</span><span style="color:#475569;">)</span><span style="color:#0c4a6e;">);
</span><span style="color:#0c4a6e;">  </span><span style="color:#475569;">--</span><span style="color:#0c4a6e;">brand-500</span><span style="color:#475569;">: </span><span style="color:#0c4a6e;">oklch(</span><span style="font-weight:bold;color:#d97706;">.6 .18 </span><span style="color:#0284c7;">var</span><span style="color:#475569;">(--</span><span style="color:#0c4a6e;">brand-hue</span><span style="color:#475569;">)</span><span style="color:#0c4a6e;">);
</span><span style="color:#0c4a6e;">  </span><span style="color:#475569;">--</span><span style="color:#0c4a6e;">brand-600</span><span style="color:#475569;">: </span><span style="color:#0c4a6e;">oklch(</span><span style="font-weight:bold;color:#d97706;">.52 .16 </span><span style="color:#0284c7;">var</span><span style="color:#475569;">(--</span><span style="color:#0c4a6e;">brand-hue</span><span style="color:#475569;">)</span><span style="color:#0c4a6e;">);
</span><span style="color:#0c4a6e;">  </span><span style="color:#475569;">--</span><span style="color:#0c4a6e;">brand-700</span><span style="color:#475569;">: </span><span style="color:#0c4a6e;">oklch(</span><span style="font-weight:bold;color:#d97706;">.44 .14 </span><span style="color:#0284c7;">var</span><span style="color:#475569;">(--</span><span style="color:#0c4a6e;">brand-hue</span><span style="color:#475569;">)</span><span style="color:#0c4a6e;">);
</span><span style="color:#0c4a6e;">  </span><span style="color:#475569;">--</span><span style="color:#0c4a6e;">brand-800</span><span style="color:#475569;">: </span><span style="color:#0c4a6e;">oklch(</span><span style="font-weight:bold;color:#d97706;">.36 .12 </span><span style="color:#0284c7;">var</span><span style="color:#475569;">(--</span><span style="color:#0c4a6e;">brand-hue</span><span style="color:#475569;">)</span><span style="color:#0c4a6e;">);
</span><span style="color:#0c4a6e;">  </span><span style="color:#475569;">--</span><span style="color:#0c4a6e;">brand-900</span><span style="color:#475569;">: </span><span style="color:#0c4a6e;">oklch(</span><span style="font-weight:bold;color:#d97706;">.26 .08 </span><span style="color:#0284c7;">var</span><span style="color:#475569;">(--</span><span style="color:#0c4a6e;">brand-hue</span><span style="color:#475569;">)</span><span style="color:#0c4a6e;">);
</span><span style="color:#0c4a6e;">  </span><span style="color:#475569;">--</span><span style="color:#0c4a6e;">brand-950</span><span style="color:#475569;">: </span><span style="color:#0c4a6e;">oklch(</span><span style="font-weight:bold;color:#d97706;">.16 .04 </span><span style="color:#0284c7;">var</span><span style="color:#475569;">(--</span><span style="color:#0c4a6e;">brand-hue</span><span style="color:#475569;">)</span><span style="color:#0c4a6e;">);
</span><span style="color:#0c4a6e;">
</span><span style="color:#0c4a6e;">  </span><span style="font-style:italic;color:#475569;">/*</span><span style="font-style:italic;color:#64748b;"> Accent (complementary) </span><span style="font-style:italic;color:#475569;">*/
</span><span style="color:#0c4a6e;">  </span><span style="color:#475569;">--</span><span style="color:#0c4a6e;">accent-50</span><span style="color:#475569;">: </span><span style="color:#0c4a6e;">oklch(</span><span style="font-weight:bold;color:#d97706;">.99 .01 </span><span style="color:#0284c7;">calc</span><span style="color:#475569;">(</span><span style="color:#0284c7;">var</span><span style="color:#475569;">(--</span><span style="color:#0c4a6e;">brand-hue</span><span style="color:#475569;">) </span><span style="font-weight:bold;color:#0369a1;">+ </span><span style="font-weight:bold;color:#d97706;">180</span><span style="color:#475569;">)</span><span style="color:#0c4a6e;">);
</span><span style="color:#0c4a6e;">  </span><span style="color:#475569;">--</span><span style="color:#0c4a6e;">accent-100</span><span style="color:#475569;">: </span><span style="color:#0c4a6e;">oklch(</span><span style="font-weight:bold;color:#d97706;">.98 .02 </span><span style="color:#0284c7;">calc</span><span style="color:#475569;">(</span><span style="color:#0284c7;">var</span><span style="color:#475569;">(--</span><span style="color:#0c4a6e;">brand-hue</span><span style="color:#475569;">) </span><span style="font-weight:bold;color:#0369a1;">+ </span><span style="font-weight:bold;color:#d97706;">180</span><span style="color:#475569;">)</span><span style="color:#0c4a6e;">);
</span><span style="color:#0c4a6e;">  </span><span style="color:#475569;">--</span><span style="color:#0c4a6e;">accent-200</span><span style="color:#475569;">: </span><span style="color:#0c4a6e;">oklch(</span><span style="font-weight:bold;color:#d97706;">.94 .04 </span><span style="color:#0284c7;">calc</span><span style="color:#475569;">(</span><span style="color:#0284c7;">var</span><span style="color:#475569;">(--</span><span style="color:#0c4a6e;">brand-hue</span><span style="color:#475569;">) </span><span style="font-weight:bold;color:#0369a1;">+ </span><span style="font-weight:bold;color:#d97706;">180</span><span style="color:#475569;">)</span><span style="color:#0c4a6e;">);
</span><span style="color:#0c4a6e;">  </span><span style="color:#475569;">--</span><span style="color:#0c4a6e;">accent-300</span><span style="color:#475569;">: </span><span style="color:#0c4a6e;">oklch(</span><span style="font-weight:bold;color:#d97706;">.86 .08 </span><span style="color:#0284c7;">calc</span><span style="color:#475569;">(</span><span style="color:#0284c7;">var</span><span style="color:#475569;">(--</span><span style="color:#0c4a6e;">brand-hue</span><span style="color:#475569;">) </span><span style="font-weight:bold;color:#0369a1;">+ </span><span style="font-weight:bold;color:#d97706;">180</span><span style="color:#475569;">)</span><span style="color:#0c4a6e;">);
</span><span style="color:#0c4a6e;">  </span><span style="color:#475569;">--</span><span style="color:#0c4a6e;">accent-400</span><span style="color:#475569;">: </span><span style="color:#0c4a6e;">oklch(</span><span style="font-weight:bold;color:#d97706;">.74 .14 </span><span style="color:#0284c7;">calc</span><span style="color:#475569;">(</span><span style="color:#0284c7;">var</span><span style="color:#475569;">(--</span><span style="color:#0c4a6e;">brand-hue</span><span style="color:#475569;">) </span><span style="font-weight:bold;color:#0369a1;">+ </span><span style="font-weight:bold;color:#d97706;">180</span><span style="color:#475569;">)</span><span style="color:#0c4a6e;">);
</span><span style="color:#0c4a6e;">  </span><span style="color:#475569;">--</span><span style="color:#0c4a6e;">accent-500</span><span style="color:#475569;">: </span><span style="color:#0c4a6e;">oklch(</span><span style="font-weight:bold;color:#d97706;">.6 .18 </span><span style="color:#0284c7;">calc</span><span style="color:#475569;">(</span><span style="color:#0284c7;">var</span><span style="color:#475569;">(--</span><span style="color:#0c4a6e;">brand-hue</span><span style="color:#475569;">) </span><span style="font-weight:bold;color:#0369a1;">+ </span><span style="font-weight:bold;color:#d97706;">180</span><span style="color:#475569;">)</span><span style="color:#0c4a6e;">);
</span><span style="color:#0c4a6e;">  </span><span style="color:#475569;">--</span><span style="color:#0c4a6e;">accent-600</span><span style="color:#475569;">: </span><span style="color:#0c4a6e;">oklch(</span><span style="font-weight:bold;color:#d97706;">.52 .16 </span><span style="color:#0284c7;">calc</span><span style="color:#475569;">(</span><span style="color:#0284c7;">var</span><span style="color:#475569;">(--</span><span style="color:#0c4a6e;">brand-hue</span><span style="color:#475569;">) </span><span style="font-weight:bold;color:#0369a1;">+ </span><span style="font-weight:bold;color:#d97706;">180</span><span style="color:#475569;">)</span><span style="color:#0c4a6e;">);
</span><span style="color:#0c4a6e;">  </span><span style="color:#475569;">--</span><span style="color:#0c4a6e;">accent-700</span><span style="color:#475569;">: </span><span style="color:#0c4a6e;">oklch(</span><span style="font-weight:bold;color:#d97706;">.44 .14 </span><span style="color:#0284c7;">calc</span><span style="color:#475569;">(</span><span style="color:#0284c7;">var</span><span style="color:#475569;">(--</span><span style="color:#0c4a6e;">brand-hue</span><span style="color:#475569;">) </span><span style="font-weight:bold;color:#0369a1;">+ </span><span style="font-weight:bold;color:#d97706;">180</span><span style="color:#475569;">)</span><span style="color:#0c4a6e;">);
</span><span style="color:#0c4a6e;">  </span><span style="color:#475569;">--</span><span style="color:#0c4a6e;">accent-800</span><span style="color:#475569;">: </span><span style="color:#0c4a6e;">oklch(</span><span style="font-weight:bold;color:#d97706;">.36 .12 </span><span style="color:#0284c7;">calc</span><span style="color:#475569;">(</span><span style="color:#0284c7;">var</span><span style="color:#475569;">(--</span><span style="color:#0c4a6e;">brand-hue</span><span style="color:#475569;">) </span><span style="font-weight:bold;color:#0369a1;">+ </span><span style="font-weight:bold;color:#d97706;">180</span><span style="color:#475569;">)</span><span style="color:#0c4a6e;">);
</span><span style="color:#0c4a6e;">  </span><span style="color:#475569;">--</span><span style="color:#0c4a6e;">accent-900</span><span style="color:#475569;">: </span><span style="color:#0c4a6e;">oklch(</span><span style="font-weight:bold;color:#d97706;">.26 .08 </span><span style="color:#0284c7;">calc</span><span style="color:#475569;">(</span><span style="color:#0284c7;">var</span><span style="color:#475569;">(--</span><span style="color:#0c4a6e;">brand-hue</span><span style="color:#475569;">) </span><span style="font-weight:bold;color:#0369a1;">+ </span><span style="font-weight:bold;color:#d97706;">180</span><span style="color:#475569;">)</span><span style="color:#0c4a6e;">);
</span><span style="color:#0c4a6e;">  </span><span style="color:#475569;">--</span><span style="color:#0c4a6e;">accent-950</span><span style="color:#475569;">: </span><span style="color:#0c4a6e;">oklch(</span><span style="font-weight:bold;color:#d97706;">.16 .04 </span><span style="color:#0284c7;">calc</span><span style="color:#475569;">(</span><span style="color:#0284c7;">var</span><span style="color:#475569;">(--</span><span style="color:#0c4a6e;">brand-hue</span><span style="color:#475569;">) </span><span style="font-weight:bold;color:#0369a1;">+ </span><span style="font-weight:bold;color:#d97706;">180</span><span style="color:#475569;">)</span><span style="color:#0c4a6e;">);
</span><span style="color:#475569;">}
</span></code></pre>
<p>Use them anywhere:</p>
<pre lang="css" style="background-color:#f8fafc;"><code><span style="color:#475569;">.</span><span style="color:#0369a1;">btn--primary </span><span style="color:#475569;">{
</span><span style="color:#0c4a6e;">  background</span><span style="color:#475569;">: </span><span style="color:#0284c7;">var</span><span style="color:#475569;">(--</span><span style="color:#0c4a6e;">brand-500</span><span style="color:#475569;">);
</span><span style="color:#0c4a6e;">
</span><span style="color:#0c4a6e;">  &amp;</span><span style="color:#475569;">:</span><span style="color:#0c4a6e;">hover {
</span><span style="color:#0c4a6e;">    background: </span><span style="color:#0284c7;">var</span><span style="color:#475569;">(--</span><span style="color:#0c4a6e;">brand-600</span><span style="color:#475569;">);
</span><span style="color:#0c4a6e;">  </span><span style="color:#475569;">}
</span><span style="color:#0c4a6e;">}
</span><span style="color:#0c4a6e;">
</span><span style="color:#475569;">.</span><span style="color:#0369a1;">card </span><span style="color:#475569;">{
</span><span style="color:#0c4a6e;">  background</span><span style="color:#475569;">: </span><span style="color:#0284c7;">var</span><span style="color:#475569;">(--</span><span style="color:#0c4a6e;">gray-50</span><span style="color:#475569;">);
</span><span style="color:#0c4a6e;">  border</span><span style="color:#475569;">: </span><span style="font-weight:bold;color:#d97706;">1</span><span style="font-weight:bold;color:#dc2626;">px </span><span style="color:#0c4a6e;">solid </span><span style="color:#0284c7;">var</span><span style="color:#475569;">(--</span><span style="color:#0c4a6e;">gray-100</span><span style="color:#475569;">);
</span><span style="color:#475569;">}
</span><span style="color:#0c4a6e;">
</span><span style="color:#475569;">.</span><span style="color:#0369a1;">badge--new </span><span style="color:#475569;">{
</span><span style="color:#0c4a6e;">  color</span><span style="color:#475569;">: </span><span style="color:#0284c7;">var</span><span style="color:#475569;">(--</span><span style="color:#0c4a6e;">accent-700</span><span style="color:#475569;">);
</span><span style="color:#0c4a6e;">  background</span><span style="color:#475569;">: </span><span style="color:#0284c7;">var</span><span style="color:#475569;">(--</span><span style="color:#0c4a6e;">accent-100</span><span style="color:#475569;">);
</span><span style="color:#475569;">}
</span></code></pre>
<p>Three palettes. One variable to change them all. No hex codes to manage. Winning! 🏆</p>
<p>Above <code>:root{}</code> content is easily copied from one app or site to your next one. Making sure you can return building quickly.</p>
]]></content>


  </entry>
  
  <entry>
    <id>https://railsdesigner.com/recreating-stimulus-targets-actions-values/?ref=rss</id>
    <title>Recreating Stimulus: targets, actions and reactive values</title>
    <link href="https://railsdesigner.com/recreating-stimulus-targets-actions-values/?ref=rss" rel="alternate" type="text/html"/>
    <published>2026-08-06T07:30:00Z</published>
    <updated>2026-08-06T07:30:00Z</updated>

    
      <author>
        <name>Rails Designer</name>
        <email>support@railsdesigner.com</email>
      </author>


      <content type="html" xml:base="https://railsdesigner.com/recreating-stimulus-targets-actions-values/?ref=rss"><![CDATA[<p>This is part 2 of a two-part series. <a href="/recreating-stimulus-controllers/">Part 1</a> covered controllers and lifecycle.</p>
<p><img src="https://railsdesigner.com/images/posts/recreating-stimulus-2.jpg" alt=""></p>
<p>Controllers connect and disconnect. That is not useful on its own. The value comes from three things: referencing elements inside the controller, handling events without inline JavaScript and reacting to data changes. Stimulus calls these targets, actions and values.</p>
<p>Each maps to a distinct JavaScript feature. And none of them repeat the tricks from part 1.</p>
<p>Here is the code. See the <a href="https://github.com/rails-designer-repos/recreate-stimulus/tree/b4fa5bb">full commit on GitHub</a>.</p>
<h2>
<a href="#targets-dynamic-getters" aria-hidden="true" class="anchor" id="targets-dynamic-getters"></a>Targets: dynamic getters</h2>
<p>A target is a named element inside a controller’s scope. Declare it in the class and get a getter for free:</p>
<pre lang="js" style="background-color:#f8fafc;"><code><span style="font-weight:bold;color:#dc2626;">class </span><span style="font-weight:bold;color:#b91c1c;">HelloController </span><span style="font-weight:bold;color:#dc2626;">extends </span><span style="color:#0c4a6e;">Controller </span><span style="color:#475569;">{
</span><span style="color:#0c4a6e;">  </span><span style="font-weight:bold;color:#dc2626;">static </span><span style="color:#0284c7;">targets </span><span style="color:#0c4a6e;">= ["name", "output"]
</span><span style="color:#475569;">}
</span></code></pre>
<p>The getter <code>this.nameTarget</code> returns the first element with <code>data-hello-target="name"</code> inside the controller element. The plural <code>this.nameTargets</code> returns all of them. The existence <code>this.hasNameTarget</code> returns true or false.</p>
<p>These getters do not exist at compile time. They are created dynamically using <code>Object.defineProperty</code>:</p>
<pre lang="js" style="background-color:#f8fafc;"><code><span style="font-weight:bold;color:#dc2626;">export </span><span style="color:#1e293b;">function wireTargets</span><span style="color:#475569;">(</span><span style="color:#1e293b;">controller</span><span style="color:#475569;">, </span><span style="color:#1e293b;">identifier</span><span style="color:#475569;">) {
</span><span style="color:#0c4a6e;">  </span><span style="font-weight:bold;color:#dc2626;">for </span><span style="color:#475569;">(</span><span style="font-weight:bold;color:#dc2626;">const </span><span style="color:#1e293b;">name </span><span style="font-weight:bold;color:#0369a1;">of </span><span style="color:#1e293b;">controller</span><span style="color:#475569;">.</span><span style="color:#1e293b;">constructor</span><span style="color:#475569;">.</span><span style="color:#0c4a6e;">targets</span><span style="color:#475569;">) {
</span><span style="color:#0c4a6e;">    Object</span><span style="color:#475569;">.</span><span style="color:#1e293b;">defineProperty</span><span style="color:#475569;">(</span><span style="color:#1e293b;">controller</span><span style="color:#475569;">, `${</span><span style="color:#1e293b;">camelize</span><span style="color:#475569;">(</span><span style="color:#1e293b;">name</span><span style="color:#475569;">)}</span><span style="color:#0369a1;">Target</span><span style="color:#475569;">`, {
</span><span style="color:#0c4a6e;">      </span><span style="color:#0284c7;">get</span><span style="color:#475569;">() {
</span><span style="color:#0c4a6e;">        </span><span style="font-weight:bold;color:#dc2626;">return </span><span style="color:#1e293b;">this</span><span style="color:#475569;">.</span><span style="color:#0c4a6e;">element</span><span style="color:#475569;">.</span><span style="color:#1e293b;">querySelector</span><span style="color:#475569;">(`</span><span style="color:#0369a1;">[data-</span><span style="color:#475569;">${</span><span style="color:#1e293b;">identifier</span><span style="color:#475569;">}</span><span style="color:#0369a1;">-target="</span><span style="color:#475569;">${</span><span style="color:#1e293b;">name</span><span style="color:#475569;">}</span><span style="color:#0369a1;">"]</span><span style="color:#475569;">`)
</span><span style="color:#0c4a6e;">      </span><span style="color:#475569;">}
</span><span style="color:#0c4a6e;">    </span><span style="color:#475569;">})
</span><span style="color:#0c4a6e;">
</span><span style="color:#0c4a6e;">    Object</span><span style="color:#475569;">.</span><span style="color:#1e293b;">defineProperty</span><span style="color:#475569;">(</span><span style="color:#1e293b;">controller</span><span style="color:#475569;">, `${</span><span style="color:#1e293b;">camelize</span><span style="color:#475569;">(</span><span style="color:#1e293b;">name</span><span style="color:#475569;">)}</span><span style="color:#0369a1;">Targets</span><span style="color:#475569;">`, {
</span><span style="color:#0c4a6e;">      </span><span style="color:#0284c7;">get</span><span style="color:#475569;">() {
</span><span style="color:#0c4a6e;">        </span><span style="font-weight:bold;color:#dc2626;">return </span><span style="color:#1e293b;">this</span><span style="color:#475569;">.</span><span style="color:#0c4a6e;">element</span><span style="color:#475569;">.</span><span style="color:#1e293b;">querySelectorAll</span><span style="color:#475569;">(`</span><span style="color:#0369a1;">[data-</span><span style="color:#475569;">${</span><span style="color:#1e293b;">identifier</span><span style="color:#475569;">}</span><span style="color:#0369a1;">-target="</span><span style="color:#475569;">${</span><span style="color:#1e293b;">name</span><span style="color:#475569;">}</span><span style="color:#0369a1;">"]</span><span style="color:#475569;">`)
</span><span style="color:#0c4a6e;">      </span><span style="color:#475569;">}
</span><span style="color:#0c4a6e;">    </span><span style="color:#475569;">})
</span><span style="color:#0c4a6e;">  </span><span style="color:#475569;">}
</span><span style="color:#475569;">}
</span></code></pre>
<p><code>Object.defineProperty</code> defines a property on an existing object with configurable behavior (in Ruby, you’d use <code>define_method</code> or <code>attr_accessor</code> with a custom getter to achieve similar dynamic property behavior). The getter runs every time the property is accessed, so the query is always live. If the DOM changes, the getter returns the updated result. No manual refresh needed.</p>
<p>This is different from a regular property assignment. With <code>controller.nameTarget = value</code> you set a static value. With <code>Object.defineProperty</code> you control every aspect: get, set, enumerable and configurable (in Ruby, this level of control over property access would be achieved using <code>method_missing</code> or <code>define_method</code> with custom logic to intercept and control all aspects of property access).</p>
<h2>
<a href="#actions-event-delegation" aria-hidden="true" class="anchor" id="actions-event-delegation"></a>Actions: event delegation</h2>
<p>Actions wire DOM events to controller methods. In HTML you write:</p>
<pre lang="html" style="background-color:#f8fafc;"><code><span style="color:#475569;">&lt;</span><span style="font-weight:bold;color:#dc2626;">button </span><span style="color:#0369a1;">data-action</span><span style="color:#475569;">="</span><span style="color:#0369a1;">click-&gt;hello#greet</span><span style="color:#475569;">"&gt;</span><span style="color:#0c4a6e;">Greet</span><span style="color:#475569;">&lt;/</span><span style="font-weight:bold;color:#dc2626;">button</span><span style="color:#475569;">&gt;
</span></code></pre>
<p>No <code>addEventListener</code> in sight. The framework handles it with a single document-level listener per event type. This is event delegation, and it works like this:</p>
<pre lang="js" style="background-color:#f8fafc;"><code><span style="font-weight:bold;color:#dc2626;">export </span><span style="color:#1e293b;">function energize</span><span style="color:#475569;">(</span><span style="color:#1e293b;">lookup</span><span style="color:#475569;">) {
</span><span style="color:#0c4a6e;">  </span><span style="color:#1e293b;">controllerLookup </span><span style="font-weight:bold;color:#0369a1;">= </span><span style="color:#1e293b;">lookup
</span><span style="color:#0c4a6e;">
</span><span style="color:#0c4a6e;">  </span><span style="font-weight:bold;color:#dc2626;">for </span><span style="color:#475569;">(</span><span style="font-weight:bold;color:#dc2626;">const </span><span style="color:#1e293b;">eventType </span><span style="font-weight:bold;color:#0369a1;">of </span><span style="color:#475569;">["</span><span style="color:#0369a1;">click</span><span style="color:#475569;">", "</span><span style="color:#0369a1;">submit</span><span style="color:#475569;">", "</span><span style="color:#0369a1;">change</span><span style="color:#475569;">", "</span><span style="color:#0369a1;">input</span><span style="color:#475569;">", "</span><span style="color:#0369a1;">keydown</span><span style="color:#475569;">", "</span><span style="color:#0369a1;">keyup</span><span style="color:#475569;">"]) {
</span><span style="color:#0c4a6e;">    document</span><span style="color:#475569;">.</span><span style="color:#1e293b;">addEventListener</span><span style="color:#475569;">(</span><span style="color:#1e293b;">eventType</span><span style="color:#475569;">, </span><span style="color:#1e293b;">spark</span><span style="color:#475569;">)
</span><span style="color:#0c4a6e;">  </span><span style="color:#475569;">}
</span><span style="color:#475569;">}
</span><span style="color:#0c4a6e;">
</span><span style="font-weight:bold;color:#dc2626;">function </span><span style="color:#0284c7;">spark</span><span style="color:#475569;">(</span><span style="color:#1e293b;">event</span><span style="color:#475569;">) {
</span><span style="color:#0c4a6e;">  </span><span style="font-weight:bold;color:#dc2626;">const </span><span style="color:#1e293b;">actionElement </span><span style="font-weight:bold;color:#0369a1;">= </span><span style="color:#1e293b;">event</span><span style="color:#475569;">.</span><span style="color:#0c4a6e;">target</span><span style="color:#475569;">.</span><span style="color:#1e293b;">closest</span><span style="color:#475569;">("</span><span style="color:#0369a1;">[data-action]</span><span style="color:#475569;">")
</span><span style="color:#0c4a6e;">  </span><span style="font-weight:bold;color:#dc2626;">if </span><span style="color:#475569;">(</span><span style="font-weight:bold;color:#0369a1;">!</span><span style="color:#1e293b;">actionElement</span><span style="color:#475569;">) </span><span style="font-weight:bold;color:#dc2626;">return
</span><span style="color:#0c4a6e;">
</span><span style="color:#0c4a6e;">  </span><span style="font-weight:bold;color:#dc2626;">const </span><span style="color:#1e293b;">raw </span><span style="font-weight:bold;color:#0369a1;">= </span><span style="color:#1e293b;">actionElement</span><span style="color:#475569;">.</span><span style="color:#0284c7;">getAttribute</span><span style="color:#475569;">("</span><span style="color:#0369a1;">data-action</span><span style="color:#475569;">")
</span><span style="color:#0c4a6e;">  </span><span style="font-weight:bold;color:#dc2626;">const </span><span style="color:#1e293b;">descriptors </span><span style="font-weight:bold;color:#0369a1;">= </span><span style="color:#1e293b;">raw</span><span style="color:#475569;">.</span><span style="color:#1e293b;">split</span><span style="color:#475569;">(" ").</span><span style="color:#1e293b;">map</span><span style="color:#475569;">(</span><span style="color:#1e293b;">part </span><span style="font-weight:bold;color:#dc2626;">=&gt; </span><span style="color:#1e293b;">part</span><span style="color:#475569;">.</span><span style="color:#1e293b;">trim</span><span style="color:#475569;">()).</span><span style="color:#1e293b;">filter</span><span style="color:#475569;">(</span><span style="color:#0c4a6e;">Boolean</span><span style="color:#475569;">)
</span><span style="color:#0c4a6e;">
</span><span style="color:#0c4a6e;">  </span><span style="font-weight:bold;color:#dc2626;">for </span><span style="color:#475569;">(</span><span style="font-weight:bold;color:#dc2626;">const </span><span style="color:#1e293b;">descriptor </span><span style="font-weight:bold;color:#0369a1;">of </span><span style="color:#1e293b;">descriptors</span><span style="color:#475569;">) {
</span><span style="color:#0c4a6e;">    </span><span style="font-weight:bold;color:#dc2626;">const </span><span style="color:#1e293b;">route </span><span style="font-weight:bold;color:#0369a1;">= </span><span style="color:#1e293b;">deconstruct</span><span style="color:#475569;">(</span><span style="color:#1e293b;">descriptor</span><span style="color:#475569;">, </span><span style="color:#1e293b;">event</span><span style="color:#475569;">.</span><span style="color:#0c4a6e;">type</span><span style="color:#475569;">)
</span><span style="color:#0c4a6e;">    </span><span style="font-weight:bold;color:#dc2626;">if </span><span style="color:#475569;">(</span><span style="font-weight:bold;color:#0369a1;">!</span><span style="color:#1e293b;">route</span><span style="color:#475569;">) </span><span style="font-weight:bold;color:#dc2626;">continue
</span><span style="color:#0c4a6e;">
</span><span style="color:#0c4a6e;">    </span><span style="font-weight:bold;color:#dc2626;">const </span><span style="color:#1e293b;">controllerElement </span><span style="font-weight:bold;color:#0369a1;">= </span><span style="color:#1e293b;">actionElement</span><span style="color:#475569;">.</span><span style="color:#1e293b;">closest</span><span style="color:#475569;">(`</span><span style="color:#0369a1;">[data-controller~="</span><span style="color:#475569;">${</span><span style="color:#1e293b;">route</span><span style="color:#475569;">.</span><span style="color:#0c4a6e;">identifier</span><span style="color:#475569;">}</span><span style="color:#0369a1;">"]</span><span style="color:#475569;">`)
</span><span style="color:#0c4a6e;">    </span><span style="font-weight:bold;color:#dc2626;">if </span><span style="color:#475569;">(</span><span style="font-weight:bold;color:#0369a1;">!</span><span style="color:#1e293b;">controllerElement</span><span style="color:#475569;">) </span><span style="font-weight:bold;color:#dc2626;">continue
</span><span style="color:#0c4a6e;">
</span><span style="color:#0c4a6e;">    </span><span style="font-weight:bold;color:#dc2626;">const </span><span style="color:#1e293b;">controller </span><span style="font-weight:bold;color:#0369a1;">= </span><span style="color:#1e293b;">controllerLookup</span><span style="color:#475569;">(</span><span style="color:#1e293b;">controllerElement</span><span style="color:#475569;">)
</span><span style="color:#0c4a6e;">    </span><span style="font-weight:bold;color:#dc2626;">if </span><span style="color:#475569;">(</span><span style="font-weight:bold;color:#0369a1;">!</span><span style="color:#1e293b;">controller</span><span style="color:#475569;">) </span><span style="font-weight:bold;color:#dc2626;">continue
</span><span style="color:#0c4a6e;">
</span><span style="color:#0c4a6e;">    </span><span style="font-weight:bold;color:#dc2626;">if </span><span style="color:#475569;">(</span><span style="font-weight:bold;color:#0369a1;">typeof </span><span style="color:#1e293b;">controller</span><span style="color:#475569;">[</span><span style="color:#1e293b;">route</span><span style="color:#475569;">.</span><span style="color:#0c4a6e;">methodName</span><span style="color:#475569;">] </span><span style="font-weight:bold;color:#0369a1;">=== </span><span style="color:#475569;">"</span><span style="color:#0369a1;">function</span><span style="color:#475569;">") {
</span><span style="color:#0c4a6e;">      </span><span style="color:#1e293b;">controller</span><span style="color:#475569;">[</span><span style="color:#1e293b;">route</span><span style="color:#475569;">.</span><span style="color:#0c4a6e;">methodName</span><span style="color:#475569;">](</span><span style="color:#1e293b;">event</span><span style="color:#475569;">)
</span><span style="color:#0c4a6e;">    </span><span style="color:#475569;">}
</span><span style="color:#0c4a6e;">  </span><span style="color:#475569;">}
</span><span style="color:#475569;">}
</span></code></pre>
<p>One listener per event type on <code>document</code>. No matter how many action-annotated elements are on the page. When a click fires, <code>event.target.closest("[data-action]")</code> walks up the DOM tree to find the nearest element with an action attribute. If it finds one, the descriptor is parsed and the right method is called.</p>
<p>The parsing is straightforward string work with <code>split</code> and <code>trim</code>:</p>
<pre lang="js" style="background-color:#f8fafc;"><code><span style="font-weight:bold;color:#dc2626;">function </span><span style="color:#0284c7;">deconstruct</span><span style="color:#475569;">(</span><span style="color:#1e293b;">descriptor</span><span style="color:#475569;">, </span><span style="color:#1e293b;">eventType</span><span style="color:#475569;">) {
</span><span style="color:#0c4a6e;">  </span><span style="font-weight:bold;color:#dc2626;">const </span><span style="color:#1e293b;">parts </span><span style="font-weight:bold;color:#0369a1;">= </span><span style="color:#1e293b;">descriptor</span><span style="color:#475569;">.</span><span style="color:#1e293b;">split</span><span style="color:#475569;">("</span><span style="color:#0369a1;">-&gt;</span><span style="color:#475569;">")
</span><span style="color:#0c4a6e;">
</span><span style="color:#0c4a6e;">  </span><span style="font-weight:bold;color:#dc2626;">if </span><span style="color:#475569;">(</span><span style="color:#1e293b;">parts</span><span style="color:#475569;">.</span><span style="color:#0c4a6e;">length </span><span style="font-weight:bold;color:#0369a1;">=== </span><span style="font-weight:bold;color:#d97706;">2</span><span style="color:#475569;">) {
</span><span style="color:#0c4a6e;">    </span><span style="font-weight:bold;color:#dc2626;">if </span><span style="color:#475569;">(</span><span style="color:#1e293b;">parts</span><span style="color:#475569;">[</span><span style="font-weight:bold;color:#d97706;">0</span><span style="color:#475569;">].</span><span style="color:#1e293b;">trim</span><span style="color:#475569;">() </span><span style="font-weight:bold;color:#0369a1;">!== </span><span style="color:#1e293b;">eventType</span><span style="color:#475569;">) </span><span style="font-weight:bold;color:#dc2626;">return </span><span style="font-weight:bold;color:#075985;">null
</span><span style="color:#0c4a6e;">
</span><span style="color:#0c4a6e;">    </span><span style="font-weight:bold;color:#dc2626;">const </span><span style="color:#1e293b;">rest </span><span style="font-weight:bold;color:#0369a1;">= </span><span style="color:#1e293b;">parts</span><span style="color:#475569;">[</span><span style="font-weight:bold;color:#d97706;">1</span><span style="color:#475569;">].</span><span style="color:#1e293b;">split</span><span style="color:#475569;">("</span><span style="color:#0369a1;">#</span><span style="color:#475569;">")
</span><span style="color:#0c4a6e;">
</span><span style="color:#0c4a6e;">    </span><span style="font-weight:bold;color:#dc2626;">return </span><span style="color:#475569;">{ </span><span style="color:#0c4a6e;">identifier</span><span style="color:#475569;">: </span><span style="color:#1e293b;">rest</span><span style="color:#475569;">[</span><span style="font-weight:bold;color:#d97706;">0</span><span style="color:#475569;">].</span><span style="color:#1e293b;">trim</span><span style="color:#475569;">(), </span><span style="color:#0c4a6e;">methodName</span><span style="color:#475569;">: </span><span style="color:#1e293b;">rest</span><span style="color:#475569;">[</span><span style="font-weight:bold;color:#d97706;">1</span><span style="color:#475569;">].</span><span style="color:#1e293b;">trim</span><span style="color:#475569;">() }
</span><span style="color:#0c4a6e;">  </span><span style="color:#475569;">}
</span><span style="color:#0c4a6e;">
</span><span style="color:#0c4a6e;">  </span><span style="font-weight:bold;color:#dc2626;">return </span><span style="font-weight:bold;color:#075985;">null
</span><span style="color:#475569;">}
</span></code></pre>
<p>This is the old-school JavaScript that never goes out of style. No regex, no framework. Just <code>split</code>, <code>trim</code> and a conditional. 🧓</p>
<h2>
<a href="#values-reactive-data" aria-hidden="true" class="anchor" id="values-reactive-data"></a>Values: reactive data</h2>
<p>Values bring reactivity. Declare them with a type and get getter, setter and change callback:</p>
<pre lang="js" style="background-color:#f8fafc;"><code><span style="font-weight:bold;color:#dc2626;">class </span><span style="font-weight:bold;color:#b91c1c;">HelloController </span><span style="font-weight:bold;color:#dc2626;">extends </span><span style="color:#0c4a6e;">Controller </span><span style="color:#475569;">{
</span><span style="color:#0c4a6e;">  </span><span style="font-weight:bold;color:#dc2626;">static </span><span style="color:#0284c7;">values </span><span style="color:#0c4a6e;">= { count: Number </span><span style="color:#475569;">}
</span><span style="color:#0c4a6e;">
</span><span style="color:#0c4a6e;">  </span><span style="color:#1e293b;">countValueChanged</span><span style="color:#475569;">(</span><span style="color:#1e293b;">current</span><span style="color:#475569;">, </span><span style="color:#1e293b;">previous</span><span style="color:#475569;">) {
</span><span style="color:#0c4a6e;">    console</span><span style="color:#475569;">.</span><span style="color:#0284c7;">log</span><span style="color:#475569;">(`</span><span style="color:#0369a1;">Count went from </span><span style="color:#475569;">${</span><span style="color:#1e293b;">previous</span><span style="color:#475569;">}</span><span style="color:#0369a1;"> to </span><span style="color:#475569;">${</span><span style="color:#1e293b;">current</span><span style="color:#475569;">}`)
</span><span style="color:#0c4a6e;">  </span><span style="color:#475569;">}
</span><span style="color:#0c4a6e;">}
</span></code></pre>
<p>Setting <code>this.countValue = this.countValue + 1</code> updates the attribute <code>data-hello-count-value</code> on the DOM element and fires <code>countValueChanged</code> with the old and new values.</p>
<p>The implementation uses <code>Object.defineProperty</code> again, this time with both a getter and a setter:</p>
<pre lang="js" style="background-color:#f8fafc;"><code><span style="color:#0c4a6e;">Object</span><span style="color:#475569;">.</span><span style="color:#1e293b;">defineProperty</span><span style="color:#475569;">(</span><span style="color:#1e293b;">controller</span><span style="color:#475569;">, </span><span style="color:#1e293b;">propertyName</span><span style="color:#475569;">, {
</span><span style="color:#0c4a6e;">  </span><span style="color:#0284c7;">get</span><span style="color:#475569;">() {
</span><span style="color:#0c4a6e;">    </span><span style="font-weight:bold;color:#dc2626;">return </span><span style="color:#1e293b;">stored
</span><span style="color:#0c4a6e;">  </span><span style="color:#475569;">},
</span><span style="color:#0c4a6e;">
</span><span style="color:#0c4a6e;">  </span><span style="color:#0284c7;">set</span><span style="color:#475569;">(</span><span style="color:#1e293b;">value</span><span style="color:#475569;">) {
</span><span style="color:#0c4a6e;">    </span><span style="font-weight:bold;color:#dc2626;">const </span><span style="color:#1e293b;">previous </span><span style="font-weight:bold;color:#0369a1;">= </span><span style="color:#1e293b;">stored
</span><span style="color:#0c4a6e;">    </span><span style="font-weight:bold;color:#dc2626;">if </span><span style="color:#475569;">(</span><span style="color:#1e293b;">value </span><span style="font-weight:bold;color:#0369a1;">=== </span><span style="color:#1e293b;">previous</span><span style="color:#475569;">) </span><span style="font-weight:bold;color:#dc2626;">return
</span><span style="color:#0c4a6e;">
</span><span style="color:#0c4a6e;">    </span><span style="color:#1e293b;">stored </span><span style="font-weight:bold;color:#0369a1;">= </span><span style="color:#1e293b;">value
</span><span style="color:#0c4a6e;">    </span><span style="color:#1e293b;">controller</span><span style="color:#475569;">.</span><span style="color:#0c4a6e;">element</span><span style="color:#475569;">.</span><span style="color:#0284c7;">setAttribute</span><span style="color:#475569;">(</span><span style="color:#1e293b;">attributeName</span><span style="color:#475569;">, </span><span style="color:#1e293b;">serialize</span><span style="color:#475569;">(</span><span style="color:#1e293b;">value</span><span style="color:#475569;">, </span><span style="color:#1e293b;">type</span><span style="color:#475569;">))
</span><span style="color:#0c4a6e;">
</span><span style="color:#0c4a6e;">    </span><span style="font-weight:bold;color:#dc2626;">const </span><span style="color:#1e293b;">changedCallback </span><span style="font-weight:bold;color:#0369a1;">= </span><span style="color:#475569;">`${</span><span style="color:#1e293b;">camelize</span><span style="color:#475569;">(</span><span style="color:#1e293b;">name</span><span style="color:#475569;">)}</span><span style="color:#0369a1;">ValueChanged</span><span style="color:#475569;">`
</span><span style="color:#0c4a6e;">    </span><span style="font-weight:bold;color:#dc2626;">if </span><span style="color:#475569;">(</span><span style="font-weight:bold;color:#0369a1;">typeof </span><span style="color:#1e293b;">controller</span><span style="color:#475569;">[</span><span style="color:#1e293b;">changedCallback</span><span style="color:#475569;">] </span><span style="font-weight:bold;color:#0369a1;">=== </span><span style="color:#475569;">"</span><span style="color:#0369a1;">function</span><span style="color:#475569;">") {
</span><span style="color:#0c4a6e;">      </span><span style="color:#1e293b;">controller</span><span style="color:#475569;">[</span><span style="color:#1e293b;">changedCallback</span><span style="color:#475569;">](</span><span style="color:#1e293b;">value</span><span style="color:#475569;">, </span><span style="color:#1e293b;">previous</span><span style="color:#475569;">)
</span><span style="color:#0c4a6e;">    </span><span style="color:#475569;">}
</span><span style="color:#0c4a6e;">  </span><span style="color:#475569;">}
</span><span style="color:#475569;">})
</span></code></pre>
<p>The getter returns a cached value. The setter stores the new value, syncs it to the DOM attribute and calls the change callback if it exists. The <code>if (value === previous) return</code> guard prevents unnecessary updates.</p>
<p>Type coercion happens through a helper that maps JavaScript constructors to coercion logic:</p>
<pre lang="js" style="background-color:#f8fafc;"><code><span style="font-weight:bold;color:#dc2626;">function </span><span style="color:#0284c7;">read</span><span style="color:#475569;">(</span><span style="color:#1e293b;">raw</span><span style="color:#475569;">, </span><span style="color:#1e293b;">type</span><span style="color:#475569;">) {
</span><span style="color:#0c4a6e;">  </span><span style="font-weight:bold;color:#dc2626;">if </span><span style="color:#475569;">(</span><span style="color:#1e293b;">type </span><span style="font-weight:bold;color:#0369a1;">=== </span><span style="color:#0c4a6e;">Number</span><span style="color:#475569;">) </span><span style="font-weight:bold;color:#dc2626;">return </span><span style="color:#1e293b;">raw </span><span style="font-weight:bold;color:#0369a1;">=== </span><span style="color:#475569;">"" </span><span style="font-weight:bold;color:#0369a1;">|| </span><span style="color:#1e293b;">raw </span><span style="font-weight:bold;color:#0369a1;">=== </span><span style="font-weight:bold;color:#075985;">null </span><span style="font-weight:bold;color:#0369a1;">? </span><span style="font-weight:bold;color:#075985;">null </span><span style="font-weight:bold;color:#0369a1;">: </span><span style="color:#1e293b;">Number</span><span style="color:#475569;">(</span><span style="color:#1e293b;">raw</span><span style="color:#475569;">)
</span><span style="color:#0c4a6e;">  </span><span style="font-weight:bold;color:#dc2626;">if </span><span style="color:#475569;">(</span><span style="color:#1e293b;">type </span><span style="font-weight:bold;color:#0369a1;">=== </span><span style="color:#0c4a6e;">Boolean</span><span style="color:#475569;">) </span><span style="font-weight:bold;color:#dc2626;">return </span><span style="color:#1e293b;">raw </span><span style="font-weight:bold;color:#0369a1;">=== </span><span style="color:#475569;">"</span><span style="color:#0369a1;">true</span><span style="color:#475569;">" </span><span style="font-weight:bold;color:#0369a1;">|| </span><span style="color:#1e293b;">raw </span><span style="font-weight:bold;color:#0369a1;">=== </span><span style="color:#475569;">"</span><span style="color:#0369a1;">1</span><span style="color:#475569;">"
</span><span style="color:#0c4a6e;">  </span><span style="font-weight:bold;color:#dc2626;">if </span><span style="color:#475569;">(</span><span style="color:#1e293b;">type </span><span style="font-weight:bold;color:#0369a1;">=== </span><span style="color:#0c4a6e;">Array </span><span style="font-weight:bold;color:#0369a1;">|| </span><span style="color:#1e293b;">type </span><span style="font-weight:bold;color:#0369a1;">=== </span><span style="color:#0c4a6e;">Object</span><span style="color:#475569;">) {
</span><span style="color:#0c4a6e;">    </span><span style="font-weight:bold;color:#dc2626;">try </span><span style="color:#475569;">{ </span><span style="font-weight:bold;color:#dc2626;">return </span><span style="color:#1e293b;">JSON</span><span style="color:#475569;">.</span><span style="color:#1e293b;">parse</span><span style="color:#475569;">(</span><span style="color:#1e293b;">raw</span><span style="color:#475569;">) } </span><span style="font-weight:bold;color:#dc2626;">catch </span><span style="color:#475569;">{ </span><span style="font-weight:bold;color:#dc2626;">return </span><span style="color:#1e293b;">raw </span><span style="color:#475569;">}
</span><span style="color:#0c4a6e;">  </span><span style="color:#475569;">}
</span><span style="color:#0c4a6e;">  </span><span style="font-weight:bold;color:#dc2626;">return </span><span style="color:#1e293b;">raw
</span><span style="color:#475569;">}
</span></code></pre>
<p><code>Number("42")</code> returns <code>42</code>. <code>JSON.parse("[1,2,3]")</code> returns an actual array. <code>"false"</code> as Boolean returns… well, <code>Boolean("false")</code> would return <code>true</code> (non-empty string is truthy). So we check the string value directly. These are the small traps that make framework development interesting. 😬</p>
<hr>
<p>Three features, three JavaScript concepts. <code>Object.defineProperty</code> for dynamic accessors. Event delegation via <code>closest()</code>. Static class fields for declarative configuration. Plus a dash of <code>JSON.parse</code> and <code>Number</code> for type coercion.</p>
<p>All code from this article (and the <a href="/recreating-stimulus-controllers/">previous one</a>) is in the <a href="https://github.com/rails-designer-repos/recreate-stimulus">recreate-stimulus repo</a>.</p>
]]></content>


  </entry>
  
  <entry>
    <id>https://railsdesigner.com/new-rails-courrier/?ref=rss</id>
    <title>Courrier: a gem to send emails without SMTP</title>
    <link href="https://railsdesigner.com/new-rails-courrier/?ref=rss" rel="alternate" type="text/html"/>
    <published>2026-07-30T07:30:00Z</published>
    <updated>2026-07-30T07:30:00Z</updated>

    
      <author>
        <name>Rails Designer</name>
        <email>support@railsdesigner.com</email>
      </author>


      <content type="html" xml:base="https://railsdesigner.com/new-rails-courrier/?ref=rss"><![CDATA[<p>Every transactional email provider ships a Ruby SDK. Each one has its own client class, its own conventions, its own way of doing the same thing. I got tired of learning yet another API for every project. So I built <a href="https://github.com/Rails-Designer/courrier">Courrier</a>.</p>
<p>About 14 months and 73 commits later, Courrier 1.0 is here. It covers 13 email providers and 7 newsletter platforms. There’s a <a href="https://github.com/Rails-Designer/rails_courrier">companion gem for Rails</a> apps that adds generators, ActiveJob support, browser-based inbox previews and more.</p>
<p><a href="https://github.com/Rails-Designer/courrier">Star it on GitHub</a> ✨</p>
<h2>
<a href="#13-providers-one-api" aria-hidden="true" class="anchor" id="13-providers-one-api"></a>13 providers, one API</h2>
<pre lang="ruby" style="background-color:#f8fafc;"><code><span style="color:#0c4a6e;">Courrier</span><span style="color:#475569;">.</span><span style="color:#0c4a6e;">configure </span><span style="font-weight:bold;color:#dc2626;">do </span><span style="color:#475569;">|</span><span style="color:#1e293b;">config</span><span style="color:#475569;">|
</span><span style="color:#0c4a6e;">  config</span><span style="color:#475569;">.</span><span style="color:#0c4a6e;">email </span><span style="font-weight:bold;color:#0369a1;">= </span><span style="color:#475569;">{
</span><span style="color:#0c4a6e;">    </span><span style="font-weight:bold;color:#075985;">provider</span><span style="font-weight:bold;color:#475569;">: :</span><span style="font-weight:bold;color:#075985;">postmark</span><span style="color:#475569;">,
</span><span style="color:#0c4a6e;">    </span><span style="font-weight:bold;color:#075985;">api_key</span><span style="font-weight:bold;color:#475569;">: </span><span style="color:#475569;">"</span><span style="color:#0369a1;">your_postmark_api_key</span><span style="color:#475569;">"
</span><span style="color:#0c4a6e;">  </span><span style="color:#475569;">}
</span><span style="color:#0c4a6e;">
</span><span style="color:#0c4a6e;">  config</span><span style="color:#475569;">.</span><span style="color:#0c4a6e;">from </span><span style="font-weight:bold;color:#0369a1;">= </span><span style="color:#475569;">"</span><span style="color:#0369a1;">devs@railsdesigner.com</span><span style="color:#475569;">"
</span><span style="font-weight:bold;color:#dc2626;">end
</span><span style="color:#0c4a6e;">
</span><span style="font-style:italic;color:#475569;">#</span><span style="font-style:italic;color:#64748b;"> courrier/emails/order_email.rb
</span><span style="font-weight:bold;color:#dc2626;">class </span><span style="font-weight:bold;color:#b91c1c;">OrderEmail </span><span style="color:#475569;">&lt; </span><span style="color:#0c4a6e;">Courrier</span><span style="color:#475569;">::</span><span style="color:#0c4a6e;">Email
</span><span style="color:#0c4a6e;">  </span><span style="font-weight:bold;color:#dc2626;">def </span><span style="color:#0284c7;">subject</span><span style="color:#0c4a6e;"> = "</span><span style="color:#1e293b;">Your order is ready</span><span style="color:#0c4a6e;">!"
</span><span style="color:#0c4a6e;">
</span><span style="color:#0c4a6e;">  </span><span style="font-weight:bold;color:#dc2626;">def </span><span style="color:#0284c7;">text
</span><span style="color:#0c4a6e;">    </span><span style="color:#475569;">&lt;&lt;~TEXT
</span><span style="color:#0369a1;">      Thanks for ordering, </span><span style="color:#475569;">#{</span><span style="color:#0284c7;">name</span><span style="color:#475569;">}</span><span style="color:#0369a1;">!
</span><span style="color:#0369a1;">
</span><span style="color:#0369a1;">      Your order #</span><span style="color:#475569;">#{</span><span style="color:#0369a1;">order_id</span><span style="color:#475569;">}</span><span style="color:#0369a1;"> is on its way.
</span><span style="color:#475569;">    TEXT
</span><span style="color:#0c4a6e;">  </span><span style="font-weight:bold;color:#dc2626;">end
</span><span style="color:#0c4a6e;">
</span><span style="color:#0c4a6e;">  </span><span style="font-weight:bold;color:#dc2626;">def </span><span style="color:#0284c7;">html
</span><span style="color:#0c4a6e;">    </span><span style="color:#475569;">&lt;&lt;~HTML
</span><span style="color:#0369a1;">      </span><span style="color:#475569;">&lt;</span><span style="font-weight:bold;color:#dc2626;">h1</span><span style="color:#475569;">&gt;</span><span style="color:#0369a1;">Thanks for ordering!</span><span style="color:#475569;">&lt;/</span><span style="font-weight:bold;color:#dc2626;">h1</span><span style="color:#475569;">&gt;
</span><span style="color:#0369a1;">
</span><span style="color:#0369a1;">      </span><span style="color:#475569;">&lt;</span><span style="font-weight:bold;color:#dc2626;">p</span><span style="color:#475569;">&gt;</span><span style="color:#0369a1;">Your order #</span><span style="color:#475569;">#{</span><span style="color:#0369a1;">order_id</span><span style="color:#475569;">}</span><span style="color:#0369a1;"> is on its way.</span><span style="color:#475569;">&lt;/</span><span style="font-weight:bold;color:#dc2626;">p</span><span style="color:#475569;">&gt;
</span><span style="color:#475569;">    HTML
</span><span style="color:#0c4a6e;">  </span><span style="font-weight:bold;color:#dc2626;">end
</span><span style="font-weight:bold;color:#dc2626;">end
</span><span style="color:#0c4a6e;">
</span><span style="color:#0c4a6e;">OrderEmail</span><span style="color:#475569;">.</span><span style="color:#0c4a6e;">deliver </span><span style="font-weight:bold;color:#075985;">to</span><span style="font-weight:bold;color:#475569;">: </span><span style="color:#475569;">"</span><span style="color:#0369a1;">customer@railsdesigner.com</span><span style="color:#475569;">", </span><span style="font-weight:bold;color:#075985;">name</span><span style="font-weight:bold;color:#475569;">: </span><span style="color:#475569;">"</span><span style="color:#0369a1;">Cam</span><span style="color:#475569;">", </span><span style="font-weight:bold;color:#075985;">order_id</span><span style="font-weight:bold;color:#475569;">: </span><span style="font-weight:bold;color:#d97706;">42
</span></code></pre>
<p>That’s it. That’s the whole thing. One class, one deliver call, works with any supported provider.</p>
<p>Courrier has three levels of configuration that build on each other. Set defaults globally, override per email class or per delivery. Need to use Mailpace for transactional emails and Postmark for marketing? Easy. Need a provider not on the list? Subclass <code>Courrier::Email::Providers::Base</code> and add it yourself.</p>
<h2>
<a href="#content-your-way" aria-hidden="true" class="anchor" id="content-your-way"></a>Content your way</h2>
<p>The example above uses <code>text</code> and <code>html</code> methods. That’s the simplest path and works for most cases.</p>
<p>Prefer markdown? Define a <code>markdown</code> method instead. Courrier detects your markdown engine (kramdown, redcarpet or commonmarker) automatically and renders it to HTML.</p>
<p>Want the same structure as ViewComponent gives you (an ERB template alongside your email class):</p>
<pre style="background-color:#f8fafc;"><code><span style="color:#0c4a6e;">courrier/emails/order_email.rb
</span><span style="color:#0c4a6e;">courrier/emails/order_email.html.erb
</span></code></pre>
<p>Method definitions take precedence over template files, so you can mix approaches. Plain text via a method, HTML via a template. Or both via templates. Whatever fits your mental model.</p>
<p>Layouts wrap your email content the same way Rails layouts wrap views. Define one inline, in a method or in a separate class. And if you only write HTML, Courrier can auto generate the plain text version. 🤖</p>
<h3>
<a href="#but-wait-there-is-more" aria-hidden="true" class="anchor" id="but-wait-there-is-more"></a>But wait, there is more</h3>
<p>The <code>Result</code> object tells you if delivery succeeded, with access to the raw response data and any errors. Test helpers give you <code>assert_emails_delivered</code> and friends, so you can verify delivery without hitting a real API. <code>before_deliver</code> and <code>after_deliver</code> callbacks let you hook into the lifecycle. Custom HTTP headers (like <code>List-Unsubscribe</code>) go straight into each email class.</p>
<p>There’s also a a newsletter subscription system: <code>Courrier::Subscriber.create</code> and <code>.destroy</code> work with Beehiiv, Buttondown, Kit, Loops, Mailchimp, MailerLite and Brevo.</p>
<h2>
<a href="#rails-courrier" aria-hidden="true" class="anchor" id="rails-courrier"></a>Rails Courrier</h2>
<p>Courrier works with any Ruby app. But if you’re using Rails, there’s a companion gem that adds Rails-specific features.</p>
<p><img src="https://railsdesigner.com/images/posts/rails-courrier-inbox.jpg" alt=""></p>
<p><strong>Generators</strong> scaffold everything for you. Run <code>rails generate courrier:install</code> to create the initializer. Pass <code>--provider</code> to pre-fill provider-specific config. Run <code>rails generate courrier:email Order</code> to create an email class.</p>
<p><strong>ActiveJob</strong> support means you can send emails in the background with a single method change. Call <code>deliver_later</code> instead of <code>deliver</code>.</p>
<p><strong>Inbox</strong> gives you browser-based email previews, like (good ol’) Letter Opener but built into the gem. Mount the engine in your routes and every sent email opens in your browser.</p>
<p><strong>I18n</strong> is scoped under <code>courrier.email.&lt;class_name&gt;</code>, so your translations stay organised. The <code>t</code> helper works in email classes and ERB templates.</p>
<p><strong>Instrumentation</strong> publishes <code>delivery.courrier</code> and <code>delivery_failed.courrier</code> events through <code>ActiveSupport::Notifications</code>.</p>
<hr>
<p>I have a few ideas for what is next. Auto redundancy: if your primary provider goes down, Courrier falls back to a backup provider. Baked-in layouts to make your emails a bit fancier (without asking a LLM). Dedicated real email testing tools that go beyond the test helpers. And more delivery methods beyond email (SMS, push notifications). 🤯</p>
<p>A huge thank you to <a href="https://github.com/delynn">delynn</a>, <a href="https://github.com/benedikt">benedikt</a>, <a href="https://github.com/faheemKamboh">faheemKamboh</a> and <a href="https://github.com/JSap0914">JSap0914</a> for their contributions. ❤️</p>
<p>Give Courrier a try. <a href="https://github.com/Rails-Designer/courrier">Star the repo on GitHub</a>. For Rails apps, use <a href="https://github.com/Rails-Designer/rails_courrier">rails_courrier</a>. Would love to see what you build with it. 🚀🤘</p>
]]></content>


  </entry>
  
  <entry>
    <id>https://railsdesigner.com/recreating-stimulus-controllers/?ref=rss</id>
    <title>Recreating Stimulus: how data-controller works under the hood</title>
    <link href="https://railsdesigner.com/recreating-stimulus-controllers/?ref=rss" rel="alternate" type="text/html"/>
    <published>2026-07-23T07:30:00Z</published>
    <updated>2026-07-23T07:30:00Z</updated>

    
      <author>
        <name>Rails Designer</name>
        <email>support@railsdesigner.com</email>
      </author>


      <content type="html" xml:base="https://railsdesigner.com/recreating-stimulus-controllers/?ref=rss"><![CDATA[<p>This is part 1 of a two-part series. Part 2, coming soon, will cover targets, actions and reactive values.</p>
<p><img src="https://railsdesigner.com/images/posts/recreating-stimulus-1.jpg" alt=""></p>
<p><em>Yep, that text is programmatically added using a recreated Stimulus framework and a <code>hello_world_controller.js</code></em></p>
<p>Stimulus is a modest JavaScript framework to sprinkle bits of interactivity. At its core it watches the DOM for elements with a <code>data-controller</code> attribute and connects them to JavaScript classes. When an element appears, a controller instance is created. When it disappears, the instance is cleaned up. That’s it. That’s the entire foundation.</p>
<p>I want to walk through how you can recreate Stimulus yourself to learn a few modern JavaScript features to have in your magic hat, you can tell your LLM agent to use instead.</p>
<p>To recreate it you need a few things: a registry to store controllers, a watcher for DOM changes and a base class for controllers to extend. Each of these maps to a modern JavaScript feature.</p>
<p>Here is the code. See the <a href="https://github.com/rails-designer-repos/recreate-stimulus/tree/a939453">full commit on GitHub</a>.</p>
<h2>
<a href="#the-registry" aria-hidden="true" class="anchor" id="the-registry"></a>The registry</h2>
<p>The <code>Engine</code> class holds a private map of registered controllers:</p>
<pre lang="js" style="background-color:#f8fafc;"><code><span style="font-weight:bold;color:#dc2626;">class </span><span style="font-weight:bold;color:#b91c1c;">Engine </span><span style="color:#475569;">{
</span><span style="color:#0c4a6e;">  #controllers = new </span><span style="color:#0284c7;">Map</span><span style="color:#475569;">()
</span><span style="color:#0c4a6e;">  #connections = new </span><span style="color:#0284c7;">WeakMap</span><span style="color:#475569;">()
</span><span style="color:#0c4a6e;">  #observer = null
</span><span style="color:#0c4a6e;">
</span><span style="color:#0c4a6e;">  </span><span style="color:#0284c7;">register</span><span style="color:#475569;">(</span><span style="color:#1e293b;">name</span><span style="color:#475569;">, </span><span style="color:#1e293b;">controllerClass</span><span style="color:#475569;">) {
</span><span style="color:#0c4a6e;">    </span><span style="color:#1e293b;">this</span><span style="color:#475569;">.</span><span style="color:#0c4a6e;">#</span><span style="color:#1e293b;">controllers</span><span style="color:#475569;">.</span><span style="color:#1e293b;">set</span><span style="color:#475569;">(</span><span style="color:#1e293b;">name</span><span style="color:#475569;">, </span><span style="color:#1e293b;">controllerClass</span><span style="color:#475569;">)
</span><span style="color:#0c4a6e;">  </span><span style="color:#475569;">}
</span><span style="color:#475569;">}
</span></code></pre>
<p><code>#controllers</code> is a <code>Map</code>, not a plain object. Why? Maps have a <code>get</code>, <code>set</code> and <code>has</code> API. They accept any key type, not just strings. They are iterable with <code>for...of</code>. And they have a clear <code>.size</code> property. For a registry, Maps are more “honest” than objects.</p>
<p>The private <code>#</code> prefix is real ES2022 encapsulation (if you been around these parts of the internet, you have seen them many times before 🤓). No <code>private</code> access modifier like in Ruby. If you try to access <code>engine.#controllers</code> from outside the class, JavaScript throws an error (even when you inherit from the class with the private method; unlike with Ruby!).</p>
<h2>
<a href="#watching-the-dom" aria-hidden="true" class="anchor" id="watching-the-dom"></a>Watching the DOM</h2>
<p>Controllers need to connect when elements appear and disconnect when they disappear. The tool for that is <code>MutationObserver</code>:</p>
<pre lang="js" style="background-color:#f8fafc;"><code><span style="color:#1e293b;">start</span><span style="color:#475569;">() {
</span><span style="color:#0c4a6e;">  </span><span style="color:#1e293b;">this</span><span style="color:#475569;">.</span><span style="color:#0c4a6e;">#</span><span style="color:#1e293b;">observer </span><span style="font-weight:bold;color:#0369a1;">= new </span><span style="color:#1e293b;">MutationObserver</span><span style="color:#475569;">(</span><span style="color:#1e293b;">mutations </span><span style="font-weight:bold;color:#dc2626;">=&gt; </span><span style="color:#475569;">{
</span><span style="color:#0c4a6e;">    </span><span style="font-weight:bold;color:#dc2626;">for </span><span style="color:#475569;">(</span><span style="font-weight:bold;color:#dc2626;">const </span><span style="color:#475569;">{ </span><span style="color:#1e293b;">addedNodes</span><span style="color:#475569;">, </span><span style="color:#1e293b;">removedNodes </span><span style="color:#475569;">} </span><span style="font-weight:bold;color:#0369a1;">of </span><span style="color:#1e293b;">mutations</span><span style="color:#475569;">) {
</span><span style="color:#0c4a6e;">      </span><span style="font-weight:bold;color:#dc2626;">for </span><span style="color:#475569;">(</span><span style="font-weight:bold;color:#dc2626;">const </span><span style="color:#1e293b;">node </span><span style="font-weight:bold;color:#0369a1;">of </span><span style="color:#1e293b;">addedNodes</span><span style="color:#475569;">) {
</span><span style="color:#0c4a6e;">        </span><span style="font-weight:bold;color:#dc2626;">if </span><span style="color:#475569;">(</span><span style="color:#1e293b;">node</span><span style="color:#475569;">.</span><span style="color:#0c4a6e;">nodeType </span><span style="font-weight:bold;color:#0369a1;">=== </span><span style="color:#0c4a6e;">Node</span><span style="color:#475569;">.</span><span style="color:#0c4a6e;">ELEMENT_NODE</span><span style="color:#475569;">) </span><span style="color:#1e293b;">this</span><span style="color:#475569;">.</span><span style="color:#0c4a6e;">#</span><span style="color:#1e293b;">wireUp</span><span style="color:#475569;">(</span><span style="color:#1e293b;">node</span><span style="color:#475569;">)
</span><span style="color:#0c4a6e;">      </span><span style="color:#475569;">}
</span><span style="color:#0c4a6e;">      </span><span style="font-weight:bold;color:#dc2626;">for </span><span style="color:#475569;">(</span><span style="font-weight:bold;color:#dc2626;">const </span><span style="color:#1e293b;">node </span><span style="font-weight:bold;color:#0369a1;">of </span><span style="color:#1e293b;">removedNodes</span><span style="color:#475569;">) {
</span><span style="color:#0c4a6e;">        </span><span style="font-weight:bold;color:#dc2626;">if </span><span style="color:#475569;">(</span><span style="color:#1e293b;">node</span><span style="color:#475569;">.</span><span style="color:#0c4a6e;">nodeType </span><span style="font-weight:bold;color:#0369a1;">=== </span><span style="color:#0c4a6e;">Node</span><span style="color:#475569;">.</span><span style="color:#0c4a6e;">ELEMENT_NODE</span><span style="color:#475569;">) </span><span style="color:#1e293b;">this</span><span style="color:#475569;">.</span><span style="color:#0c4a6e;">#</span><span style="color:#1e293b;">wireDown</span><span style="color:#475569;">(</span><span style="color:#1e293b;">node</span><span style="color:#475569;">)
</span><span style="color:#0c4a6e;">      </span><span style="color:#475569;">}
</span><span style="color:#0c4a6e;">    </span><span style="color:#475569;">}
</span><span style="color:#0c4a6e;">  </span><span style="color:#475569;">})
</span><span style="color:#0c4a6e;">
</span><span style="color:#0c4a6e;">  </span><span style="color:#1e293b;">this</span><span style="color:#475569;">.</span><span style="color:#0c4a6e;">#</span><span style="color:#1e293b;">observer</span><span style="color:#475569;">.</span><span style="color:#1e293b;">observe</span><span style="color:#475569;">(</span><span style="color:#0c4a6e;">document</span><span style="color:#475569;">.</span><span style="color:#0c4a6e;">body</span><span style="color:#475569;">, { </span><span style="color:#0c4a6e;">childList</span><span style="color:#475569;">: </span><span style="font-weight:bold;color:#075985;">true</span><span style="color:#475569;">, </span><span style="color:#0c4a6e;">subtree</span><span style="color:#475569;">: </span><span style="font-weight:bold;color:#075985;">true </span><span style="color:#475569;">})
</span><span style="color:#0c4a6e;">  </span><span style="color:#1e293b;">this</span><span style="color:#475569;">.</span><span style="color:#0c4a6e;">#</span><span style="color:#1e293b;">wireUp</span><span style="color:#475569;">(</span><span style="color:#0c4a6e;">document</span><span style="color:#475569;">.</span><span style="color:#0c4a6e;">body</span><span style="color:#475569;">)
</span><span style="color:#475569;">}
</span></code></pre>
<p><code>MutationObserver</code> fires a callback when the DOM changes. You pass it <code>{ childList: true, subtree: true }</code> to observe all additions and removals anywhere in the body. When nodes come in, it scans for <code>[data-controller]</code> elements and connect them. When nodes leave, they are cleaned up.</p>
<p>The <code>Node.ELEMENT_NODE</code> check is a small detail that matters. MutationObserver also reports text nodes and comments. Those you do not want, so these are filtered.</p>
<p>The initial <code>this.#wireUp(document.body)</code> handles existing elements on page load. MutationObserver only fires on future changes.</p>
<h2>
<a href="#tracking-instances" aria-hidden="true" class="anchor" id="tracking-instances"></a>Tracking instances</h2>
<p>When a controller is created, it needs to remember which element it belongs to. Later, when that element leaves the DOM, the instance is found and <code>disconnect()</code> is called.</p>
<p>A <code>WeakMap</code> is the right tool:</p>
<pre lang="js" style="background-color:#f8fafc;"><code><span style="color:#0c4a6e;">#</span><span style="color:#1e293b;">wire</span><span style="color:#475569;">(</span><span style="color:#1e293b;">element</span><span style="color:#475569;">) {
</span><span style="color:#0c4a6e;">  </span><span style="font-weight:bold;color:#dc2626;">if </span><span style="color:#475569;">(</span><span style="color:#1e293b;">this</span><span style="color:#475569;">.</span><span style="color:#0c4a6e;">#</span><span style="color:#1e293b;">connections</span><span style="color:#475569;">.</span><span style="color:#1e293b;">has</span><span style="color:#475569;">(</span><span style="color:#1e293b;">element</span><span style="color:#475569;">)) </span><span style="font-weight:bold;color:#dc2626;">return
</span><span style="color:#0c4a6e;">
</span><span style="color:#0c4a6e;">  </span><span style="font-weight:bold;color:#dc2626;">const </span><span style="color:#1e293b;">name </span><span style="font-weight:bold;color:#0369a1;">= </span><span style="color:#1e293b;">element</span><span style="color:#475569;">.</span><span style="color:#0284c7;">getAttribute</span><span style="color:#475569;">("</span><span style="color:#0369a1;">data-controller</span><span style="color:#475569;">")
</span><span style="color:#0c4a6e;">  </span><span style="font-weight:bold;color:#dc2626;">const </span><span style="color:#1e293b;">ControllerClass </span><span style="font-weight:bold;color:#0369a1;">= </span><span style="color:#1e293b;">this</span><span style="color:#475569;">.</span><span style="color:#0c4a6e;">#</span><span style="color:#1e293b;">controllers</span><span style="color:#475569;">.</span><span style="color:#1e293b;">get</span><span style="color:#475569;">(</span><span style="color:#1e293b;">name</span><span style="color:#475569;">)
</span><span style="color:#0c4a6e;">
</span><span style="color:#0c4a6e;">  </span><span style="font-weight:bold;color:#dc2626;">if </span><span style="color:#475569;">(</span><span style="font-weight:bold;color:#0369a1;">!</span><span style="color:#1e293b;">ControllerClass</span><span style="color:#475569;">) </span><span style="font-weight:bold;color:#dc2626;">return
</span><span style="color:#0c4a6e;">
</span><span style="color:#0c4a6e;">  </span><span style="font-weight:bold;color:#dc2626;">const </span><span style="color:#1e293b;">controller </span><span style="font-weight:bold;color:#0369a1;">= new </span><span style="color:#1e293b;">ControllerClass</span><span style="color:#475569;">(</span><span style="color:#1e293b;">element</span><span style="color:#475569;">)
</span><span style="color:#0c4a6e;">  </span><span style="color:#1e293b;">this</span><span style="color:#475569;">.</span><span style="color:#0c4a6e;">#</span><span style="color:#1e293b;">connections</span><span style="color:#475569;">.</span><span style="color:#1e293b;">set</span><span style="color:#475569;">(</span><span style="color:#1e293b;">element</span><span style="color:#475569;">, </span><span style="color:#1e293b;">controller</span><span style="color:#475569;">)
</span><span style="color:#0c4a6e;">
</span><span style="color:#0c4a6e;">  </span><span style="color:#1e293b;">controller</span><span style="color:#475569;">.</span><span style="color:#1e293b;">connect</span><span style="color:#475569;">()
</span><span style="color:#475569;">}
</span><span style="color:#0c4a6e;">
</span><span style="color:#0c4a6e;">#</span><span style="color:#1e293b;">unwire</span><span style="color:#475569;">(</span><span style="color:#1e293b;">element</span><span style="color:#475569;">) {
</span><span style="color:#0c4a6e;">  </span><span style="font-weight:bold;color:#dc2626;">const </span><span style="color:#1e293b;">controller </span><span style="font-weight:bold;color:#0369a1;">= </span><span style="color:#1e293b;">this</span><span style="color:#475569;">.</span><span style="color:#0c4a6e;">#</span><span style="color:#1e293b;">connections</span><span style="color:#475569;">.</span><span style="color:#1e293b;">get</span><span style="color:#475569;">(</span><span style="color:#1e293b;">element</span><span style="color:#475569;">)
</span><span style="color:#0c4a6e;">  </span><span style="font-weight:bold;color:#dc2626;">if </span><span style="color:#475569;">(</span><span style="font-weight:bold;color:#0369a1;">!</span><span style="color:#1e293b;">controller</span><span style="color:#475569;">) </span><span style="font-weight:bold;color:#dc2626;">return
</span><span style="color:#0c4a6e;">
</span><span style="color:#0c4a6e;">  </span><span style="color:#1e293b;">controller</span><span style="color:#475569;">.</span><span style="color:#1e293b;">disconnect</span><span style="color:#475569;">()
</span><span style="color:#0c4a6e;">
</span><span style="color:#0c4a6e;">  </span><span style="color:#1e293b;">this</span><span style="color:#475569;">.</span><span style="color:#0c4a6e;">#</span><span style="color:#1e293b;">connections</span><span style="color:#475569;">.</span><span style="color:#1e293b;">delete</span><span style="color:#475569;">(</span><span style="color:#1e293b;">element</span><span style="color:#475569;">)
</span><span style="color:#475569;">}
</span></code></pre>
<p><code>WeakMap</code> uses the DOM element as its key. When the element is garbage collected, the entry disappears automatically. No manual cleanup needed. No risk of memory leaks.</p>
<p>A regular <code>Map</code> would hold a strong reference to the element and prevent garbage collection (GC; the automatic process of freeing up memory from unused objects). <code>WeakMap</code> does not hold such strong references, allowing objects to be garbage collected even if they’re stored in it. It is one of those JavaScript features you do not need often, but when you do, it is the only tool for the job. 🤘</p>
<h2>
<a href="#the-controller" aria-hidden="true" class="anchor" id="the-controller"></a>The controller</h2>
<p>The base class is intentionally minimal:</p>
<pre lang="js" style="background-color:#f8fafc;"><code><span style="font-weight:bold;color:#dc2626;">class </span><span style="font-weight:bold;color:#b91c1c;">Controller </span><span style="color:#475569;">{
</span><span style="color:#0c4a6e;">  #element
</span><span style="color:#0c4a6e;">
</span><span style="color:#0c4a6e;">  </span><span style="color:#0284c7;">constructor</span><span style="color:#475569;">(</span><span style="color:#1e293b;">element</span><span style="color:#475569;">) {
</span><span style="color:#0c4a6e;">    </span><span style="color:#1e293b;">this</span><span style="color:#475569;">.</span><span style="color:#0c4a6e;">#</span><span style="color:#1e293b;">element </span><span style="font-weight:bold;color:#0369a1;">= </span><span style="color:#1e293b;">element
</span><span style="color:#0c4a6e;">
</span><span style="color:#0c4a6e;">    </span><span style="color:#1e293b;">this</span><span style="color:#475569;">.</span><span style="color:#1e293b;">initialize</span><span style="color:#475569;">()
</span><span style="color:#0c4a6e;">  </span><span style="color:#475569;">}
</span><span style="color:#0c4a6e;">
</span><span style="color:#0c4a6e;">  </span><span style="font-weight:bold;color:#dc2626;">get </span><span style="color:#0284c7;">element</span><span style="color:#475569;">() {
</span><span style="color:#0c4a6e;">    </span><span style="font-weight:bold;color:#dc2626;">return </span><span style="color:#1e293b;">this</span><span style="color:#475569;">.</span><span style="color:#0c4a6e;">#</span><span style="color:#1e293b;">element
</span><span style="color:#0c4a6e;">  </span><span style="color:#475569;">}
</span><span style="color:#0c4a6e;">
</span><span style="color:#0c4a6e;">  </span><span style="color:#0284c7;">initialize</span><span style="color:#475569;">() {}
</span><span style="color:#0c4a6e;">  </span><span style="color:#0284c7;">connect</span><span style="color:#475569;">() {}
</span><span style="color:#0c4a6e;">  </span><span style="color:#0284c7;">disconnect</span><span style="color:#475569;">() {}
</span><span style="color:#475569;">}
</span></code></pre>
<p>The <code>#element</code> private field stores the DOM element. A getter exposes it read-only. Subclasses can access <code>this.element</code> but cannot reassign it.</p>
<p>The real Stimulus calls <code>initialize()</code> once and <code>connect()</code> when the element enters the DOM. This recreation does the same. Subclasses override these methods to add behavior.</p>
<p>All code from this article is in the <a href="https://github.com/rails-designer-repos/recreate-stimulus/tree/a939453">recreate-stimulus repo</a>.</p>
<p>In a next article: targets, actions and reactive values. Stay tuned. 🤙</p>
]]></content>


  </entry>
  
  <entry>
    <id>https://railsdesigner.com/newsletter-subscribe/?ref=rss</id>
    <title>Add newsletter subscriptions to Rails 8 signups</title>
    <link href="https://railsdesigner.com/newsletter-subscribe/?ref=rss" rel="alternate" type="text/html"/>
    <published>2026-07-16T07:30:00Z</published>
    <updated>2026-07-16T07:30:00Z</updated>

    
      <author>
        <name>Rails Designer</name>
        <email>support@railsdesigner.com</email>
      </author>


      <content type="html" xml:base="https://railsdesigner.com/newsletter-subscribe/?ref=rss"><![CDATA[<p>Users are creating accounts on your new Saas. Yay (and not just family and friends or bots). Yay! Now comes the next step from every marketing handbook: capturing newsletter subscriptions.</p>
<p>This article builds on <a href="https://railsdesigner.com/saas/articles/signup-for-rails-8/">Add Sign Up to Rails 8’ Authentication</a>.</p>
<p>Add a simple checkbox to let users opt in to product updates during signup. Store their preference using <a href="https://github.com/Rails-Designer/rails_vault/">Rails Vault</a> and manage the subscription with <a href="https://github.com/Rails-Designer/rails_courrier/">Rails Courrier</a>.</p>
<p>First, add Rails Vault and Rails Courrier to your Gemfile:</p>
<pre lang="ruby" style="background-color:#f8fafc;"><code><span style="font-weight:bold;color:#dc2626;">gem </span><span style="color:#475569;">"</span><span style="color:#0369a1;">rails_vault</span><span style="color:#475569;">"
</span><span style="font-weight:bold;color:#dc2626;">gem </span><span style="color:#475569;">"</span><span style="color:#0369a1;">rails_courrier</span><span style="color:#475569;">"
</span></code></pre>
<p><a href="https://github.com/Rails-Designer/rails_vault/">Rails Vault</a> adds simple and easy settings, preferences and so on to any ActiveRecord model (I recently pushed 1.0.0). <a href="https://github.com/Rails-Designer/courrier/">Courrier</a> is API-powered email delivery for Ruby apps with support for Mailgun, Postmark, Resend and more. <a href="https://github.com/Rails-Designer/rails_courrier/">Rails Courrier</a> is the Rails “wrapper” for Courrier. These two gems work really nicely together for this feature.</p>
<p>Run <code>bundle install</code> and generate the Rails Vault migration:</p>
<pre lang="bash" style="background-color:#f8fafc;"><code><span style="color:#1e293b;">rails</span><span style="color:#0c4a6e;"> generate rails_vault:install
</span><span style="color:#1e293b;">rails</span><span style="color:#0c4a6e;"> db:migrate
</span></code></pre>
<p>It creates a new file <code>app/models/user/subscriptions.rb</code>:</p>
<pre lang="ruby" style="background-color:#f8fafc;"><code><span style="font-weight:bold;color:#dc2626;">class </span><span style="font-weight:bold;color:#b91c1c;">User</span><span style="font-weight:bold;color:#475569;">::</span><span style="font-weight:bold;color:#b91c1c;">Subscriptions </span><span style="color:#475569;">&lt; </span><span style="color:#0c4a6e;">Vault
</span><span style="color:#0c4a6e;">  vault_attribute </span><span style="font-weight:bold;color:#475569;">:</span><span style="font-weight:bold;color:#075985;">product_emails_subscribed_at</span><span style="color:#475569;">, </span><span style="font-weight:bold;color:#475569;">:</span><span style="font-weight:bold;color:#075985;">datetime
</span><span style="color:#0c4a6e;">
</span><span style="color:#0c4a6e;">  </span><span style="font-style:italic;color:#475569;">#</span><span style="font-style:italic;color:#64748b;"> Add more subscription types as needed:
</span><span style="color:#0c4a6e;">  </span><span style="font-style:italic;color:#475569;">#</span><span style="font-style:italic;color:#64748b;"> vault_attribute :marketing_emails_subscribed_at, :datetime
</span><span style="color:#0c4a6e;">  </span><span style="font-style:italic;color:#475569;">#</span><span style="font-style:italic;color:#64748b;"> vault_attribute :weekly_digest_subscribed_at, :datetime
</span><span style="font-weight:bold;color:#dc2626;">end
</span></code></pre>
<p>And updates your User model to use this vault:</p>
<pre lang="gitdiff" style="background-color:#f8fafc;"><code><span style="color:#0c4a6e;"># app/models/user.rb
</span><span style="color:#0c4a6e;">class User &lt; ApplicationRecord
</span><span style="color:#0c4a6e;">+  vault :subscriptions
</span><span style="color:#0c4a6e;">
</span><span style="color:#0c4a6e;">  has_secure_password
</span><span style="color:#0c4a6e;">  has_many :sessions, dependent: :destroy
</span><span style="color:#0c4a6e;">end
</span></code></pre>
<p>This keeps subscription data organized without cluttering your User table. More subscription types can be added later without database migrations.</p>
<p>Now the plumbing is done, add a checkbox to your signup form in <code>app/views/signups/new.html.erb</code>:</p>
<pre lang="erb" style="background-color:#f8fafc;"><code><span style="color:#475569;">&lt;%=</span><span style="color:#0c4a6e;"> form</span><span style="color:#475569;">.</span><span style="color:#0c4a6e;">check_box </span><span style="font-weight:bold;color:#475569;">:</span><span style="font-weight:bold;color:#075985;">product_emails </span><span style="color:#475569;">%&gt;
</span><span style="color:#475569;">&lt;%=</span><span style="color:#0c4a6e;"> form</span><span style="color:#475569;">.</span><span style="color:#0c4a6e;">label </span><span style="font-weight:bold;color:#475569;">:</span><span style="font-weight:bold;color:#075985;">product_emails</span><span style="color:#475569;">, "</span><span style="color:#0369a1;">Subscribe to product updates</span><span style="color:#475569;">" %&gt;
</span></code></pre>
<p>Update the Signup model to accept this parameter:</p>
<pre lang="diff" style="background-color:#f8fafc;"><code><span style="color:#0c4a6e;"># app/models/signup.rb
</span><span style="color:#0c4a6e;">class Signup
</span><span style="color:#0c4a6e;">  include ActiveModel::Model
</span><span style="color:#0c4a6e;">  include ActiveModel::Attributes
</span><span style="color:#0c4a6e;">
</span><span style="color:#0c4a6e;">  attribute :email_address, :string
</span><span style="color:#0c4a6e;">  attribute :password, :string
</span><span style="color:#0c4a6e;">  attribute :terms, :boolean, default: false
</span><span style="color:#475569;">+</span><span style="color:#0c4a6e;"> attribute :product_emails, :boolean, default: false
</span><span style="color:#0c4a6e;">
</span><span style="color:#0c4a6e;">  # …existing validations
</span><span style="color:#0c4a6e;">
</span><span style="color:#0c4a6e;">  def save
</span><span style="color:#0c4a6e;">    if valid?
</span><span style="color:#0c4a6e;">      User.create!(email_address: email_address, password: password).tap do |user|
</span><span style="color:#0c4a6e;">        create_workspace_for user
</span><span style="color:#475569;">+</span><span style="color:#0c4a6e;">       subscribe_to_product_emails user
</span><span style="color:#0c4a6e;">
</span><span style="color:#0c4a6e;">        send_welcome_email_to user
</span><span style="color:#0c4a6e;">      end
</span><span style="color:#0c4a6e;">    end
</span><span style="color:#0c4a6e;">  end
</span><span style="color:#0c4a6e;">
</span><span style="color:#0c4a6e;">  private
</span><span style="color:#0c4a6e;">
</span><span style="color:#475569;">+</span><span style="color:#0c4a6e;"> def subscribe_to_product_emails(user)
</span><span style="color:#475569;">+</span><span style="color:#0c4a6e;">   return if product_emails
</span><span style="color:#475569;">+
</span><span style="color:#475569;">+</span><span style="color:#0c4a6e;">   user.create_subscriptions(product_emails_subscribed_at: Time.current)
</span><span style="color:#475569;">+
</span><span style="color:#475569;">+</span><span style="color:#0c4a6e;">   Courrier::Subscriber.create email_address
</span><span style="color:#475569;">+</span><span style="color:#0c4a6e;"> end
</span><span style="color:#0c4a6e;">end
</span></code></pre>
<pre lang="diff" style="background-color:#f8fafc;"><code><span style="color:#0c4a6e;">  def signup_params
</span><span style="color:#0c4a6e;">    # NOTE: new syntax, see PR: https://github.com/rails/rails/pull/51674
</span><span style="color:#475569;">-</span><span style="color:#0c4a6e;">   params.expect(signup: [ :email_address, :password, :terms ])
</span><span style="color:#475569;">+</span><span style="color:#0c4a6e;">   params.expect(signup: [ :email_address, :password, :terms, :product_emails ])
</span><span style="color:#0c4a6e;">  end
</span></code></pre>
<p>Create <code>config/initializers/courrier.rb</code>:</p>
<pre lang="ruby" style="background-color:#f8fafc;"><code><span style="color:#0c4a6e;">Courrier</span><span style="color:#475569;">.</span><span style="color:#0c4a6e;">configure </span><span style="font-weight:bold;color:#dc2626;">do </span><span style="color:#475569;">|</span><span style="color:#1e293b;">config</span><span style="color:#475569;">|
</span><span style="color:#0c4a6e;">  </span><span style="font-style:italic;color:#475569;">#</span><span style="font-style:italic;color:#64748b;"> …
</span><span style="color:#0c4a6e;">
</span><span style="color:#0c4a6e;">  config</span><span style="color:#475569;">.</span><span style="color:#0c4a6e;">subscriber </span><span style="font-weight:bold;color:#0369a1;">= </span><span style="color:#475569;">{
</span><span style="color:#0c4a6e;">    </span><span style="font-weight:bold;color:#075985;">provider</span><span style="font-weight:bold;color:#475569;">: </span><span style="color:#475569;">"</span><span style="color:#0369a1;">buttondown</span><span style="color:#475569;">",
</span><span style="color:#0c4a6e;">    </span><span style="font-weight:bold;color:#075985;">api_key</span><span style="font-weight:bold;color:#475569;">: </span><span style="color:#0c4a6e;">Rails</span><span style="color:#475569;">.</span><span style="color:#0c4a6e;">application</span><span style="color:#475569;">.</span><span style="color:#0c4a6e;">credentials</span><span style="color:#475569;">.</span><span style="color:#0c4a6e;">dig</span><span style="color:#475569;">(</span><span style="font-weight:bold;color:#475569;">:</span><span style="font-weight:bold;color:#075985;">buttondown</span><span style="color:#475569;">, </span><span style="font-weight:bold;color:#475569;">:</span><span style="font-weight:bold;color:#075985;">api_key</span><span style="color:#475569;">)
</span><span style="color:#0c4a6e;">  </span><span style="color:#475569;">}
</span><span style="font-weight:bold;color:#dc2626;">end
</span></code></pre>
<p>Replace <code>"buttondown"</code> with your preferred newsletter provider. Courrier has support for many providers.</p>
<p>Time to test it! Create a new user through the signup form with the product emails checkbox enabled. The subscription gets stored in the Rails Vault and the subscriber gets created in your newsletter service.</p>
<p>All code from this article is available in the <a href="https://github.com/rails-designer-repos/rails-8-authentication">Rails 8 Authentication repository</a>.</p>
<p>Questions about subscriptions or newsletter management? Let me know below in the comments.</p>
]]></content>


  </entry>
  
  <entry>
    <id>https://railsdesigner.com/feature-guard/?ref=rss</id>
    <title>Permission UI the Rails way</title>
    <link href="https://railsdesigner.com/feature-guard/?ref=rss" rel="alternate" type="text/html"/>
    <published>2026-07-09T07:30:00Z</published>
    <updated>2026-07-09T07:30:00Z</updated>

    
      <author>
        <name>Rails Designer</name>
        <email>support@railsdesigner.com</email>
      </author>


      <content type="html" xml:base="https://railsdesigner.com/feature-guard/?ref=rss"><![CDATA[<p>I’ve <a href="/hire/">built many a SaaS</a>. And most have pricing tiers: the higher the plans the more <em>widgets</em> you can create or features are allowd. Typically there are two ways to approach this:</p>
<ul>
<li>hide the feature if the customer does not have access;</li>
<li>show all features, to all customers, but guard them with some, optional, upsell.</li>
</ul>
<p>I have succesfully implementated the latter approach with a helper that quacks like Rails itself.</p>
<p>The helper lets you wrap content and decide what happens when access is denied. Hide it, redirect to a link, render content or render a partial. It’s small but flexible. This is how it looks (added a toggle allowed/denied states):</p>
<p><img src="https://railsdesigner.com/images/posts/allowed-helper.gif" alt=""></p>
<p>As always <a href="https://github.com/rails-designer-repos/conditional_link_to">view on GitHub</a> for a ready-to-copy code.</p>
<p>The API is elegant. Let’s look at some examples:</p>
<pre lang="erb" style="background-color:#f8fafc;"><code><span style="color:#475569;">&lt;%=</span><span style="color:#0c4a6e;"> allowed? Current</span><span style="color:#475569;">.</span><span style="color:#0c4a6e;">user</span><span style="color:#475569;">.</span><span style="color:#0c4a6e;">premium? </span><span style="font-weight:bold;color:#dc2626;">do </span><span style="color:#475569;">%&gt;
</span><span style="color:#0c4a6e;">  </span><span style="color:#475569;">&lt;%=</span><span style="color:#0c4a6e;"> link_to </span><span style="color:#475569;">"</span><span style="color:#0369a1;">Create project</span><span style="color:#475569;">",</span><span style="color:#0c4a6e;"> projects_path </span><span style="color:#475569;">%&gt;
</span><span style="color:#475569;">&lt;% </span><span style="font-weight:bold;color:#dc2626;">end </span><span style="color:#475569;">%&gt;
</span></code></pre>
<p>When <code>Current.user.premium?</code> is true, the link renders. When false, nothing shows. That’s the default behavior.</p>
<p>But you can do more. Redirect to a link instead:</p>
<pre lang="erb" style="background-color:#f8fafc;"><code><span style="color:#475569;">&lt;%=</span><span style="color:#0c4a6e;"> allowed? Current</span><span style="color:#475569;">.</span><span style="color:#0c4a6e;">user</span><span style="color:#475569;">.</span><span style="color:#0c4a6e;">premium?</span><span style="color:#475569;">, </span><span style="font-weight:bold;color:#075985;">redirect_to</span><span style="font-weight:bold;color:#475569;">:</span><span style="color:#0c4a6e;"> upgrade_path </span><span style="font-weight:bold;color:#dc2626;">do </span><span style="color:#475569;">%&gt;
</span><span style="color:#0c4a6e;">  </span><span style="color:#475569;">&lt;%=</span><span style="color:#0c4a6e;"> link_to </span><span style="color:#475569;">"</span><span style="color:#0369a1;">Advanced analytics</span><span style="color:#475569;">",</span><span style="color:#0c4a6e;"> analytics_path </span><span style="color:#475569;">%&gt;
</span><span style="color:#475569;">&lt;% </span><span style="font-weight:bold;color:#dc2626;">end </span><span style="color:#475569;">%&gt;
</span></code></pre>
<p>The content becomes a clickable link pointing to your upgrade page.</p>
<p>Show plain text as a fallback:</p>
<pre lang="erb" style="background-color:#f8fafc;"><code><span style="color:#475569;">&lt;%=</span><span style="color:#0c4a6e;"> allowed? Current</span><span style="color:#475569;">.</span><span style="color:#0c4a6e;">user</span><span style="color:#475569;">.</span><span style="color:#0c4a6e;">premium?</span><span style="color:#475569;">, </span><span style="font-weight:bold;color:#075985;">render</span><span style="font-weight:bold;color:#475569;">: </span><span style="color:#475569;">{ </span><span style="font-weight:bold;color:#075985;">plain</span><span style="font-weight:bold;color:#475569;">: </span><span style="color:#475569;">"</span><span style="color:#0369a1;">Upgrade to unlock this.</span><span style="color:#475569;">" } </span><span style="font-weight:bold;color:#dc2626;">do </span><span style="color:#475569;">%&gt;
</span><span style="color:#0c4a6e;">  </span><span style="color:#475569;">&lt;%=</span><span style="color:#0c4a6e;"> button_to </span><span style="color:#475569;">"</span><span style="color:#0369a1;">Delete project</span><span style="color:#475569;">",</span><span style="color:#0c4a6e;"> project_path</span><span style="color:#475569;">, </span><span style="font-weight:bold;color:#075985;">method</span><span style="font-weight:bold;color:#475569;">: :</span><span style="font-weight:bold;color:#075985;">delete </span><span style="color:#475569;">%&gt;
</span><span style="color:#475569;">&lt;% </span><span style="font-weight:bold;color:#dc2626;">end </span><span style="color:#475569;">%&gt;
</span></code></pre>
<p>Or render HTML:</p>
<pre lang="erb" style="background-color:#f8fafc;"><code><span style="color:#475569;">&lt;%=</span><span style="color:#0c4a6e;"> allowed? Current</span><span style="color:#475569;">.</span><span style="color:#0c4a6e;">user</span><span style="color:#475569;">.</span><span style="color:#0c4a6e;">premium?</span><span style="color:#475569;">, </span><span style="font-weight:bold;color:#075985;">render</span><span style="font-weight:bold;color:#475569;">: </span><span style="color:#475569;">{ </span><span style="font-weight:bold;color:#075985;">html</span><span style="font-weight:bold;color:#475569;">: </span><span style="color:#475569;">"</span><span style="color:#0369a1;">Upgrade to the &lt;strong&gt;Pro plan&lt;/strong&gt;.</span><span style="color:#475569;">" } </span><span style="font-weight:bold;color:#dc2626;">do </span><span style="color:#475569;">%&gt;
</span><span style="color:#0c4a6e;">  </span><span style="color:#475569;">&lt;%=</span><span style="color:#0c4a6e;"> button_to </span><span style="color:#475569;">"</span><span style="color:#0369a1;">Delete project</span><span style="color:#475569;">",</span><span style="color:#0c4a6e;"> project_path</span><span style="color:#475569;">, </span><span style="font-weight:bold;color:#075985;">method</span><span style="font-weight:bold;color:#475569;">: :</span><span style="font-weight:bold;color:#075985;">delete </span><span style="color:#475569;">%&gt;
</span><span style="color:#475569;">&lt;% </span><span style="font-weight:bold;color:#dc2626;">end </span><span style="color:#475569;">%&gt;
</span></code></pre>
<p>And render a partial for complex fallbacks:</p>
<pre lang="erb" style="background-color:#f8fafc;"><code><span style="color:#475569;">&lt;%=</span><span style="color:#0c4a6e;"> allowed? Current</span><span style="color:#475569;">.</span><span style="color:#0c4a6e;">user</span><span style="color:#475569;">.</span><span style="color:#0c4a6e;">premium?</span><span style="color:#475569;">, </span><span style="font-weight:bold;color:#075985;">render</span><span style="font-weight:bold;color:#475569;">: </span><span style="color:#475569;">"</span><span style="color:#0369a1;">upsell</span><span style="color:#475569;">" </span><span style="font-weight:bold;color:#dc2626;">do </span><span style="color:#475569;">%&gt;
</span><span style="color:#0c4a6e;">  </span><span style="color:#475569;">&lt;%=</span><span style="color:#0c4a6e;"> button_to </span><span style="color:#475569;">"</span><span style="color:#0369a1;">Advanced settings</span><span style="color:#475569;">",</span><span style="color:#0c4a6e;"> settings_path </span><span style="color:#475569;">%&gt;
</span><span style="color:#475569;">&lt;% </span><span style="font-weight:bold;color:#dc2626;">end </span><span style="color:#475569;">%&gt;
</span></code></pre>
<h2>
<a href="#the-helper" aria-hidden="true" class="anchor" id="the-helper"></a>The helper</h2>
<p>Here’s the full helper in <code>app/helpers/allowed_helper.rb</code>:</p>
<pre lang="ruby" style="background-color:#f8fafc;"><code><span style="font-weight:bold;color:#dc2626;">module </span><span style="color:#0c4a6e;">AllowedHelper
</span><span style="color:#0c4a6e;">  </span><span style="font-weight:bold;color:#dc2626;">def </span><span style="color:#0284c7;">allowed?</span><span style="color:#475569;">(</span><span style="color:#1e293b;">condition</span><span style="color:#475569;">, </span><span style="color:#1e293b;">options </span><span style="font-weight:bold;color:#0369a1;">= </span><span style="color:#475569;">{})
</span><span style="color:#0c4a6e;">    </span><span style="font-weight:bold;color:#dc2626;">return yield if</span><span style="color:#0c4a6e;"> condition
</span><span style="color:#0c4a6e;">
</span><span style="color:#0c4a6e;">    </span><span style="font-weight:bold;color:#dc2626;">if</span><span style="color:#0c4a6e;"> options</span><span style="color:#475569;">[</span><span style="font-weight:bold;color:#475569;">:</span><span style="font-weight:bold;color:#075985;">redirect_to</span><span style="color:#475569;">]
</span><span style="color:#0c4a6e;">      content </span><span style="font-weight:bold;color:#0369a1;">=</span><span style="color:#0c4a6e;"> capture </span><span style="color:#475569;">{ </span><span style="font-weight:bold;color:#dc2626;">yield </span><span style="color:#475569;">}
</span><span style="color:#0c4a6e;">
</span><span style="color:#0c4a6e;">      link_to strip_tags</span><span style="color:#475569;">(</span><span style="color:#0c4a6e;">content</span><span style="color:#475569;">),</span><span style="color:#0c4a6e;"> options</span><span style="color:#475569;">[</span><span style="font-weight:bold;color:#475569;">:</span><span style="font-weight:bold;color:#075985;">redirect_to</span><span style="color:#475569;">]
</span><span style="color:#0c4a6e;">    </span><span style="font-weight:bold;color:#dc2626;">elsif</span><span style="color:#0c4a6e;"> options</span><span style="color:#475569;">.</span><span style="color:#0c4a6e;">key?</span><span style="color:#475569;">(</span><span style="font-weight:bold;color:#475569;">:</span><span style="font-weight:bold;color:#075985;">render</span><span style="color:#475569;">)
</span><span style="color:#0c4a6e;">      render_options </span><span style="font-weight:bold;color:#0369a1;">=</span><span style="color:#0c4a6e;"> options</span><span style="color:#475569;">[</span><span style="font-weight:bold;color:#475569;">:</span><span style="font-weight:bold;color:#075985;">render</span><span style="color:#475569;">]
</span><span style="color:#0c4a6e;">
</span><span style="color:#0c4a6e;">      </span><span style="font-weight:bold;color:#dc2626;">if</span><span style="color:#0c4a6e;"> render_options</span><span style="color:#475569;">.</span><span style="color:#0284c7;">is_a?</span><span style="color:#475569;">(</span><span style="color:#0284c7;">Hash</span><span style="color:#475569;">) </span><span style="font-weight:bold;color:#0369a1;">&amp;&amp;</span><span style="color:#0c4a6e;"> render_options</span><span style="color:#475569;">.</span><span style="color:#0c4a6e;">key?</span><span style="color:#475569;">(</span><span style="font-weight:bold;color:#475569;">:</span><span style="font-weight:bold;color:#075985;">html</span><span style="color:#475569;">)
</span><span style="color:#0c4a6e;">        render_options</span><span style="color:#475569;">[</span><span style="font-weight:bold;color:#475569;">:</span><span style="font-weight:bold;color:#075985;">html</span><span style="color:#475569;">].</span><span style="color:#0c4a6e;">html_safe
</span><span style="color:#0c4a6e;">      </span><span style="font-weight:bold;color:#dc2626;">elsif</span><span style="color:#0c4a6e;"> render_options</span><span style="color:#475569;">.</span><span style="color:#0284c7;">is_a?</span><span style="color:#475569;">(</span><span style="color:#0284c7;">Hash</span><span style="color:#475569;">) </span><span style="font-weight:bold;color:#0369a1;">&amp;&amp;</span><span style="color:#0c4a6e;"> render_options</span><span style="color:#475569;">.</span><span style="color:#0c4a6e;">key?</span><span style="color:#475569;">(</span><span style="font-weight:bold;color:#475569;">:</span><span style="font-weight:bold;color:#075985;">plain</span><span style="color:#475569;">)
</span><span style="color:#0c4a6e;">        render_options</span><span style="color:#475569;">[</span><span style="font-weight:bold;color:#475569;">:</span><span style="font-weight:bold;color:#075985;">plain</span><span style="color:#475569;">]
</span><span style="color:#0c4a6e;">      </span><span style="font-weight:bold;color:#dc2626;">else
</span><span style="color:#0c4a6e;">        render</span><span style="color:#475569;">({ </span><span style="font-weight:bold;color:#075985;">partial</span><span style="font-weight:bold;color:#475569;">:</span><span style="color:#0c4a6e;"> render_options</span><span style="color:#475569;">.</span><span style="color:#0284c7;">to_s </span><span style="color:#475569;">}) </span><span style="font-weight:bold;color:#dc2626;">if</span><span style="color:#0c4a6e;"> render_options</span><span style="color:#475569;">.</span><span style="color:#0284c7;">is_a?</span><span style="color:#475569;">(</span><span style="color:#0284c7;">String</span><span style="color:#475569;">) </span><span style="font-weight:bold;color:#0369a1;">||</span><span style="color:#0c4a6e;"> render_options</span><span style="color:#475569;">.</span><span style="color:#0284c7;">is_a?</span><span style="color:#475569;">(</span><span style="color:#1e293b;">Symbol</span><span style="color:#475569;">)
</span><span style="color:#0c4a6e;">      </span><span style="font-weight:bold;color:#dc2626;">end
</span><span style="color:#0c4a6e;">    </span><span style="font-weight:bold;color:#dc2626;">end
</span><span style="color:#0c4a6e;">  </span><span style="font-weight:bold;color:#dc2626;">end
</span><span style="font-weight:bold;color:#dc2626;">end
</span></code></pre>
<p>The logic is straightforward. If the condition is true, render the block. If false, check your options and handle it accordingly.</p>
<p>When you pass <code>redirect_to</code>, it captures the block content, strips HTML tags and wraps it in a link. When you pass <code>render</code>, it supports three formats: plain text, raw HTML or a partial name as a string or symbol.</p>
<p>This helper did, ~10 years ago, not start like this. Over the years, after working on many dozens Rails-based SaaS apps, my aim became to make helpers “quack” more like Rails methods. You’re familiar with <code>render plain:</code>, <code>render html:</code> and partial rendering. This helper just extends that familiar syntax to conditional rendering.</p>
<p>I like it. What do you think of this?</p>
]]></content>


  </entry>
  
  <entry>
    <id>https://railsdesigner.com/changelog-with-perron/?ref=rss</id>
    <title>Build a changelog widget (with Perron)</title>
    <link href="https://railsdesigner.com/changelog-with-perron/?ref=rss" rel="alternate" type="text/html"/>
    <published>2026-07-02T07:30:00Z</published>
    <updated>2026-07-02T07:30:00Z</updated>

    
      <author>
        <name>Rails Designer</name>
        <email>support@railsdesigner.com</email>
      </author>


      <content type="html" xml:base="https://railsdesigner.com/changelog-with-perron/?ref=rss"><![CDATA[<p>Changelog widgets, like those from Headway and Beamer, are still a popular way to tell your users about updates to your product. What if you could build one yourself?</p>
<p><a href="https://perron.railsdesigner.com">Perron</a>, the Rails-based SSG, has a library of production-ready custom elements. One of them, the <a href="https://perron.railsdesigner.com/library/embed/">Embed Content component</a> is perfect for this exact use case. It fetches JSON data, renders it as a list, tracks read state and handles all the UI interactions. You just provide the data.</p>
<p>The result will look like this:</p>
<p><img src="https://railsdesigner.com/images/posts/changelog-widget.gif" alt="GIF of changelog widget in action"></p>
<p>Pretty smooth, right?</p>
<p>Most changelog services lock you into their platform. You pay per seat, deal with their branding and accept their feature set. If you want something simpler or more tailored to your product, you’re stuck building it from scratch.</p>
<p>But here’s the thing: a changelog widget isn’t complicated. It needs to fetch some data, display it nicely, track which items users have read and maybe show a badge with unread counts. That’s it. The Embed Content component is a custom element that fetches JSON from any endpoint, renders items with a template you control, tracks unread state based on a <code>last-read-at</code> timestamp, shows an unread badge automatically and handles open/close toggle states.</p>
<p>You drop it into your HTML, point it at your changelog endpoint and it works. You write the changelog entries in your Perron site (where they are also published. Win-win! 🏆).</p>
<h2>
<a href="#getting-started" aria-hidden="true" class="anchor" id="getting-started"></a>Getting Started</h2>
<p>First, add the Embed Content component to your project. The <a href="https://perron.railsdesigner.com/library/embed/">setup instructions</a> are straightforward: run the template in your app and the custom element is ready to use.</p>
<p>Next, you’ll need a JSON feed. Perron makes this easy: check out the <a href="https://perron.railsdesigner.com/docs/feeds/#custom-templates">Perron docs</a> to see how to create a custom template that outputs your changelog items as JSON.</p>
<p>Once your feed is live, drop the Embed Content component into your view:</p>
<pre lang="erb" style="background-color:#f8fafc;"><code><span style="color:#475569;">&lt;</span><span style="font-weight:bold;color:#dc2626;">embed-content </span><span style="color:#0369a1;">id</span><span style="color:#475569;">="</span><span style="color:#0369a1;">changelog-widget</span><span style="color:#475569;">" </span><span style="color:#0369a1;">src</span><span style="color:#475569;">="</span><span style="color:#0369a1;">https://example.com/changelog.json</span><span style="color:#475569;">" </span><span style="color:#0369a1;">limit</span><span style="color:#475569;">="</span><span style="color:#0369a1;">5</span><span style="color:#475569;">" </span><span style="color:#0369a1;">last-read-at</span><span style="color:#475569;">="</span><span style="color:#0369a1;">2026-03-20T00:00:00Z</span><span style="color:#475569;">"&gt;
</span><span style="color:#0c4a6e;">  </span><span style="color:#475569;">&lt;</span><span style="font-weight:bold;color:#dc2626;">button </span><span style="color:#0369a1;">aria-label</span><span style="color:#475569;">="</span><span style="color:#0369a1;">Toggle changelog</span><span style="color:#475569;">"&gt;
</span><span style="color:#0c4a6e;">    </span><span style="color:#475569;">&lt;</span><span style="font-weight:bold;color:#dc2626;">svg </span><span style="color:#0369a1;">xmlns</span><span style="color:#475569;">="</span><span style="color:#0369a1;">http://www.w3.org/2000/svg</span><span style="color:#475569;">" </span><span style="color:#0369a1;">width</span><span style="color:#475569;">="</span><span style="color:#0369a1;">20</span><span style="color:#475569;">" </span><span style="color:#0369a1;">height</span><span style="color:#475569;">="</span><span style="color:#0369a1;">20</span><span style="color:#475569;">" </span><span style="color:#0369a1;">viewBox</span><span style="color:#475569;">="</span><span style="color:#0369a1;">0 0 24 24</span><span style="color:#475569;">" </span><span style="color:#0369a1;">fill</span><span style="color:#475569;">="</span><span style="color:#0369a1;">none</span><span style="color:#475569;">" </span><span style="color:#0369a1;">stroke</span><span style="color:#475569;">="</span><span style="color:#0369a1;">currentColor</span><span style="color:#475569;">" </span><span style="color:#0369a1;">stroke-width</span><span style="color:#475569;">="</span><span style="color:#0369a1;">2</span><span style="color:#475569;">" </span><span style="color:#0369a1;">stroke-linecap</span><span style="color:#475569;">="</span><span style="color:#0369a1;">round</span><span style="color:#475569;">" </span><span style="color:#0369a1;">stroke-linejoin</span><span style="color:#475569;">="</span><span style="color:#0369a1;">round</span><span style="color:#475569;">"&gt;
</span><span style="color:#0c4a6e;">      </span><span style="color:#475569;">&lt;</span><span style="font-weight:bold;color:#dc2626;">path </span><span style="color:#0369a1;">d</span><span style="color:#475569;">="</span><span style="color:#0369a1;">M6 8a6 6 0 0 1 12 0c0 7 3 9 3 9H3s3-2 3-9</span><span style="color:#475569;">"/&gt;
</span><span style="color:#0c4a6e;">      </span><span style="color:#475569;">&lt;</span><span style="font-weight:bold;color:#dc2626;">path </span><span style="color:#0369a1;">d</span><span style="color:#475569;">="</span><span style="color:#0369a1;">M10.3 21a1.94 1.94 0 0 0 3.4 0</span><span style="color:#475569;">"/&gt;
</span><span style="color:#0c4a6e;">    </span><span style="color:#475569;">&lt;/</span><span style="font-weight:bold;color:#dc2626;">svg</span><span style="color:#475569;">&gt;
</span><span style="color:#0c4a6e;">
</span><span style="color:#0c4a6e;">    </span><span style="color:#475569;">&lt;</span><span style="font-weight:bold;color:#dc2626;">span </span><span style="color:#0369a1;">badge</span><span style="color:#475569;">&gt;&lt;/</span><span style="font-weight:bold;color:#dc2626;">span</span><span style="color:#475569;">&gt;
</span><span style="color:#0c4a6e;">  </span><span style="color:#475569;">&lt;/</span><span style="font-weight:bold;color:#dc2626;">button</span><span style="color:#475569;">&gt;
</span><span style="color:#0c4a6e;">
</span><span style="color:#0c4a6e;">  </span><span style="color:#475569;">&lt;</span><span style="font-weight:bold;color:#dc2626;">div </span><span style="color:#0369a1;">panel</span><span style="color:#475569;">&gt;
</span><span style="color:#0c4a6e;">    </span><span style="color:#475569;">&lt;</span><span style="font-weight:bold;color:#dc2626;">div </span><span style="color:#0369a1;">header</span><span style="color:#475569;">&gt;
</span><span style="color:#0c4a6e;">      </span><span style="color:#475569;">&lt;</span><span style="font-weight:bold;color:#dc2626;">h2</span><span style="color:#475569;">&gt;</span><span style="color:#0c4a6e;">What's new</span><span style="color:#475569;">&lt;/</span><span style="font-weight:bold;color:#dc2626;">h2</span><span style="color:#475569;">&gt;
</span><span style="color:#0c4a6e;">    </span><span style="color:#475569;">&lt;/</span><span style="font-weight:bold;color:#dc2626;">div</span><span style="color:#475569;">&gt;
</span><span style="color:#0c4a6e;">
</span><span style="color:#0c4a6e;">    </span><span style="color:#475569;">&lt;</span><span style="font-weight:bold;color:#dc2626;">ul </span><span style="color:#0369a1;">items</span><span style="color:#475569;">&gt;&lt;/</span><span style="font-weight:bold;color:#dc2626;">ul</span><span style="color:#475569;">&gt;
</span><span style="color:#0c4a6e;">  </span><span style="color:#475569;">&lt;/</span><span style="font-weight:bold;color:#dc2626;">div</span><span style="color:#475569;">&gt;
</span><span style="color:#475569;">&lt;/</span><span style="font-weight:bold;color:#dc2626;">embed-content</span><span style="color:#475569;">&gt;
</span></code></pre>
<p>The component reads the <code>src</code> attribute, fetches your JSON and renders each item. The <code>limit</code> attribute controls how many items show. The <code>last-read-at</code> attribute tracks which items are new: anything published after that timestamp gets marked as unread and counted in the badge.</p>
<p>Your feed doesn’t have to come from Perron. The component just needs JSON with <code>title</code>, <code>body</code>, <code>url</code> and <code>published_at</code> fields. You could use a custom Rails endpoint, a headless CMS or any JSON API. The pattern is the same.</p>
<p>The component uses semantic HTML and CSS custom properties, so styling is straightforward. You control the colors, spacing and layout. This pattern works for any feed-like feature: product announcements, status updates, notification centers or feature releases. The <a href="https://perron.railsdesigner.com/library/embed/">Embed Content component</a> handles the hard parts. You focus on your content. ✨</p>
<p>Check out the <a href="https://github.com/rails-designer-repos/changelog-widget">example repository</a> for the complete example including CSS.</p>
]]></content>


  </entry>
  
  <entry>
    <id>https://railsdesigner.com/deploy-with-beam-up/?ref=rss</id>
    <title>Beam Up: CLI to deploy static sites</title>
    <link href="https://railsdesigner.com/deploy-with-beam-up/?ref=rss" rel="alternate" type="text/html"/>
    <published>2026-06-25T07:30:00Z</published>
    <updated>2026-06-25T07:30:00Z</updated>

    
      <author>
        <name>Rails Designer</name>
        <email>support@railsdesigner.com</email>
      </author>


      <content type="html" xml:base="https://railsdesigner.com/deploy-with-beam-up/?ref=rss"><![CDATA[<p>Beam Up is a command-line tool I wanted for some time. Its goal is to make deployments of static sites across various providers simpler from your machine: run one command: <code>beam_up ./output/</code>. ❤️</p>
<p>If you feel generous, head over to <a href="https://github.com/Rails-Designer/beam_up">the GitHub repo</a> and give it a star! 🌟</p>
<h2>
<a href="#installation-and-configuration" aria-hidden="true" class="anchor" id="installation-and-configuration"></a>Installation and configuration</h2>
<p>To install Beam Up, run:</p>
<pre lang="bash" style="background-color:#f8fafc;"><code><span style="color:#1e293b;">gem</span><span style="color:#0c4a6e;"> install beam_up
</span></code></pre>
<p>Then initialize a configuration file for your chosen provider with:</p>
<pre lang="bash" style="background-color:#f8fafc;"><code><span style="color:#1e293b;">beam_up</span><span style="color:#0c4a6e;"> init </span><span style="font-style:italic;color:#475569;">#</span><span style="font-style:italic;color:#64748b;"> to start an interactive process, or:
</span><span style="font-style:italic;color:#475569;">#</span><span style="font-style:italic;color:#64748b;"> beam_up init hetzner
</span></code></pre>
<p>This creates a <code>.beam_up.yml</code> file:</p>
<pre lang="yaml" style="background-color:#f8fafc;"><code><span style="font-weight:bold;color:#dc2626;">provider</span><span style="color:#475569;">: </span><span style="color:#0369a1;">netlify
</span><span style="font-weight:bold;color:#dc2626;">netlify</span><span style="color:#475569;">:
</span><span style="color:#0c4a6e;">  </span><span style="font-weight:bold;color:#dc2626;">api_token</span><span style="color:#475569;">: </span><span style="color:#0369a1;">your_token_here
</span><span style="color:#0c4a6e;">  </span><span style="font-weight:bold;color:#dc2626;">project_id</span><span style="color:#475569;">: </span><span style="color:#0369a1;">your_project_id
</span></code></pre>
<h2>
<a href="#ready-to-beam-" aria-hidden="true" class="anchor" id="ready-to-beam-"></a>Ready to beam ⚡</h2>
<p>Now you can deploy your static site using the super fun <code>beam_up</code> command:</p>
<pre lang="bash" style="background-color:#f8fafc;"><code><span style="color:#1e293b;">beam_up</span><span style="color:#0c4a6e;"> ./output
</span></code></pre>
<p>Beam Up supports multiple providers including AWS S3, <a href="https://sealstatic.com">Seal Static</a>, Hetzner, Netlify and Statichost. Oh, and it even works with SFTP (remember those days?!).</p>
<h2>
<a href="#usage-from-ruby" aria-hidden="true" class="anchor" id="usage-from-ruby"></a>Usage from Ruby</h2>
<p>Beam Up can also be used within Ruby scripts:</p>
<pre lang="ruby" style="background-color:#f8fafc;"><code><span style="font-weight:bold;color:#dc2626;">require </span><span style="color:#475569;">"</span><span style="color:#0369a1;">beam_up</span><span style="color:#475569;">"
</span><span style="color:#0c4a6e;">
</span><span style="color:#0c4a6e;">BeamUp</span><span style="color:#475569;">.</span><span style="color:#0c4a6e;">deploy! </span><span style="color:#475569;">"</span><span style="color:#0369a1;">./output</span><span style="color:#475569;">"
</span></code></pre>
<h2>
<a href="#integration-with-perron" aria-hidden="true" class="anchor" id="integration-with-perron"></a>Integration with Perron</h2>
<p>While Beam Up is designed to work with any SSG (Jekyll, Middleman or Bridgetown), I built it for <a href="https://github.com/Rails-Designer/perron">Perron</a>. With the latest version, you can now simply run <code>bin/rails perron:deploy</code>, it will build your site (<code>bin/rails perron:build</code>) and deploy it: your site will be live in no time. Without any config, it will default to deploy to <a href="https://sealstatic.com">Seal Static</a> (where an account is created for you on first deploy). Cool, right? 😎</p>
<hr>
<p>Beam Up is a small, new OSS project made with ❤️ from Rails Designer HQ. If you like it, do <a href="https://github.com/Rails-Designer/beam_up">star it on GitHub</a> and give it a try on your (next) SSG project.</p>
]]></content>


  </entry>
  
  <entry>
    <id>https://railsdesigner.com/before-after-images-stimulus/?ref=rss</id>
    <title>Build a reusable before/after image slider with Stimulus</title>
    <link href="https://railsdesigner.com/before-after-images-stimulus/?ref=rss" rel="alternate" type="text/html"/>
    <published>2026-06-18T07:30:00Z</published>
    <updated>2026-06-18T07:30:00Z</updated>

    
      <author>
        <name>Rails Designer</name>
        <email>support@railsdesigner.com</email>
      </author>


      <content type="html" xml:base="https://railsdesigner.com/before-after-images-stimulus/?ref=rss"><![CDATA[<p>Before and after (image) sliders are great for product showcases, before/after transformations, renovation projects or photo editing results. They’re engaging, interactive, and honestly just fun to use.</p>
<p>Ever thought of building one from scratch? Not complicated at all! In this article, I want to show how to build a simple, reusable Stimulus controller that does just all that. This is how the end result will look like:</p>
<p><img src="https://railsdesigner.com/images/posts/before-after-preview.jpg" alt=""></p>
<p>As always, <a href="https://github.com/rails-designer-repos/before-after-image">the code can be found on GitHub</a>.</p>
<h2>
<a href="#it-is-simple-really" aria-hidden="true" class="anchor" id="it-is-simple-really"></a>It is simple, really</h2>
<p>The beauty of this controller is its simplicity. You need three things:</p>
<ul>
<li>a wrapper element;</li>
<li>two images (before and after), and;</li>
<li>a slider.</li>
</ul>
<p>That’s it. Here’s it in HTML:</p>
<pre lang="html" style="background-color:#f8fafc;"><code><span style="color:#475569;">&lt;</span><span style="font-weight:bold;color:#dc2626;">div </span><span style="color:#0369a1;">data-controller</span><span style="color:#475569;">="</span><span style="color:#0369a1;">compare</span><span style="color:#475569;">"&gt;
</span><span style="color:#0c4a6e;">  </span><span style="color:#475569;">&lt;</span><span style="font-weight:bold;color:#dc2626;">img </span><span style="color:#0369a1;">data-compare-target</span><span style="color:#475569;">="</span><span style="color:#0369a1;">before</span><span style="color:#475569;">" </span><span style="color:#0369a1;">src</span><span style="color:#475569;">="</span><span style="color:#0369a1;">before.jpg</span><span style="color:#475569;">"&gt;
</span><span style="color:#0c4a6e;">  </span><span style="color:#475569;">&lt;</span><span style="font-weight:bold;color:#dc2626;">img </span><span style="color:#0369a1;">data-compare-target</span><span style="color:#475569;">="</span><span style="color:#0369a1;">after</span><span style="color:#475569;">" </span><span style="color:#0369a1;">src</span><span style="color:#475569;">="</span><span style="color:#0369a1;">after.jpg</span><span style="color:#475569;">"&gt;
</span><span style="color:#0c4a6e;">
</span><span style="color:#0c4a6e;">  </span><span style="color:#475569;">&lt;</span><span style="font-weight:bold;color:#dc2626;">div </span><span style="color:#0369a1;">data-compare-target</span><span style="color:#475569;">="</span><span style="color:#0369a1;">slider</span><span style="color:#475569;">"&gt;&lt;/</span><span style="font-weight:bold;color:#dc2626;">div</span><span style="color:#475569;">&gt;
</span><span style="color:#475569;">&lt;/</span><span style="font-weight:bold;color:#dc2626;">div</span><span style="color:#475569;">&gt;
</span></code></pre>
<p>The two images are positioned absolutely and the slider sits on top as a draggable handle. The “after” image gets clipped dynamically as you drag.</p>
<p>Here’s that interesting part. It uses <code>clip-path</code> to reveal or hide the after image:</p>
<pre lang="javascript" style="background-color:#f8fafc;"><code><span style="color:#1e293b;">set</span><span style="color:#0c4a6e;"> #</span><span style="color:#1e293b;">position</span><span style="color:#475569;">(</span><span style="color:#1e293b;">value</span><span style="color:#475569;">) {
</span><span style="color:#0c4a6e;">  </span><span style="color:#1e293b;">this</span><span style="color:#475569;">.</span><span style="color:#0c4a6e;">positionValue </span><span style="font-weight:bold;color:#0369a1;">= </span><span style="color:#1e293b;">value
</span><span style="color:#0c4a6e;">  </span><span style="color:#1e293b;">this</span><span style="color:#475569;">.</span><span style="color:#0c4a6e;">sliderTarget</span><span style="color:#475569;">.</span><span style="color:#0c4a6e;">style</span><span style="color:#475569;">.</span><span style="color:#0c4a6e;">left </span><span style="font-weight:bold;color:#0369a1;">= </span><span style="color:#475569;">`${</span><span style="color:#1e293b;">value </span><span style="font-weight:bold;color:#0369a1;">* </span><span style="font-weight:bold;color:#d97706;">100</span><span style="color:#475569;">}</span><span style="color:#0369a1;">%</span><span style="color:#475569;">`
</span><span style="color:#0c4a6e;">  </span><span style="color:#1e293b;">this</span><span style="color:#475569;">.</span><span style="color:#0c4a6e;">afterTarget</span><span style="color:#475569;">.</span><span style="color:#0c4a6e;">style</span><span style="color:#475569;">.</span><span style="color:#0c4a6e;">clipPath </span><span style="font-weight:bold;color:#0369a1;">= </span><span style="color:#475569;">`</span><span style="color:#0369a1;">inset(0 0 0 </span><span style="color:#475569;">${</span><span style="color:#1e293b;">value </span><span style="font-weight:bold;color:#0369a1;">* </span><span style="font-weight:bold;color:#d97706;">100</span><span style="color:#475569;">}</span><span style="color:#0369a1;">%)</span><span style="color:#475569;">`
</span><span style="color:#475569;">}
</span></code></pre>
<p>When you drag the slider, it calculates the position relative to the container’s width, then updates both the slider’s left position and the clip-path of the after image. Most of that is done with:</p>
<pre lang="javascript" style="background-color:#f8fafc;"><code><span style="color:#0c4a6e;">#</span><span style="color:#0284c7;">pointerDown </span><span style="font-weight:bold;color:#0369a1;">= </span><span style="color:#475569;">(</span><span style="color:#1e293b;">event</span><span style="color:#475569;">) </span><span style="font-weight:bold;color:#dc2626;">=&gt; </span><span style="color:#475569;">{
</span><span style="color:#0c4a6e;">  </span><span style="font-weight:bold;color:#dc2626;">if </span><span style="color:#475569;">(</span><span style="color:#1e293b;">event</span><span style="color:#475569;">.</span><span style="color:#0c4a6e;">target </span><span style="font-weight:bold;color:#0369a1;">!== </span><span style="color:#1e293b;">this</span><span style="color:#475569;">.</span><span style="color:#0c4a6e;">sliderTarget</span><span style="color:#475569;">) </span><span style="font-weight:bold;color:#dc2626;">return
</span><span style="color:#0c4a6e;">
</span><span style="color:#0c4a6e;">  </span><span style="color:#1e293b;">event</span><span style="color:#475569;">.</span><span style="color:#1e293b;">preventDefault</span><span style="color:#475569;">()
</span><span style="color:#0c4a6e;">
</span><span style="color:#0c4a6e;">  document</span><span style="color:#475569;">.</span><span style="color:#1e293b;">addEventListener</span><span style="color:#475569;">("</span><span style="color:#0369a1;">pointermove</span><span style="color:#475569;">", </span><span style="color:#1e293b;">this</span><span style="color:#475569;">.</span><span style="color:#0c4a6e;">#</span><span style="color:#1e293b;">pointerMove</span><span style="color:#475569;">)
</span><span style="color:#0c4a6e;">  document</span><span style="color:#475569;">.</span><span style="color:#1e293b;">addEventListener</span><span style="color:#475569;">("</span><span style="color:#0369a1;">pointerup</span><span style="color:#475569;">", </span><span style="color:#1e293b;">this</span><span style="color:#475569;">.</span><span style="color:#0c4a6e;">#</span><span style="color:#1e293b;">pointerUp</span><span style="color:#475569;">)
</span><span style="color:#475569;">}
</span></code></pre>
<h2>
<a href="#stimulus-controllers-are-meant-to-be-reusable" aria-hidden="true" class="anchor" id="stimulus-controllers-are-meant-to-be-reusable"></a>Stimulus controllers are meant to be reusable</h2>
<p>This controller is a wrapper element plus two images. That’s it. Use cases then are limitless (they generally work great on marketing blogs as well!):</p>
<ul>
<li>
<strong>product photography</strong>; show different angles or colors of the same product</li>
<li>
<strong>photo editing results</strong>; before/after with filters, adjustments, or retouching</li>
<li>
<strong>UI redesigns</strong>; old interface vs. new interface</li>
</ul>
<hr>
<p>You could (should) extend this in several directions. Add keyboard support for accessibility. Include labels (“Before” / “After”) that move with the slider. Add touch support with haptic feedback on mobile.</p>
<p>It is the kind of controller you copy and paste into your projects. Just as it should be.</p>
]]></content>


  </entry>
  
  <entry>
    <id>https://railsdesigner.com/quiz-stimulus/?ref=rss</id>
    <title>Building a quiz with Stimulus</title>
    <link href="https://railsdesigner.com/quiz-stimulus/?ref=rss" rel="alternate" type="text/html"/>
    <published>2026-06-11T07:30:00Z</published>
    <updated>2026-06-11T07:30:00Z</updated>

    
      <author>
        <name>Rails Designer</name>
        <email>support@railsdesigner.com</email>
      </author>


      <content type="html" xml:base="https://railsdesigner.com/quiz-stimulus/?ref=rss"><![CDATA[<p>Quizzes are a fun! Well… I do think they are. Always up to learn new things. So how can you create one in with your favorite frameworks? In this article, I want to show how you can build a quiz witg Stimulus. It can be a good starting point for learn about a new customer in your SaaS or as a smart, little marketing tool (keep readers engaged/on your page). 💡</p>
<p>The quiz loads questions from a Rails endpoint, tracks answers in real-time, calculates results and submits them to your server. As always, <a href="https://github.com/rails-designer-repos/stimulus-quiz">the code can be found on GitHub</a>.</p>
<p><img src="https://railsdesigner.com/images/posts/binary-quiz.jpg" alt=""></p>
<p>This will be the result. Time to dust off that good ol’ computer science knowledge… 🤓</p>
<h2>
<a href="#building-the-data-class" aria-hidden="true" class="anchor" id="building-the-data-class"></a>Building the data class</h2>
<p>Here’s the <code>QuizData</code> class that handles the quiz logic. For this example it lives inside the Stimulus controller, but you can organise it however you want.</p>
<pre lang="javascript" style="background-color:#f8fafc;"><code><span style="font-weight:bold;color:#dc2626;">class </span><span style="font-weight:bold;color:#b91c1c;">QuizData </span><span style="color:#475569;">{
</span><span style="color:#0c4a6e;">  </span><span style="color:#0284c7;">constructor</span><span style="color:#475569;">(</span><span style="color:#1e293b;">questions</span><span style="color:#475569;">) {
</span><span style="color:#0c4a6e;">    </span><span style="color:#1e293b;">this</span><span style="color:#475569;">.</span><span style="color:#0c4a6e;">questions </span><span style="font-weight:bold;color:#0369a1;">= </span><span style="color:#1e293b;">questions
</span><span style="color:#0c4a6e;">    </span><span style="color:#1e293b;">this</span><span style="color:#475569;">.</span><span style="color:#0c4a6e;">answers </span><span style="font-weight:bold;color:#0369a1;">= </span><span style="color:#475569;">{}
</span><span style="color:#0c4a6e;">  </span><span style="color:#475569;">}
</span><span style="color:#0c4a6e;">
</span><span style="color:#0c4a6e;">  </span><span style="color:#0284c7;">answer</span><span style="color:#475569;">(</span><span style="color:#1e293b;">questionIndex</span><span style="color:#475569;">, </span><span style="color:#1e293b;">selectedOption</span><span style="color:#475569;">) {
</span><span style="color:#0c4a6e;">    </span><span style="color:#1e293b;">this</span><span style="color:#475569;">.</span><span style="color:#0c4a6e;">answers</span><span style="color:#475569;">[</span><span style="color:#1e293b;">questionIndex</span><span style="color:#475569;">] </span><span style="font-weight:bold;color:#0369a1;">= </span><span style="color:#1e293b;">selectedOption
</span><span style="color:#0c4a6e;">  </span><span style="color:#475569;">}
</span><span style="color:#0c4a6e;">
</span><span style="color:#0c4a6e;">  </span><span style="color:#0284c7;">getAnswer</span><span style="color:#475569;">(</span><span style="color:#1e293b;">questionIndex</span><span style="color:#475569;">) {
</span><span style="color:#0c4a6e;">    </span><span style="font-weight:bold;color:#dc2626;">return </span><span style="color:#1e293b;">this</span><span style="color:#475569;">.</span><span style="color:#0c4a6e;">answers</span><span style="color:#475569;">[</span><span style="color:#1e293b;">questionIndex</span><span style="color:#475569;">]
</span><span style="color:#0c4a6e;">  </span><span style="color:#475569;">}
</span><span style="color:#0c4a6e;">
</span><span style="color:#0c4a6e;">  </span><span style="color:#0284c7;">correctCount</span><span style="color:#475569;">() {
</span><span style="color:#0c4a6e;">    </span><span style="font-weight:bold;color:#dc2626;">return </span><span style="color:#1e293b;">this</span><span style="color:#475569;">.</span><span style="color:#0c4a6e;">questions</span><span style="color:#475569;">.</span><span style="color:#1e293b;">filter</span><span style="color:#475569;">((</span><span style="color:#1e293b;">question</span><span style="color:#475569;">, </span><span style="color:#1e293b;">questionIndex</span><span style="color:#475569;">) </span><span style="font-weight:bold;color:#dc2626;">=&gt; </span><span style="color:#475569;">{
</span><span style="color:#0c4a6e;">      </span><span style="font-weight:bold;color:#dc2626;">const </span><span style="color:#1e293b;">answer </span><span style="font-weight:bold;color:#0369a1;">= </span><span style="color:#1e293b;">this</span><span style="color:#475569;">.</span><span style="color:#0c4a6e;">answers</span><span style="color:#475569;">[</span><span style="color:#1e293b;">questionIndex</span><span style="color:#475569;">]
</span><span style="color:#0c4a6e;">      </span><span style="font-weight:bold;color:#dc2626;">return </span><span style="color:#1e293b;">answer </span><span style="font-weight:bold;color:#0369a1;">!== </span><span style="font-weight:bold;color:#075985;">undefined </span><span style="font-weight:bold;color:#0369a1;">&amp;&amp; </span><span style="color:#1e293b;">answer </span><span style="font-weight:bold;color:#0369a1;">=== </span><span style="color:#1e293b;">question</span><span style="color:#475569;">.</span><span style="color:#0c4a6e;">correct
</span><span style="color:#0c4a6e;">    </span><span style="color:#475569;">}).</span><span style="color:#0c4a6e;">length
</span><span style="color:#0c4a6e;">  </span><span style="color:#475569;">}
</span><span style="color:#0c4a6e;">
</span><span style="color:#0c4a6e;">  </span><span style="color:#0284c7;">result</span><span style="color:#475569;">() {
</span><span style="color:#0c4a6e;">    </span><span style="font-weight:bold;color:#dc2626;">return </span><span style="color:#1e293b;">this</span><span style="color:#475569;">.</span><span style="color:#0c4a6e;">questions</span><span style="color:#475569;">.</span><span style="color:#1e293b;">reduce</span><span style="color:#475569;">((</span><span style="color:#1e293b;">accumulate</span><span style="color:#475569;">, </span><span style="color:#1e293b;">question</span><span style="color:#475569;">, </span><span style="color:#1e293b;">questionIndex</span><span style="color:#475569;">) </span><span style="font-weight:bold;color:#dc2626;">=&gt; </span><span style="color:#475569;">{
</span><span style="color:#0c4a6e;">      </span><span style="font-weight:bold;color:#dc2626;">const </span><span style="color:#1e293b;">answer </span><span style="font-weight:bold;color:#0369a1;">= </span><span style="color:#1e293b;">this</span><span style="color:#475569;">.</span><span style="color:#0c4a6e;">answers</span><span style="color:#475569;">[</span><span style="color:#1e293b;">questionIndex</span><span style="color:#475569;">]
</span><span style="color:#0c4a6e;">
</span><span style="color:#0c4a6e;">      </span><span style="font-weight:bold;color:#dc2626;">return </span><span style="color:#1e293b;">accumulate </span><span style="font-weight:bold;color:#0369a1;">+ </span><span style="color:#475569;">((</span><span style="color:#1e293b;">answer </span><span style="font-weight:bold;color:#0369a1;">=== </span><span style="color:#1e293b;">question</span><span style="color:#475569;">.</span><span style="color:#0c4a6e;">correct</span><span style="color:#475569;">) </span><span style="font-weight:bold;color:#0369a1;">? </span><span style="color:#0c4a6e;">Math</span><span style="color:#475569;">.</span><span style="color:#1e293b;">pow</span><span style="color:#475569;">(</span><span style="font-weight:bold;color:#d97706;">2</span><span style="color:#475569;">, </span><span style="color:#1e293b;">this</span><span style="color:#475569;">.</span><span style="color:#0c4a6e;">questions</span><span style="color:#475569;">.</span><span style="color:#0c4a6e;">length </span><span style="font-weight:bold;color:#0369a1;">- </span><span style="font-weight:bold;color:#d97706;">1 </span><span style="font-weight:bold;color:#0369a1;">- </span><span style="color:#1e293b;">questionIndex</span><span style="color:#475569;">) </span><span style="font-weight:bold;color:#0369a1;">: </span><span style="font-weight:bold;color:#d97706;">0</span><span style="color:#475569;">)
</span><span style="color:#0c4a6e;">    </span><span style="color:#475569;">}, </span><span style="font-weight:bold;color:#d97706;">0</span><span style="color:#475569;">)
</span><span style="color:#0c4a6e;">  </span><span style="color:#475569;">}
</span><span style="color:#0c4a6e;">
</span><span style="color:#0c4a6e;">  </span><span style="font-weight:bold;color:#dc2626;">get </span><span style="color:#0284c7;">totalQuestions</span><span style="color:#475569;">() {
</span><span style="color:#0c4a6e;">    </span><span style="font-weight:bold;color:#dc2626;">return </span><span style="color:#1e293b;">this</span><span style="color:#475569;">.</span><span style="color:#0c4a6e;">questions</span><span style="color:#475569;">.</span><span style="color:#0c4a6e;">length
</span><span style="color:#0c4a6e;">  </span><span style="color:#475569;">}
</span><span style="color:#0c4a6e;">
</span><span style="color:#0c4a6e;">  </span><span style="font-weight:bold;color:#dc2626;">get </span><span style="color:#0284c7;">isComplete</span><span style="color:#475569;">() {
</span><span style="color:#0c4a6e;">    </span><span style="font-weight:bold;color:#dc2626;">return </span><span style="color:#0c4a6e;">Object</span><span style="color:#475569;">.</span><span style="color:#1e293b;">keys</span><span style="color:#475569;">(</span><span style="color:#1e293b;">this</span><span style="color:#475569;">.</span><span style="color:#0c4a6e;">answers</span><span style="color:#475569;">).</span><span style="color:#0c4a6e;">length </span><span style="font-weight:bold;color:#0369a1;">=== </span><span style="color:#1e293b;">this</span><span style="color:#475569;">.</span><span style="color:#0c4a6e;">totalQuestions
</span><span style="color:#0c4a6e;">  </span><span style="color:#475569;">}
</span><span style="color:#0c4a6e;">
</span><span style="color:#0c4a6e;">  </span><span style="font-weight:bold;color:#dc2626;">static </span><span style="color:#0284c7;">default</span><span style="color:#475569;">() {
</span><span style="color:#0c4a6e;">    </span><span style="font-weight:bold;color:#dc2626;">return </span><span style="font-weight:bold;color:#0369a1;">new </span><span style="color:#1e293b;">QuizData</span><span style="color:#475569;">([
</span><span style="color:#0c4a6e;">      </span><span style="color:#475569;">{
</span><span style="color:#0c4a6e;">        question</span><span style="color:#475569;">: "</span><span style="color:#0369a1;">What is </span><span style="font-weight:bold;color:#075985;">\"</span><span style="color:#0369a1;">Hi</span><span style="font-weight:bold;color:#075985;">\"</span><span style="color:#0369a1;"> in binary?</span><span style="color:#475569;">",
</span><span style="color:#0c4a6e;">        options</span><span style="color:#475569;">: ["</span><span style="color:#0369a1;">01001000 01101001</span><span style="color:#475569;">", "</span><span style="color:#0369a1;">01000111 01101001</span><span style="color:#475569;">", "</span><span style="color:#0369a1;">01001000 01110011</span><span style="color:#475569;">", "</span><span style="color:#0369a1;">01000001 01101001</span><span style="color:#475569;">"],
</span><span style="color:#0c4a6e;">        correct</span><span style="color:#475569;">: </span><span style="font-weight:bold;color:#d97706;">0
</span><span style="color:#0c4a6e;">      </span><span style="color:#475569;">},
</span><span style="color:#0c4a6e;">
</span><span style="color:#0c4a6e;">      </span><span style="font-style:italic;color:#475569;">//</span><span style="font-style:italic;color:#64748b;"> more questions…
</span><span style="color:#0c4a6e;">    </span><span style="color:#475569;">])
</span><span style="color:#0c4a6e;">  </span><span style="color:#475569;">}
</span><span style="color:#475569;">}
</span></code></pre>
<p>This class provides methods to record answers, checks if all questions are answered and calculate the score and encode results. The <code>result()</code> method is a little bit clever, it encodes which questions were answered correctly as a binary number, making it easy to store and analyze results server-side.</p>
<p>The <code>static default()</code> method provides quiz data if you do not have a remote endpoint so you can use it also outside of a Rails app (in a <a href="https://perron.railsdesigner.com/">static site</a>, for example).</p>
<h2>
<a href="#the-rails-endpoint" aria-hidden="true" class="anchor" id="the-rails-endpoint"></a>The Rails endpoint</h2>
<p>Your quiz questions need to come from somewhere. Create a <code>QuizzesController</code> with an <code>index</code> action that returns questions as JSON:</p>
<pre lang="ruby" style="background-color:#f8fafc;"><code><span style="font-weight:bold;color:#dc2626;">class </span><span style="font-weight:bold;color:#b91c1c;">QuizzesController </span><span style="color:#475569;">&lt; </span><span style="color:#0c4a6e;">ApplicationController
</span><span style="color:#0c4a6e;">  </span><span style="font-weight:bold;color:#dc2626;">def </span><span style="color:#0284c7;">index
</span><span style="color:#0c4a6e;">    render </span><span style="font-weight:bold;color:#075985;">json</span><span style="font-weight:bold;color:#475569;">: </span><span style="color:#475569;">{
</span><span style="color:#0c4a6e;">      </span><span style="font-weight:bold;color:#075985;">questions</span><span style="font-weight:bold;color:#475569;">: </span><span style="color:#475569;">[
</span><span style="color:#0c4a6e;">        </span><span style="color:#475569;">{
</span><span style="color:#0c4a6e;">          </span><span style="font-weight:bold;color:#075985;">question</span><span style="font-weight:bold;color:#475569;">: </span><span style="color:#475569;">"</span><span style="color:#0369a1;">What is </span><span style="font-weight:bold;color:#075985;">\"</span><span style="color:#0369a1;">Hi</span><span style="font-weight:bold;color:#075985;">\"</span><span style="color:#0369a1;"> in binary?</span><span style="color:#475569;">",
</span><span style="color:#0c4a6e;">          </span><span style="font-weight:bold;color:#075985;">options</span><span style="font-weight:bold;color:#475569;">: </span><span style="color:#475569;">["</span><span style="color:#0369a1;">01001000 01101001</span><span style="color:#475569;">", "</span><span style="color:#0369a1;">01000111 01101001</span><span style="color:#475569;">", </span><span style="font-weight:bold;color:#0369a1;">...</span><span style="color:#475569;">],
</span><span style="color:#0c4a6e;">          </span><span style="font-weight:bold;color:#075985;">correct</span><span style="font-weight:bold;color:#475569;">: </span><span style="font-weight:bold;color:#d97706;">0
</span><span style="color:#0c4a6e;">        </span><span style="color:#475569;">},
</span><span style="color:#0c4a6e;">
</span><span style="color:#0c4a6e;">        </span><span style="font-style:italic;color:#475569;">#</span><span style="font-style:italic;color:#64748b;"> etc…
</span><span style="color:#0c4a6e;">      </span><span style="color:#475569;">]
</span><span style="color:#0c4a6e;">    </span><span style="color:#475569;">}
</span><span style="color:#0c4a6e;">  </span><span style="font-weight:bold;color:#dc2626;">end
</span><span style="color:#0c4a6e;">
</span><span style="color:#0c4a6e;">  </span><span style="font-weight:bold;color:#dc2626;">def </span><span style="color:#0284c7;">create
</span><span style="color:#0c4a6e;">    Rails</span><span style="color:#475569;">.</span><span style="color:#0c4a6e;">logger</span><span style="color:#475569;">.</span><span style="color:#0c4a6e;">info </span><span style="color:#475569;">"</span><span style="color:#0369a1;">Quiz submission: </span><span style="color:#475569;">#{</span><span style="color:#0369a1;">params</span><span style="color:#475569;">.</span><span style="color:#0369a1;">permit!</span><span style="color:#475569;">.</span><span style="color:#0284c7;">to_h</span><span style="color:#475569;">}"
</span><span style="color:#0c4a6e;">
</span><span style="color:#0c4a6e;">    head </span><span style="font-weight:bold;color:#475569;">:</span><span style="font-weight:bold;color:#075985;">ok
</span><span style="color:#0c4a6e;">  </span><span style="font-weight:bold;color:#dc2626;">end
</span><span style="font-weight:bold;color:#dc2626;">end
</span></code></pre>
<p>The <code>index</code> action returns an array of questions with their options and the index of the correct answer. The <code>create</code> action receives the submitted answers, you can process them here however you want (send along, store in DB, etc.).</p>
<h2>
<a href="#the-stimulus-controller" aria-hidden="true" class="anchor" id="the-stimulus-controller"></a>The Stimulus controller</h2>
<p>Now the Stimulus where it all happens 🛏️✨. This controller fetches questions from your endpoint, renders them and handles user interactions. It uses the <code>@rails/request.js</code> library to make clean HTTP requests.</p>
<p>When the controller connects, it fetches the questions:</p>
<pre lang="javascript" style="background-color:#f8fafc;"><code><span style="color:#1e293b;">async connect</span><span style="color:#475569;">() {
</span><span style="color:#0c4a6e;">  </span><span style="color:#1e293b;">this</span><span style="color:#475569;">.</span><span style="color:#0c4a6e;">quiz </span><span style="font-weight:bold;color:#0369a1;">= </span><span style="color:#1e293b;">await this</span><span style="color:#475569;">.</span><span style="color:#0c4a6e;">#</span><span style="color:#1e293b;">getQuestions</span><span style="color:#475569;">()
</span><span style="color:#0c4a6e;">
</span><span style="color:#0c4a6e;">  </span><span style="color:#1e293b;">this</span><span style="color:#475569;">.</span><span style="color:#0c4a6e;">#</span><span style="color:#1e293b;">render</span><span style="color:#475569;">()
</span><span style="color:#475569;">}
</span><span style="color:#0c4a6e;">
</span><span style="color:#1e293b;">async</span><span style="color:#0c4a6e;"> #</span><span style="color:#1e293b;">getQuestions</span><span style="color:#475569;">() {
</span><span style="color:#0c4a6e;">  </span><span style="font-weight:bold;color:#dc2626;">if </span><span style="color:#475569;">(</span><span style="color:#1e293b;">this</span><span style="color:#475569;">.</span><span style="color:#0c4a6e;">hasQuestionsEndpointValue</span><span style="color:#475569;">) {
</span><span style="color:#0c4a6e;">    </span><span style="font-weight:bold;color:#dc2626;">try </span><span style="color:#475569;">{
</span><span style="color:#0c4a6e;">      </span><span style="font-weight:bold;color:#dc2626;">const </span><span style="color:#1e293b;">response </span><span style="font-weight:bold;color:#0369a1;">= </span><span style="color:#1e293b;">await get</span><span style="color:#475569;">(</span><span style="color:#1e293b;">this</span><span style="color:#475569;">.</span><span style="color:#0c4a6e;">questionsEndpointValue</span><span style="color:#475569;">, { </span><span style="color:#0c4a6e;">responseKind</span><span style="color:#475569;">: "</span><span style="color:#0369a1;">json</span><span style="color:#475569;">" })
</span><span style="color:#0c4a6e;">
</span><span style="color:#0c4a6e;">      </span><span style="font-weight:bold;color:#dc2626;">if </span><span style="color:#475569;">(</span><span style="color:#1e293b;">response</span><span style="font-weight:bold;color:#0369a1;">?</span><span style="color:#475569;">.</span><span style="color:#0c4a6e;">questions</span><span style="font-weight:bold;color:#0369a1;">?</span><span style="color:#475569;">.</span><span style="color:#0c4a6e;">length </span><span style="font-weight:bold;color:#0369a1;">&gt; </span><span style="font-weight:bold;color:#d97706;">0</span><span style="color:#475569;">) </span><span style="font-weight:bold;color:#dc2626;">return </span><span style="font-weight:bold;color:#0369a1;">new </span><span style="color:#1e293b;">QuizData</span><span style="color:#475569;">(</span><span style="color:#1e293b;">response</span><span style="color:#475569;">.</span><span style="color:#0c4a6e;">questions</span><span style="color:#475569;">)
</span><span style="color:#0c4a6e;">    </span><span style="color:#475569;">} </span><span style="font-weight:bold;color:#dc2626;">catch </span><span style="color:#475569;">(</span><span style="color:#1e293b;">error</span><span style="color:#475569;">) {
</span><span style="color:#0c4a6e;">      console</span><span style="color:#475569;">.</span><span style="color:#0284c7;">warn</span><span style="color:#475569;">("</span><span style="color:#0369a1;">Failed to load questions from endpoint, using defaults:</span><span style="color:#475569;">", </span><span style="color:#1e293b;">error</span><span style="color:#475569;">)
</span><span style="color:#0c4a6e;">    </span><span style="color:#475569;">}
</span><span style="color:#0c4a6e;">  </span><span style="color:#475569;">}
</span><span style="color:#0c4a6e;">
</span><span style="color:#0c4a6e;">  </span><span style="font-weight:bold;color:#dc2626;">return </span><span style="color:#1e293b;">QuizData</span><span style="color:#475569;">.</span><span style="color:#1e293b;">default</span><span style="color:#475569;">()
</span><span style="color:#475569;">}
</span></code></pre>
<p>This check <code>this.hasQuestionsEndpointValue</code> is added so I can use this controller also outside of a Rails app.</p>
<p>When a user selects an answer, the controller records it and enables the submit button (when all questions are answered):</p>
<pre lang="javascript" style="background-color:#f8fafc;"><code><span style="color:#1e293b;">selectAnswer</span><span style="color:#475569;">(</span><span style="color:#1e293b;">event</span><span style="color:#475569;">) {
</span><span style="color:#0c4a6e;">  </span><span style="font-weight:bold;color:#dc2626;">const </span><span style="color:#1e293b;">optionsContainer </span><span style="font-weight:bold;color:#0369a1;">= </span><span style="color:#1e293b;">event</span><span style="color:#475569;">.</span><span style="color:#0c4a6e;">target</span><span style="color:#475569;">.</span><span style="color:#1e293b;">closest</span><span style="color:#475569;">("</span><span style="color:#0369a1;">[data-quiz-question-index]</span><span style="color:#475569;">")
</span><span style="color:#0c4a6e;">  </span><span style="font-weight:bold;color:#dc2626;">const </span><span style="color:#1e293b;">questionIndex </span><span style="font-weight:bold;color:#0369a1;">= </span><span style="color:#0284c7;">parseInt</span><span style="color:#475569;">(</span><span style="color:#1e293b;">optionsContainer</span><span style="color:#475569;">.</span><span style="color:#0c4a6e;">dataset</span><span style="color:#475569;">.</span><span style="color:#0c4a6e;">quizQuestionIndex</span><span style="color:#475569;">, </span><span style="font-weight:bold;color:#d97706;">10</span><span style="color:#475569;">)
</span><span style="color:#0c4a6e;">  </span><span style="font-weight:bold;color:#dc2626;">const </span><span style="color:#1e293b;">selectedOption </span><span style="font-weight:bold;color:#0369a1;">= </span><span style="color:#0284c7;">parseInt</span><span style="color:#475569;">(</span><span style="color:#1e293b;">event</span><span style="color:#475569;">.</span><span style="color:#0c4a6e;">target</span><span style="color:#475569;">.</span><span style="color:#0c4a6e;">value</span><span style="color:#475569;">, </span><span style="font-weight:bold;color:#d97706;">10</span><span style="color:#475569;">)
</span><span style="color:#0c4a6e;">
</span><span style="color:#0c4a6e;">  </span><span style="color:#1e293b;">this</span><span style="color:#475569;">.</span><span style="color:#0c4a6e;">quiz</span><span style="color:#475569;">.</span><span style="color:#1e293b;">answer</span><span style="color:#475569;">(</span><span style="color:#1e293b;">questionIndex</span><span style="color:#475569;">, </span><span style="color:#1e293b;">selectedOption</span><span style="color:#475569;">)
</span><span style="color:#0c4a6e;">  </span><span style="color:#1e293b;">this</span><span style="color:#475569;">.</span><span style="color:#0c4a6e;">submitTarget</span><span style="color:#475569;">.</span><span style="color:#0c4a6e;">disabled </span><span style="font-weight:bold;color:#0369a1;">= !</span><span style="color:#1e293b;">this</span><span style="color:#475569;">.</span><span style="color:#0c4a6e;">quiz</span><span style="color:#475569;">.</span><span style="color:#0c4a6e;">isComplete
</span><span style="color:#475569;">}
</span></code></pre>
<p>When the user submits the quiz, the controller sends the answers and result to your Rails endpoint. For details on how <code>@rails/request.js</code> works and how to make GET and POST requests from a Stimulus controller, <a href="https://railsdesigner.com/request-from-stimulus-controller/">check out this article</a> 😊. What is happening is that you’re sending structured data (answers and a calculated result) to your server:</p>
<pre lang="javascript" style="background-color:#f8fafc;"><code><span style="color:#1e293b;">async submit</span><span style="color:#475569;">() {
</span><span style="color:#0c4a6e;">  </span><span style="font-weight:bold;color:#dc2626;">const </span><span style="color:#1e293b;">payload </span><span style="font-weight:bold;color:#0369a1;">= </span><span style="color:#475569;">{
</span><span style="color:#0c4a6e;">    answers</span><span style="color:#475569;">: </span><span style="color:#1e293b;">this</span><span style="color:#475569;">.</span><span style="color:#0c4a6e;">quiz</span><span style="color:#475569;">.</span><span style="color:#0c4a6e;">answers</span><span style="color:#475569;">,
</span><span style="color:#0c4a6e;">    result</span><span style="color:#475569;">: </span><span style="color:#1e293b;">this</span><span style="color:#475569;">.</span><span style="color:#0c4a6e;">quiz</span><span style="color:#475569;">.</span><span style="color:#1e293b;">result</span><span style="color:#475569;">()
</span><span style="color:#0c4a6e;">  </span><span style="color:#475569;">}
</span><span style="color:#0c4a6e;">
</span><span style="color:#0c4a6e;">  </span><span style="font-weight:bold;color:#dc2626;">if </span><span style="color:#475569;">(</span><span style="color:#1e293b;">this</span><span style="color:#475569;">.</span><span style="color:#0c4a6e;">hasAnswersEndpointValue</span><span style="color:#475569;">) {
</span><span style="color:#0c4a6e;">    </span><span style="font-weight:bold;color:#dc2626;">await </span><span style="color:#1e293b;">post</span><span style="color:#475569;">(</span><span style="color:#1e293b;">this</span><span style="color:#475569;">.</span><span style="color:#0c4a6e;">answersEndpointValue</span><span style="color:#475569;">, {
</span><span style="color:#0c4a6e;">      body</span><span style="color:#475569;">: </span><span style="color:#1e293b;">JSON</span><span style="color:#475569;">.</span><span style="color:#1e293b;">stringify</span><span style="color:#475569;">(</span><span style="color:#1e293b;">payload</span><span style="color:#475569;">)
</span><span style="color:#0c4a6e;">    </span><span style="color:#475569;">})
</span><span style="color:#0c4a6e;">  </span><span style="color:#475569;">}
</span><span style="color:#0c4a6e;">
</span><span style="color:#0c4a6e;">  </span><span style="color:#1e293b;">this</span><span style="color:#475569;">.</span><span style="color:#0c4a6e;">#</span><span style="color:#1e293b;">showResults</span><span style="color:#475569;">()
</span><span style="color:#475569;">}
</span></code></pre>
<p>After submission, the controller displays the results and hides the quiz:</p>
<pre lang="javascript" style="background-color:#f8fafc;"><code><span style="color:#0c4a6e;">#</span><span style="color:#1e293b;">showResults</span><span style="color:#475569;">() {
</span><span style="color:#0c4a6e;">  </span><span style="font-weight:bold;color:#dc2626;">const </span><span style="color:#1e293b;">correct </span><span style="font-weight:bold;color:#0369a1;">= </span><span style="color:#1e293b;">this</span><span style="color:#475569;">.</span><span style="color:#0c4a6e;">quiz</span><span style="color:#475569;">.</span><span style="color:#1e293b;">correctCount</span><span style="color:#475569;">()
</span><span style="color:#0c4a6e;">  </span><span style="font-weight:bold;color:#dc2626;">const </span><span style="color:#1e293b;">total </span><span style="font-weight:bold;color:#0369a1;">= </span><span style="color:#1e293b;">this</span><span style="color:#475569;">.</span><span style="color:#0c4a6e;">quiz</span><span style="color:#475569;">.</span><span style="color:#0c4a6e;">totalQuestions
</span><span style="color:#0c4a6e;">
</span><span style="color:#0c4a6e;">  </span><span style="font-weight:bold;color:#dc2626;">const </span><span style="color:#1e293b;">fieldsets </span><span style="font-weight:bold;color:#0369a1;">= </span><span style="color:#1e293b;">this</span><span style="color:#475569;">.</span><span style="color:#0c4a6e;">element</span><span style="color:#475569;">.</span><span style="color:#1e293b;">querySelectorAll</span><span style="color:#475569;">("</span><span style="color:#0369a1;">fieldset</span><span style="color:#475569;">")
</span><span style="color:#0c4a6e;">  </span><span style="color:#1e293b;">fieldsets</span><span style="color:#475569;">.</span><span style="color:#1e293b;">forEach</span><span style="color:#475569;">(</span><span style="color:#1e293b;">fieldset </span><span style="font-weight:bold;color:#dc2626;">=&gt; </span><span style="color:#1e293b;">fieldset</span><span style="color:#475569;">.</span><span style="color:#0284c7;">remove</span><span style="color:#475569;">())
</span><span style="color:#0c4a6e;">
</span><span style="color:#0c4a6e;">  </span><span style="color:#1e293b;">this</span><span style="color:#475569;">.</span><span style="color:#0c4a6e;">resultsTarget</span><span style="color:#475569;">.</span><span style="color:#0c4a6e;">innerHTML </span><span style="font-weight:bold;color:#0369a1;">= </span><span style="color:#475569;">`</span><span style="color:#0369a1;">&lt;div&gt;</span><span style="color:#475569;">${</span><span style="color:#1e293b;">correct</span><span style="color:#475569;">}</span><span style="color:#0369a1;"> out of </span><span style="color:#475569;">${</span><span style="color:#1e293b;">total</span><span style="color:#475569;">}</span><span style="color:#0369a1;"> correct&lt;/div&gt;</span><span style="color:#475569;">`
</span><span style="color:#0c4a6e;">  </span><span style="color:#1e293b;">this</span><span style="color:#475569;">.</span><span style="color:#0c4a6e;">submitTarget</span><span style="color:#475569;">.</span><span style="color:#0c4a6e;">hidden </span><span style="font-weight:bold;color:#0369a1;">= </span><span style="font-weight:bold;color:#075985;">true
</span><span style="color:#475569;">}
</span></code></pre>
<p>The HTML view is minimal:</p>
<pre lang="erb" style="background-color:#f8fafc;"><code><span style="color:#475569;">&lt;</span><span style="font-weight:bold;color:#dc2626;">article </span><span style="color:#0369a1;">data-controller</span><span style="color:#475569;">="</span><span style="color:#0369a1;">quiz</span><span style="color:#475569;">" </span><span style="color:#0369a1;">data-quiz-questions-endpoint-value</span><span style="color:#475569;">="&lt;%=</span><span style="color:#0369a1;"> quizzes_path </span><span style="color:#475569;">%&gt;" </span><span style="color:#0369a1;">data-quiz-answers-endpoint-value</span><span style="color:#475569;">="&lt;%=</span><span style="color:#0369a1;"> quizzes_path </span><span style="color:#475569;">%&gt;"&gt;
</span><span style="color:#0c4a6e;">  </span><span style="color:#475569;">&lt;</span><span style="font-weight:bold;color:#dc2626;">output </span><span style="color:#0369a1;">data-quiz-target</span><span style="color:#475569;">="</span><span style="color:#0369a1;">results</span><span style="color:#475569;">"&gt;&lt;/</span><span style="font-weight:bold;color:#dc2626;">output</span><span style="color:#475569;">&gt;
</span><span style="color:#0c4a6e;">
</span><span style="color:#0c4a6e;">  </span><span style="color:#475569;">&lt;</span><span style="font-weight:bold;color:#dc2626;">button </span><span style="color:#0369a1;">type</span><span style="color:#475569;">="</span><span style="color:#0369a1;">button</span><span style="color:#475569;">" </span><span style="color:#0369a1;">data-quiz-target</span><span style="color:#475569;">="</span><span style="color:#0369a1;">submit</span><span style="color:#475569;">" </span><span style="color:#0369a1;">data-action</span><span style="color:#475569;">="</span><span style="color:#0369a1;">quiz#submit</span><span style="color:#475569;">" </span><span style="color:#0369a1;">disabled</span><span style="color:#475569;">&gt;</span><span style="color:#0c4a6e;">Submit Quiz</span><span style="color:#475569;">&lt;/</span><span style="font-weight:bold;color:#dc2626;">button</span><span style="color:#475569;">&gt;
</span><span style="color:#475569;">&lt;/</span><span style="font-weight:bold;color:#dc2626;">article</span><span style="color:#475569;">&gt;
</span></code></pre>
<p>The controller renders each question as a fieldset with radio buttons. The styling uses modern CSS (oklch color space; see <a href="https://railsdesigner.com/building-customizable-tailwind-themes/">this article</a>, CSS Grid) to create a clean, accessible interface. The CSS isn’t included here, but it handles the layout, hover states and checked states for the radio buttons.</p>
<hr>
<p>This quiz is a good starting point. You could add pagination to show only a few questions at a time, add a countdown timer that auto-submits when time runs out, send detailed results to an analytics service to track which questions trip up your users, allow retakes so users can compare scores over time or fetch different question sets based on difficulty level.</p>
]]></content>


  </entry>
  
  <entry>
    <id>https://railsdesigner.com/meet-mata/?ref=rss</id>
    <title>Meet Mata: live reload for Rack Apps</title>
    <link href="https://railsdesigner.com/meet-mata/?ref=rss" rel="alternate" type="text/html"/>
    <published>2026-06-04T07:30:00Z</published>
    <updated>2026-06-04T07:30:00Z</updated>

    
      <author>
        <name>Rails Designer</name>
        <email>support@railsdesigner.com</email>
      </author>


      <content type="html" xml:base="https://railsdesigner.com/meet-mata/?ref=rss"><![CDATA[<p>I build quite a few sites. For my own products or <a href="https://railsdesigner.com/hire/">I help others</a>. Since I released <a href="https://perron.railsdesigner.com">Perron</a> that is my go-to static site generator now. But it was missing one feature for a speedy development cycle: live reload. Not just a page refresh, but more like hot reloading.</p>
<p>Most live reload solutions either require ActionCable (overkill when using Perron) or just do full-page reloads (annoying/too minimal). I wanted something in between.</p>
<p>Meet <strong>Mata</strong>: a lightweight live reload solution for Rack apps. It uses <a href="https://developer.mozilla.org/en-US/docs/Web/API/Server-sent_events/Using_server-sent_events">Server-Sent Events (SSE)</a> and <a href="https://github.com/bigskysoftware/idiomorph">idiomorph</a>.</p>
<p>You can install Mata simply by running <code>bundle add mata --group=development</code>. Then configure the middleware with <code>watch</code> and <code>skip</code> paths. That’s it. No JavaScript bundling. No ActionCable. No WebSockets. Just smart live reloading! ✨</p>
<p>But Mata isn’t just for Perron. It works with any Rack-based framework, like Rails: Sinatra, Hanami or Roda. 🚀 See the GitHub README for set up examples.</p>
<p>Look, mom, no hands:</p>
<p><img src="https://railsdesigner.com/images/posts/mmata-preview.gif" alt=""></p>
<p>So why the name? It’s <a href="https://github.com/Rails-Designer/mata#who-is-mata">named after the legendary double agent: Mata Hari</a>. 🕵️💃🤓</p>
<p>(oh, I learned while in Indonesia, in Bahasa Indonesia, <em>mata</em> means eye. A fun coincidence, for something that watches your files. 😅)</p>
<hr>
<p>Already using Mata (you do if you use <a href="https://github.com/Rails-Designer/perron">Perron</a>!)? <a href="https://github.com/Rails-Designer/mata">Give Mata a star on GitHub</a>. ⭐❤️</p>
]]></content>


  </entry>
  
  <entry>
    <id>https://railsdesigner.com/building-customizable-tailwind-themes/?ref=rss</id>
    <title>Building user-customizable themes with Tailwind CSS</title>
    <link href="https://railsdesigner.com/building-customizable-tailwind-themes/?ref=rss" rel="alternate" type="text/html"/>
    <published>2026-05-28T07:30:00Z</published>
    <updated>2026-05-28T07:30:00Z</updated>

    
      <author>
        <name>Rails Designer</name>
        <email>support@railsdesigner.com</email>
      </author>


      <content type="html" xml:base="https://railsdesigner.com/building-customizable-tailwind-themes/?ref=rss"><![CDATA[<p>A little while ago <a href="https://railsdesigner.com/hire/">I was asked to to build</a> a “white-label” feature into an existing app. Their customers can now customize the app to match their brand without touching code.</p>
<p>It will look a little something like this:</p>
<p><img src="https://railsdesigner.com/images/colors-slider.gif" alt=""></p>
<p>This article walks through how I build a custom theme system using Tailwind CSS and the OKLCH color space. The basics for this feature I extracted and is available on <a href="https://github.com/rails-designer-repos/custom-theme">GitHub</a>.</p>
<p>The approach I took generates an entire color palette from a single value, instead of managing eleven different color stops manually. Sounds complicated? It really is quite simple. Let me show you.</p>
<p>Tailwind allows defining custom colors using the <code>@theme</code> directive (these can then be used normally, e.g. <code>text-brand-500</code> and <code>bg-brand-50/60</code>). Rather than hardcoding hex values, use CSS variables that change at runtime.</p>
<p>Here is the setup in <code>app/assets/tailwind/application.css</code>:</p>
<pre lang="css" style="background-color:#f8fafc;"><code><span style="font-weight:bold;color:#475569;">@</span><span style="font-weight:bold;color:#dc2626;">import </span><span style="color:#475569;">"</span><span style="color:#0369a1;">tailwindcss</span><span style="color:#475569;">";
</span><span style="color:#0c4a6e;">
</span><span style="color:#0c4a6e;">@theme </span><span style="color:#475569;">{
</span><span style="color:#0c4a6e;">  </span><span style="color:#475569;">--</span><span style="color:#0c4a6e;">color-brand-50</span><span style="color:#475569;">: </span><span style="color:#0c4a6e;">oklch(</span><span style="font-weight:bold;color:#d97706;">0.99 0.01 </span><span style="color:#0284c7;">var</span><span style="color:#475569;">(--</span><span style="color:#0c4a6e;">color-value</span><span style="color:#475569;">)</span><span style="color:#0c4a6e;">);
</span><span style="color:#0c4a6e;">  </span><span style="color:#475569;">--</span><span style="color:#0c4a6e;">color-brand-100</span><span style="color:#475569;">: </span><span style="color:#0c4a6e;">oklch(</span><span style="font-weight:bold;color:#d97706;">0.98 0.02 </span><span style="color:#0284c7;">var</span><span style="color:#475569;">(--</span><span style="color:#0c4a6e;">color-value</span><span style="color:#475569;">)</span><span style="color:#0c4a6e;">);
</span><span style="color:#0c4a6e;">  </span><span style="color:#475569;">--</span><span style="color:#0c4a6e;">color-brand-200</span><span style="color:#475569;">: </span><span style="color:#0c4a6e;">oklch(</span><span style="font-weight:bold;color:#d97706;">0.94 0.04 </span><span style="color:#0284c7;">var</span><span style="color:#475569;">(--</span><span style="color:#0c4a6e;">color-value</span><span style="color:#475569;">)</span><span style="color:#0c4a6e;">);
</span><span style="color:#0c4a6e;">  </span><span style="color:#475569;">--</span><span style="color:#0c4a6e;">color-brand-300</span><span style="color:#475569;">: </span><span style="color:#0c4a6e;">oklch(</span><span style="font-weight:bold;color:#d97706;">0.86 0.08 </span><span style="color:#0284c7;">var</span><span style="color:#475569;">(--</span><span style="color:#0c4a6e;">color-value</span><span style="color:#475569;">)</span><span style="color:#0c4a6e;">);
</span><span style="color:#0c4a6e;">  </span><span style="color:#475569;">--</span><span style="color:#0c4a6e;">color-brand-400</span><span style="color:#475569;">: </span><span style="color:#0c4a6e;">oklch(</span><span style="font-weight:bold;color:#d97706;">0.74 0.14 </span><span style="color:#0284c7;">var</span><span style="color:#475569;">(--</span><span style="color:#0c4a6e;">color-value</span><span style="color:#475569;">)</span><span style="color:#0c4a6e;">);
</span><span style="color:#0c4a6e;">  </span><span style="color:#475569;">--</span><span style="color:#0c4a6e;">color-brand-500</span><span style="color:#475569;">: </span><span style="color:#0c4a6e;">oklch(</span><span style="font-weight:bold;color:#d97706;">0.60 0.18 </span><span style="color:#0284c7;">var</span><span style="color:#475569;">(--</span><span style="color:#0c4a6e;">color-value</span><span style="color:#475569;">)</span><span style="color:#0c4a6e;">);
</span><span style="color:#0c4a6e;">  </span><span style="color:#475569;">--</span><span style="color:#0c4a6e;">color-brand-600</span><span style="color:#475569;">: </span><span style="color:#0c4a6e;">oklch(</span><span style="font-weight:bold;color:#d97706;">0.52 0.16 </span><span style="color:#0284c7;">var</span><span style="color:#475569;">(--</span><span style="color:#0c4a6e;">color-value</span><span style="color:#475569;">)</span><span style="color:#0c4a6e;">);
</span><span style="color:#0c4a6e;">  </span><span style="color:#475569;">--</span><span style="color:#0c4a6e;">color-brand-700</span><span style="color:#475569;">: </span><span style="color:#0c4a6e;">oklch(</span><span style="font-weight:bold;color:#d97706;">0.44 0.14 </span><span style="color:#0284c7;">var</span><span style="color:#475569;">(--</span><span style="color:#0c4a6e;">color-value</span><span style="color:#475569;">)</span><span style="color:#0c4a6e;">);
</span><span style="color:#0c4a6e;">  </span><span style="color:#475569;">--</span><span style="color:#0c4a6e;">color-brand-800</span><span style="color:#475569;">: </span><span style="color:#0c4a6e;">oklch(</span><span style="font-weight:bold;color:#d97706;">0.36 0.12 </span><span style="color:#0284c7;">var</span><span style="color:#475569;">(--</span><span style="color:#0c4a6e;">color-value</span><span style="color:#475569;">)</span><span style="color:#0c4a6e;">);
</span><span style="color:#0c4a6e;">  </span><span style="color:#475569;">--</span><span style="color:#0c4a6e;">color-brand-900</span><span style="color:#475569;">: </span><span style="color:#0c4a6e;">oklch(</span><span style="font-weight:bold;color:#d97706;">0.26 0.08 </span><span style="color:#0284c7;">var</span><span style="color:#475569;">(--</span><span style="color:#0c4a6e;">color-value</span><span style="color:#475569;">)</span><span style="color:#0c4a6e;">);
</span><span style="color:#0c4a6e;">  </span><span style="color:#475569;">--</span><span style="color:#0c4a6e;">color-brand-950</span><span style="color:#475569;">: </span><span style="color:#0c4a6e;">oklch(</span><span style="font-weight:bold;color:#d97706;">0.16 0.04 </span><span style="color:#0284c7;">var</span><span style="color:#475569;">(--</span><span style="color:#0c4a6e;">color-value</span><span style="color:#475569;">)</span><span style="color:#0c4a6e;">);
</span><span style="color:#475569;">}
</span></code></pre>
<p>Notice the same <code>--color-value</code> variable? By changing this one variable, all eleven shades update automatically. The lightness and chroma values stay consistent (for a harmonious palette). 🌈</p>
<p>Use these colors in your templates like any other Tailwind color:</p>
<pre lang="erb" style="background-color:#f8fafc;"><code><span style="color:#475569;">&lt;</span><span style="font-weight:bold;color:#dc2626;">nav </span><span style="color:#0369a1;">class</span><span style="color:#475569;">="</span><span style="color:#0369a1;">bg-brand-50 border-brand-100</span><span style="color:#475569;">"&gt;
</span><span style="color:#0c4a6e;">  </span><span style="color:#475569;">&lt;</span><span style="font-weight:bold;color:#dc2626;">span </span><span style="color:#0369a1;">class</span><span style="color:#475569;">="</span><span style="color:#0369a1;">text-brand-600</span><span style="color:#475569;">"&gt;</span><span style="color:#0c4a6e;">Custom Theme</span><span style="color:#475569;">&lt;/</span><span style="font-weight:bold;color:#dc2626;">span</span><span style="color:#475569;">&gt;
</span><span style="color:#475569;">&lt;/</span><span style="font-weight:bold;color:#dc2626;">nav</span><span style="color:#475569;">&gt;
</span></code></pre>
<h2>
<a href="#oklch" aria-hidden="true" class="anchor" id="oklch"></a>OKLCH?</h2>
<p>But wait… OKLCH? What is that? OKLCH is a modern color space that separates color into three components: lightness, chroma and hue. This makes it a perfect choice for generating color palettes (Tailwind CSS changed to OKLCH internally as well since v4, iirc).</p>
<p>Take the <code>brand-500</code> color from the example above:</p>
<pre style="background-color:#f8fafc;"><code><span style="color:#0c4a6e;">oklch(0.60 0.18 var(--color-value))
</span></code></pre>
<p>So:</p>
<ul>
<li>
<code>0.60</code> is the lightness. A value of 0 is black, 1 is white. This color is medium brightness.</li>
<li>
<code>0.18</code> is the chroma (or color saturation). Higher values are more vibrant.</li>
<li>
<code>var(--color-value)</code> is the hue angle in degrees (0-360). This is what changes when you update the theme and defined initially in the style-element.</li>
</ul>
<p>The beauty of OKLCH is that lightness and chroma remain constant across the palette. Only the hue changes. This means your brand color can shift from red to blue to green while maintaining the same visual weight and saturation at each shade level.</p>
<h2>
<a href="#setting-up-the-html" aria-hidden="true" class="anchor" id="setting-up-the-html"></a>Setting up the HTML</h2>
<p>In your layout, add a style tag with the default theme value:</p>
<pre lang="erb" style="background-color:#f8fafc;"><code><span style="color:#475569;">&lt;</span><span style="font-weight:bold;color:#dc2626;">head</span><span style="color:#475569;">&gt;
</span><span style="color:#0c4a6e;">  </span><span style="color:#475569;">&lt;</span><span style="font-weight:bold;color:#dc2626;">style </span><span style="color:#0369a1;">data-theme</span><span style="color:#475569;">&gt;
</span><span style="color:#0c4a6e;">    </span><span style="color:#475569;">:</span><span style="color:#0c4a6e;">root </span><span style="color:#475569;">{ --</span><span style="color:#0c4a6e;">color-value</span><span style="color:#475569;">: </span><span style="font-weight:bold;color:#d97706;">60</span><span style="color:#475569;">; }
</span><span style="color:#0c4a6e;">  </span><span style="color:#475569;">&lt;/</span><span style="font-weight:bold;color:#dc2626;">style</span><span style="color:#475569;">&gt;
</span><span style="color:#0c4a6e;">  </span><span style="color:#475569;">&lt;%=</span><span style="color:#0c4a6e;"> stylesheet_link_tag </span><span style="color:#475569;">"</span><span style="color:#0369a1;">tailwind</span><span style="color:#475569;">", "</span><span style="color:#0369a1;">data-turbo-track</span><span style="color:#475569;">"</span><span style="font-weight:bold;color:#0369a1;">: </span><span style="color:#475569;">"</span><span style="color:#0369a1;">reload</span><span style="color:#475569;">" %&gt;
</span><span style="color:#0c4a6e;">  </span><span style="color:#475569;">&lt;%=</span><span style="color:#0c4a6e;"> javascript_importmap_tags </span><span style="color:#475569;">%&gt;
</span><span style="color:#475569;">&lt;/</span><span style="font-weight:bold;color:#dc2626;">head</span><span style="color:#475569;">&gt;
</span></code></pre>
<p>The default value of 60 is a sorta yellow-green hue. You can change it however you want.</p>
<h2>
<a href="#wiring-up-the-theme-controller" aria-hidden="true" class="anchor" id="wiring-up-the-theme-controller"></a>Wiring up the theme controller</h2>
<p>I just added this Stimulus controller for this demo (the client’s app worked a bit different).</p>
<pre lang="javascript" style="background-color:#f8fafc;"><code><span style="font-weight:bold;color:#dc2626;">import </span><span style="color:#475569;">{ </span><span style="color:#1e293b;">Controller </span><span style="color:#475569;">} </span><span style="font-weight:bold;color:#dc2626;">from </span><span style="color:#475569;">"</span><span style="color:#0369a1;">@hotwired/stimulus</span><span style="color:#475569;">"
</span><span style="color:#0c4a6e;">
</span><span style="font-weight:bold;color:#dc2626;">export default class extends </span><span style="color:#0c4a6e;">Controller </span><span style="color:#475569;">{
</span><span style="color:#0c4a6e;">  </span><span style="font-weight:bold;color:#dc2626;">static </span><span style="color:#0284c7;">targets </span><span style="color:#0c4a6e;">= ["value"]
</span><span style="color:#0c4a6e;">
</span><span style="color:#0c4a6e;">  </span><span style="color:#0284c7;">initialize</span><span style="color:#475569;">() {
</span><span style="color:#0c4a6e;">    </span><span style="color:#1e293b;">this</span><span style="color:#475569;">.</span><span style="color:#0c4a6e;">style </span><span style="font-weight:bold;color:#0369a1;">= </span><span style="color:#0c4a6e;">document</span><span style="color:#475569;">.</span><span style="color:#1e293b;">querySelector</span><span style="color:#475569;">('</span><span style="color:#0369a1;">style[data-theme]</span><span style="color:#475569;">')
</span><span style="color:#0c4a6e;">  </span><span style="color:#475569;">}
</span><span style="color:#0c4a6e;">
</span><span style="color:#0c4a6e;">  </span><span style="color:#0284c7;">update</span><span style="color:#475569;">(</span><span style="color:#1e293b;">event</span><span style="color:#475569;">) {
</span><span style="color:#0c4a6e;">    </span><span style="font-weight:bold;color:#dc2626;">const </span><span style="color:#1e293b;">value </span><span style="font-weight:bold;color:#0369a1;">= </span><span style="color:#1e293b;">event</span><span style="color:#475569;">.</span><span style="color:#0c4a6e;">target</span><span style="color:#475569;">.</span><span style="color:#0c4a6e;">value
</span><span style="color:#0c4a6e;">
</span><span style="color:#0c4a6e;">    </span><span style="color:#1e293b;">this</span><span style="color:#475569;">.</span><span style="color:#0c4a6e;">style</span><span style="color:#475569;">.</span><span style="color:#0c4a6e;">textContent </span><span style="font-weight:bold;color:#0369a1;">= </span><span style="color:#475569;">`</span><span style="color:#0369a1;">:root { --color-value: </span><span style="color:#475569;">${</span><span style="color:#1e293b;">value</span><span style="color:#475569;">}</span><span style="color:#0369a1;">; }</span><span style="color:#475569;">`
</span><span style="color:#0c4a6e;">    </span><span style="color:#1e293b;">this</span><span style="color:#475569;">.</span><span style="color:#0c4a6e;">valueTarget</span><span style="color:#475569;">.</span><span style="color:#0c4a6e;">textContent </span><span style="font-weight:bold;color:#0369a1;">= </span><span style="color:#1e293b;">value
</span><span style="color:#0c4a6e;">  </span><span style="color:#475569;">}
</span><span style="color:#475569;">}
</span></code></pre>
<p>The controller finds the existing style tag marked with <code>data-theme</code> and updates its content. This triggers a cascade: the CSS variable changes, all the brand colors are recalculated and the entire app recolors instantly. ✨</p>
<h2>
<a href="#the-demo-interface" aria-hidden="true" class="anchor" id="the-demo-interface"></a>The demo interface</h2>
<p>The example includes a simple slider to demonstrate the feature:</p>
<pre lang="erb" style="background-color:#f8fafc;"><code><span style="color:#475569;">&lt;</span><span style="font-weight:bold;color:#dc2626;">div </span><span style="color:#0369a1;">class</span><span style="color:#475569;">="</span><span style="color:#0369a1;">flex items-center gap-4 px-6 py-4 border-b border-brand-200</span><span style="color:#475569;">" </span><span style="color:#0369a1;">data-controller</span><span style="color:#475569;">="</span><span style="color:#0369a1;">theme</span><span style="color:#475569;">"&gt;
</span><span style="color:#0c4a6e;">  </span><span style="color:#475569;">&lt;</span><span style="font-weight:bold;color:#dc2626;">span </span><span style="color:#0369a1;">class</span><span style="color:#475569;">="</span><span style="color:#0369a1;">text-sm text-brand-700</span><span style="color:#475569;">"&gt;</span><span style="color:#0c4a6e;">Theme</span><span style="color:#475569;">&lt;/</span><span style="font-weight:bold;color:#dc2626;">span</span><span style="color:#475569;">&gt;
</span><span style="color:#0c4a6e;">  </span><span style="color:#475569;">&lt;</span><span style="font-weight:bold;color:#dc2626;">input </span><span style="color:#0369a1;">type</span><span style="color:#475569;">="</span><span style="color:#0369a1;">range</span><span style="color:#475569;">" </span><span style="color:#0369a1;">min</span><span style="color:#475569;">="</span><span style="color:#0369a1;">0</span><span style="color:#475569;">" </span><span style="color:#0369a1;">max</span><span style="color:#475569;">="</span><span style="color:#0369a1;">360</span><span style="color:#475569;">" </span><span style="color:#0369a1;">value</span><span style="color:#475569;">="</span><span style="color:#0369a1;">60</span><span style="color:#475569;">" </span><span style="color:#0369a1;">data-action</span><span style="color:#475569;">="</span><span style="color:#0369a1;">theme#update</span><span style="color:#475569;">" </span><span style="color:#0369a1;">class</span><span style="color:#475569;">="</span><span style="color:#0369a1;">w-32 accent-brand-600</span><span style="color:#475569;">"&gt;
</span><span style="color:#0c4a6e;">  </span><span style="color:#475569;">&lt;</span><span style="font-weight:bold;color:#dc2626;">span </span><span style="color:#0369a1;">data-theme-target</span><span style="color:#475569;">="</span><span style="color:#0369a1;">value</span><span style="color:#475569;">" </span><span style="color:#0369a1;">class</span><span style="color:#475569;">="</span><span style="color:#0369a1;">text-sm text-brand-500</span><span style="color:#475569;">"&gt;</span><span style="color:#0c4a6e;">60</span><span style="color:#475569;">&lt;/</span><span style="font-weight:bold;color:#dc2626;">span</span><span style="color:#475569;">&gt;
</span><span style="color:#475569;">&lt;/</span><span style="font-weight:bold;color:#dc2626;">div</span><span style="color:#475569;">&gt;
</span><span style="color:#0c4a6e;">
</span><span style="color:#475569;">&lt;</span><span style="font-weight:bold;color:#dc2626;">p </span><span style="color:#0369a1;">class</span><span style="color:#475569;">="</span><span style="color:#0369a1;">mt-2 p-6 text-brand-900</span><span style="color:#475569;">"&gt;</span><span style="color:#0c4a6e;">Move the slider above to change the theme color.</span><span style="color:#475569;">&lt;/</span><span style="font-weight:bold;color:#dc2626;">p</span><span style="color:#475569;">&gt;
</span><span style="color:#0c4a6e;">
</span><span style="color:#475569;">&lt;</span><span style="font-weight:bold;color:#dc2626;">ul </span><span style="color:#0369a1;">class</span><span style="color:#475569;">="</span><span style="color:#0369a1;">flex gap-4 p-6</span><span style="color:#475569;">"&gt;
</span><span style="color:#0c4a6e;">  </span><span style="color:#475569;">&lt;</span><span style="font-weight:bold;color:#dc2626;">li </span><span style="color:#0369a1;">class</span><span style="color:#475569;">="</span><span style="color:#0369a1;">size-16 rounded-lg bg-brand-50 border border-brand-200</span><span style="color:#475569;">"&gt;&lt;/</span><span style="font-weight:bold;color:#dc2626;">li</span><span style="color:#475569;">&gt;
</span><span style="color:#0c4a6e;">  </span><span style="color:#475569;">&lt;</span><span style="font-weight:bold;color:#dc2626;">li </span><span style="color:#0369a1;">class</span><span style="color:#475569;">="</span><span style="color:#0369a1;">size-16 rounded-lg bg-brand-100 border border-brand-200</span><span style="color:#475569;">"&gt;&lt;/</span><span style="font-weight:bold;color:#dc2626;">li</span><span style="color:#475569;">&gt;
</span><span style="color:#0c4a6e;">  </span><span style="color:#475569;">&lt;</span><span style="font-weight:bold;color:#dc2626;">li </span><span style="color:#0369a1;">class</span><span style="color:#475569;">="</span><span style="color:#0369a1;">size-16 rounded-lg bg-brand-200 border border-brand-200</span><span style="color:#475569;">"&gt;&lt;/</span><span style="font-weight:bold;color:#dc2626;">li</span><span style="color:#475569;">&gt;
</span><span style="color:#0c4a6e;">  </span><span style="font-style:italic;color:#475569;">&lt;!--</span><span style="font-style:italic;color:#64748b;"> … all the way to brand-950 </span><span style="font-style:italic;color:#475569;">--&gt;
</span><span style="color:#475569;">&lt;/</span><span style="font-weight:bold;color:#dc2626;">ul</span><span style="color:#475569;">&gt;
</span></code></pre>
<h2>
<a href="#user-selected-themes" aria-hidden="true" class="anchor" id="user-selected-themes"></a>User-selected themes</h2>
<p>While this approach was built for a white-label app, it works equally well for user-customizable themes.</p>
<p>The technique is flexible. You could extend it to store multiple theme variables: primary color, secondary color, accent color. Each would be a separate CSS variable that users can customize independently.</p>
<p>Pretty cool, right?</p>
]]></content>


  </entry>
  
  <entry>
    <id>https://railsdesigner.com/actionmailbox-fuik/?ref=rss</id>
    <title>Inbound email in Rails apps with Fuik</title>
    <link href="https://railsdesigner.com/actionmailbox-fuik/?ref=rss" rel="alternate" type="text/html"/>
    <published>2026-05-21T07:30:00Z</published>
    <updated>2026-05-21T07:30:00Z</updated>

    
      <author>
        <name>Rails Designer</name>
        <email>support@railsdesigner.com</email>
      </author>


      <content type="html" xml:base="https://railsdesigner.com/actionmailbox-fuik/?ref=rss"><![CDATA[<p><a href="https://railsdesigner.com/introducing-fuik/">Fuik</a> is a Rails engine for handling webhooks that I launched recently. But it can also be used to process inbound emails! 💡</p>
<p>When working with inbound email in Rails using Action Mailbox, there’s a key requirement: managing EML files and blob storage. Once an email arrives at your domain, your email provider captures it and sends the data to you via webhook. You then extract what you need and process (or store) it. Action Mailbox requires: ActiveStorage ánd ActionMailer.</p>
<p>But what if you don’t have a need for ActiveStorage (including its cloud storage setup) or ActionMailer (because you use <a href="https://github.com/Rails-Designer/courrier/">Courrier</a>).</p>
<p>Most transactional email providers send their inbound emails as webhooks: Postmark, SendGrid, Mailgun and Mailpace. They all POST the email data to a webhook URL you configure.</p>
<p>Fuik is great at capturing just that: it captures those incoming webhooks, stores them in the database and calls your event class to process them. You see all your webhooks in at <code>/webhooks</code>. You can inspect and copy payloads, pull path accessors and generally debug what’s happening.</p>
<p>It is simple to get started:</p>
<pre lang="bash" style="background-color:#f8fafc;"><code><span style="color:#1e293b;">bundle</span><span style="color:#0c4a6e;"> add fuik
</span><span style="color:#1e293b;">bin/rails</span><span style="color:#0c4a6e;"> generate fuik:install
</span><span style="color:#1e293b;">bin/rails</span><span style="color:#0c4a6e;"> db:migrate
</span></code></pre>
<p>That’s it. Your app now has <code>/webhooks</code> endpoints ready to receive any webhooks. Now to process inbound emails, let’s look at Postmark as an example (though every provider that sends inbound emails as webhooks wil work).</p>
<p>Postmark lets you receive inbound emails by pointing a MX record to their servers and then configure a webhook URL. When an email arrives, the data is POSTed to you. Let’s see how to process it in your app with Fuik.</p>
<p>Generate the class:</p>
<pre lang="bash" style="background-color:#f8fafc;"><code><span style="color:#1e293b;">bin/rails</span><span style="color:#0c4a6e;"> generate fuik:provider postmark inbound_email
</span></code></pre>
<p>This creates three files.</p>
<p>Now open <code>app/webhooks/postmark/inbound_email.rb</code>. Postmark sends <code>"To"</code>, <code>"From"</code>, <code>"Subject"</code>, <code>"TextBody"</code>, and <code>"HtmlBody"</code>. Route emails based on the recipient address:</p>
<pre lang="ruby" style="background-color:#f8fafc;"><code><span style="font-weight:bold;color:#dc2626;">module </span><span style="color:#0c4a6e;">Postmark
</span><span style="color:#0c4a6e;">  </span><span style="font-weight:bold;color:#dc2626;">class </span><span style="font-weight:bold;color:#b91c1c;">InboundEmail </span><span style="color:#475569;">&lt; </span><span style="color:#0c4a6e;">Base
</span><span style="color:#0c4a6e;">    </span><span style="font-weight:bold;color:#dc2626;">def </span><span style="color:#0284c7;">process!
</span><span style="color:#0c4a6e;">      </span><span style="font-weight:bold;color:#dc2626;">return if</span><span style="color:#0c4a6e;"> to_email</span><span style="color:#475569;">.</span><span style="color:#0c4a6e;">blank?
</span><span style="color:#0c4a6e;">
</span><span style="color:#0c4a6e;">      </span><span style="font-weight:bold;color:#dc2626;">case</span><span style="color:#0c4a6e;"> to_email
</span><span style="color:#0c4a6e;">      </span><span style="font-weight:bold;color:#dc2626;">when </span><span style="color:#475569;">/</span><span style="color:#0369a1;">replies-.*@</span><span style="color:#475569;">/
</span><span style="color:#0c4a6e;">        message </span><span style="font-weight:bold;color:#0369a1;">= </span><span style="color:#0c4a6e;">Message</span><span style="color:#475569;">.</span><span style="color:#0c4a6e;">find_by</span><span style="color:#475569;">(</span><span style="font-weight:bold;color:#075985;">email_address</span><span style="font-weight:bold;color:#475569;">:</span><span style="color:#0c4a6e;"> to_email</span><span style="color:#475569;">)
</span><span style="color:#0c4a6e;">        message</span><span style="color:#475569;">.</span><span style="color:#0c4a6e;">replies</span><span style="color:#475569;">.</span><span style="color:#0c4a6e;">create!</span><span style="color:#475569;">(
</span><span style="color:#0c4a6e;">          </span><span style="font-weight:bold;color:#075985;">content</span><span style="font-weight:bold;color:#475569;">:</span><span style="color:#0c4a6e;"> text_content</span><span style="color:#475569;">,
</span><span style="color:#0c4a6e;">          </span><span style="font-weight:bold;color:#075985;">from</span><span style="font-weight:bold;color:#475569;">:</span><span style="color:#0c4a6e;"> from_email
</span><span style="color:#0c4a6e;">        </span><span style="color:#475569;">)
</span><span style="color:#0c4a6e;">      </span><span style="font-weight:bold;color:#dc2626;">when </span><span style="color:#475569;">/</span><span style="color:#0369a1;">support@</span><span style="color:#475569;">/
</span><span style="color:#0c4a6e;">        SupportTicket</span><span style="color:#475569;">.</span><span style="color:#0c4a6e;">create!</span><span style="color:#475569;">(
</span><span style="color:#0c4a6e;">          </span><span style="font-weight:bold;color:#075985;">from</span><span style="font-weight:bold;color:#475569;">:</span><span style="color:#0c4a6e;"> from_email</span><span style="color:#475569;">,
</span><span style="color:#0c4a6e;">          </span><span style="font-weight:bold;color:#075985;">subject</span><span style="font-weight:bold;color:#475569;">:</span><span style="color:#0c4a6e;"> subject</span><span style="color:#475569;">,
</span><span style="color:#0c4a6e;">          </span><span style="font-weight:bold;color:#075985;">body</span><span style="font-weight:bold;color:#475569;">:</span><span style="color:#0c4a6e;"> text_content
</span><span style="color:#0c4a6e;">        </span><span style="color:#475569;">)
</span><span style="color:#0c4a6e;">      </span><span style="font-weight:bold;color:#dc2626;">end
</span><span style="color:#0c4a6e;">
</span><span style="color:#0c4a6e;">      </span><span style="color:#475569;">@</span><span style="color:#1e293b;">webhook_event</span><span style="color:#475569;">.</span><span style="color:#0c4a6e;">processed!
</span><span style="color:#0c4a6e;">    </span><span style="font-weight:bold;color:#dc2626;">end
</span><span style="color:#0c4a6e;">
</span><span style="color:#0c4a6e;">    </span><span style="font-weight:bold;color:#dc2626;">private
</span><span style="color:#0c4a6e;">
</span><span style="color:#0c4a6e;">    </span><span style="font-weight:bold;color:#dc2626;">def </span><span style="color:#0284c7;">to_email</span><span style="color:#0c4a6e;"> = </span><span style="color:#1e293b;">payload</span><span style="color:#0c4a6e;">["</span><span style="color:#1e293b;">To</span><span style="color:#0c4a6e;">"]
</span><span style="color:#0c4a6e;">
</span><span style="color:#0c4a6e;">    </span><span style="font-weight:bold;color:#dc2626;">def </span><span style="color:#0284c7;">from_email</span><span style="color:#0c4a6e;"> = </span><span style="color:#1e293b;">payload</span><span style="color:#0c4a6e;">["</span><span style="color:#1e293b;">From</span><span style="color:#0c4a6e;">"]
</span><span style="color:#0c4a6e;">
</span><span style="color:#0c4a6e;">    </span><span style="font-weight:bold;color:#dc2626;">def </span><span style="color:#0284c7;">subject</span><span style="color:#0c4a6e;"> = </span><span style="color:#1e293b;">payload</span><span style="color:#0c4a6e;">["</span><span style="color:#1e293b;">Subject</span><span style="color:#0c4a6e;">"]
</span><span style="color:#0c4a6e;">
</span><span style="color:#0c4a6e;">    </span><span style="font-weight:bold;color:#dc2626;">def </span><span style="color:#0284c7;">text_content</span><span style="color:#0c4a6e;"> = </span><span style="color:#1e293b;">payload</span><span style="color:#0c4a6e;">["</span><span style="color:#1e293b;">TextBody</span><span style="color:#0c4a6e;">"]
</span><span style="color:#0c4a6e;">  </span><span style="font-weight:bold;color:#dc2626;">end
</span><span style="font-weight:bold;color:#dc2626;">end
</span></code></pre>
<p>Postmark doesn’t send an event type in the payload (all inbound webhooks are inbound emails), so you set it statically. Use Fuik’s config (<code>app/webhooks/postmark/config.yml</code>) to extract it:</p>
<pre lang="yaml" style="background-color:#f8fafc;"><code><span style="font-weight:bold;color:#dc2626;">event_type</span><span style="color:#475569;">:
</span><span style="color:#0c4a6e;">  </span><span style="font-weight:bold;color:#dc2626;">source</span><span style="color:#475569;">: </span><span style="color:#0369a1;">static
</span><span style="color:#0c4a6e;">  </span><span style="font-weight:bold;color:#dc2626;">value</span><span style="color:#475569;">: </span><span style="color:#0369a1;">inbound_email
</span></code></pre>
<p>Point your Postmark inbound webhook to <code>https://yourdomain.com/webhooks/postmark</code> in their dashboard, and emails start flowing in.</p>
<p>In the repo shared, I also added an example for Sendgrid to show another example how to do this.</p>
<h2>
<a href="#any-provider-with-webhooks" aria-hidden="true" class="anchor" id="any-provider-with-webhooks"></a>Any provider with webhooks</h2>
<p>Postmark and SendGrid are just examples. Mailgun, Brevo, Mailpace and others all send structured JSON via webhooks. The pattern is the same. Generate a provider, map the payload fields to your private methods, add your business logic and mark the event as processed.</p>
<p>Check out the <a href="https://github.com/Rails-Designer/fuik">example repository</a> with both Postmark and SendGrid set up.</p>
]]></content>


  </entry>
  
</feed>